How to create a blog on Google step by step instructions. How to create your own blog on Blogger? Creating a blog on Blogger
Date of publication: 01/02/2013
Is it possible to create a blog for free, without any initial financial investment? Yes it is possible. Today there are quite a lot of web services that provide an excellent opportunity to create your own personal blog on the Internet absolutely free. The leader among others is Blogger.com.
Blogger is an online service for creating and maintaining blogs. Absolutely any user can create a blog on Blogger (Blogspot), without having absolutely any knowledge in the field of programming, installing and configuring software.
This service was created by Pyra Labs and is now owned by Google. I would like to note that Blogger was one of the very first projects that contributed to the development and popularization of blogging as an area of Internet activity throughout the world. Google made a major contribution to the development of the service. Since 2004, users of the service were given access to CSS corrections, blog commenting, the ability to publish posts via email and some other innovations were added, and in 2006 the ability to completely edit templates appeared. Today, Blogger has almost all the functionality that is necessary for full-fledged blogging.
The service is changing and new features are being added constantly. Blogger's interface has recently undergone a change. Many users, of course, did not quite like this innovation. But Google knows more than we do, and it decides what will be best for us. At the beginning I was also not satisfied with the new interface, but over time I got used to it.
Blogger gives the user the choice whether the blog will be located on the servers of the service itself, or on the owner. In addition, each user, initially or in the future, can choose to use their own domain name.
Blogger has a number of advantages over other web services, which make it possible to create a blog for free, in particular:
- complete absence of third-party advertising,
- automatic or manual insertion of code from AdSense to make money on contextual advertising from Google,
- access to fixing CSS templates and installing new amateur themes,
- availability of technology that allows you to add social functions to your blog and much more.
How to create a blog on Blogger
Anyone with a Google account can create a blog on Blogger.com. If you already have an email account in Gmail.com, this will be enough. If not, you can create a Google account.
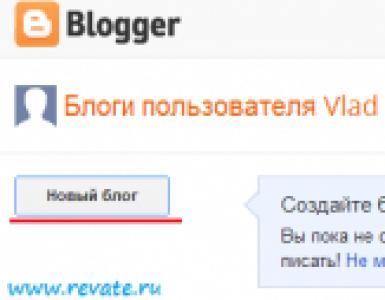
After you have created an account, go to Blogger.com and click “New Blog”.

In the window that appears, fill in two fields: “Title” and “Address”, and also select a template for your future blog.
“Title” is the name of your blog. Take your title choice seriously. The Title is important not only for future visitors to your page, but also for search engines. The title influences the further promotion of the site in search engines. After creating the site, you can change the Title if you wish.
"Address" - . Blogger (Blogspot) allows you to register a third-level domain for free. That is, the name of your blog will be as follows: your_name.blogspot.com. After creating your blog, you can optionally link your own second-level domain.
Template (theme) – appearance, design of your new page. You can choose any template from the list that Blogspot offers. In the future, you can easily change the theme to any other.
After filling out all the fields, click “Create a blog”.

The blog has been created and is available on the Internet at your address, which you came up with at the creation stage! Now you can publish new messages to it.

Administrative panel and basic blog settings on Blogger.com
The administrative panel on the Blogger service underwent minor changes in 2012, as I already mentioned above. For webmasters who have been working with Blogger for a long time, the innovation brought some inconvenience; they had to get used to the new admin panel again. Beginners will have to initially work with the new interface. It's actually not difficult to figure it out.

Initial blog settings on Blogger
In the “Settings” section in the “Basic” subsection, you can set absolutely any settings for your site. First of all, these are “Title” and “Description”.
You already set the title earlier when you created the page. You can change it at any time, but I recommend doing this only at the initial stage.
Description is also an important attribute for successful website promotion in the future. For example, I have a blog on Blogger, which people get to from search engines only thanks to a well-written description of the blog and its combination with the name.
Here you can also block your blog from being indexed by search engines. Naturally, you don’t need to do this unless you have some personal reasons for it.
In this section, you can also add your personal domain, if you have one; You can also add other people to the list of authors if you want to create a collective blog.

Also in other subsections you can set other settings for your site: settings for comments and messages, add a Google Analytics ID, etc. I only changed the time zone. Everything else was left as default.
In the "Settings" => "Other" section you can delete your blog on Blogger (Blogspot). Once deleted, the site will be visible in your list of deleted blogs.
Selecting a template. Installing a new template in Blogger
In the “Template” section you can choose any template (theme) for your site. The service itself offers only a few options. I personally use standard themes on all blogs for now. In fact, every webmaster can add a new template to the service, downloaded from the Internet. There are a lot of sites on the Internet where you can download free themes for Blogger.
So, How to install a new template in Blogger.
1. Let's assume that you have already downloaded the theme and you need to install it on your blog. First, we make a backup copy of the old template. To do this, in the upper right corner in the “Template” section, click the “Backup and Restore” button. Be sure to save your old template to your computer, especially if you have already made some changes (added banners, statistics or AdSense code).

2. Upload the file with the new template. You should definitely download the xml file. If you downloaded the archive before, then “get” the xml file from it and load it through the same window through which you saved it (picture above).
3. While downloading the template, you may receive a message about widgets being deleted. Confirm! You have nothing to be afraid of, because you previously saved your old template to your computer. If you don't like something about the new theme, you can easily download the old one.
Changing the structure (design) of the blog
In the Design section, you can easily change the structure of your site. Add some gadget: text, picture, video panel, Google translator; create a survey or a separate section on the blog, for example, with the most popular articles. Blogger gives you a lot of opportunities. You can change the structure of the site by simply dragging and dropping individual structural units.

Statistics of visits and page views in Blogspot.
The Blogger service provides the blog administrator with its statistics of visits and views of individual pages. I personally am not completely satisfied with the statistics from the service. It is for this reason that I install statistics from LiveInternet on all my blogs from this service. A personal LiveInternet script can also be inserted through the “Design” section. To do this, you need to add a new HTML/JavaScript gadget anywhere.

Next, click “Edit” for this gadget and paste any HTML code or script code into the field.

This way you can add a banner, AdSense code and much more to your blog.
If you have any questions regarding the Blogger (Blogspot) service, ask, I will try to answer.
Create your first post. Your blog isn't a blog until you start writing, so you might as well make your post right away! You will deal with more detailed settings later. To start writing, click the "Publish a new message!" button. under the blog name, or click on the button with the orange pencil. This will take you to the message editor.
Give your post a title. At the top of the editor, you will see a "Message Title" field. This title will appear at the top of the post on your blog, and will appear at the top of the window when you select a post. Make the title interesting to grab the readers' attention.
- As a general rule, your first post should be introductory. Introduce yourself and your blog's goals, or jump straight into the content you plan to create.
Start writing. There are two main modes in which you can create your blog post: compose the post using the built-in text editor, or write the post in HTML. Use the buttons in the top left corner of the editor to switch between these two modes.
- If you're not familiar with HTML, the text editor will give you plenty of options to customize your text post and easily allow you to insert links, images, videos, and more.
- For more information on using HTML to create blog posts, you can take a look.
Edit your text. Use the toolbar at the top of the editor window to edit the text properties. You can change the size, color, alignment, etc., just like in a regular text editor.
- The drop-down menu ("Normal") allows you to change the formatting depending on the type of content. You can choose between "Regular", "Heading", "Sub-Heading" and "Minor Sub-Heading". These settings not only affect the text size, but will also be taken into account by search engines when indexing page data.
- You should strive to ensure that your title format is correct and easy to read. Section or chapter titles should be in the Heading format, with smaller sections using the other two heading format styles. The content of your article must be in Regular format.
Add an image to your post. Images help grab the reader's attention and generally make the post more attractive. You can quickly add an image to your Blogger post by clicking the "Insert Image" button on the toolbar.
- You will be given several options for adding photos. You can upload them from your computer, link to other pictures on your blog, paste a link to photos from any of your Picasa albums, take a photo with your webcam, or paste a link to the URL of any picture on the Internet.
- If the links are to images from another site, be aware that if the image is removed from that site, it will not appear on your blog. Some sites don't like to have links to their photos because it increases their bandwidth every time a picture loads on your site.
Configure your message settings before publishing. You will see a list of options in the menu on the right. This will allow you to change your post settings before posting it.
- Labels are tags that are added to your messages and allow you to organize messages into groups with similar content. This is useful if you have a lot of posts because it helps readers find similar posts on your blog. These tags also help search engines find content that matches the user's search. Make sure your tags are accurate, short, and useful.
- Schedule - You can publish a message immediately or schedule it for a future time and date. This can be useful if you are at the peak of popularity and create a lot of content at once, but want to give information to your audience in doses.
- Permanent link – here you can set a direct URL to your post. By default, it will be generated based on the post title, but you can change it to whatever you would like.
- Location – here you can mark the location for the message. Especially useful for travel blogs.
- Options – Here you can configure other settings for the post, including whether readers can comment on the post and how to display the HTML code.
Friends, I welcome you to the first lesson of Wow school! Blog Project. I wrote this instruction for those who only dreams of creating his own corner on the Internet, but doesn’t know where to start, or takes first steps in blogging, but so far without a clear vision of the future of their project and without a formed concept. This article is for those who want to taste all the delights and joys of running their own blog (oh, believe me, there are plenty of them), but are not entirely sure of their intentions and are not yet ready to invest material resources in their project.
Today we will learn how to create blogs independently and without financial costs on the popular blogging platform Blogspot (Blogger), which has sufficient functionality to build even large projects.
Disadvantages of Blogspot
If you are planning to build a grandiose project, promote it in search engines and social networks, and increase the popularity of the resource, then I strongly recommend that you skip this step and go to. There we will create a separate blog on our own hosting using the WordPress engine. We will consider the advantages of a standalone (autonomous) blog there.
And I’ll probably start talking about Blogspot by listing obvious disadvantages of the service. This will make it easier for you to decide which platform to choose for creating a blog:
- Blogspot is a resource created by Pyra Labs and today owned by Google. For this reason, articles and images are indexed by Google itself (that is, they appear in search results for certain queries) quite quickly and easily. And here Serious problems may arise with Yandex. Text content is indexed worse, and images are included in the index very rarely and in small quantities. Conclusion: if you plan to promote your project in a Russian-speaking environment and a decent portion of the content consists of images, forget about Blogspot. Get ready to create a standalone blog on WordPress.
- Functional Blogspot is significantly behind WordPress.
- Opportunities for SEO optimization(for promotion in search engines) are significantly limited.
- Your blog is located on Google servers and belongs to the platform. There are known cases of accounts being blocked for unknown reasons. At any moment, you can permanently lose your blog along with all its subscribers. And if Google suddenly decides to shut down this service, your many hours of work will also be lost.
Pros of Blogspot
- Easy to create and customize a blog. However, sometimes it’s easier to solve the problem by installing a plugin (on WordPress) without fiddling with the code, which you can’t avoid on Blogspot.
- You are provided 15 Gigabytes of disk space, which can be enough for many years with rational use of resources. If you exceed the specified limit, you will have to pay for additional space.
- Free third level domain.
- Possibility to add your own domain second level.
- No advertising from the service on your blog and the opportunity to publish advertisements yourself and earn money from it.
- Big choice both standard and paid templates.
- You always have the opportunity to later move to a separate blog on WordPress with all existing content with virtually no loss.
Detailed instructions for creating a blog on Blogspot
- To get started with Blogger you must have Google account(mail to gmail). You can create a Google account.
- Next we go to the website Blogger.com and press the button "New blog".
- Looking ahead, I will explain that Blogger is very convenient for saving and reading other blogs that interest you, which are located not only on this platform. To add a new blog to your reading feed, open the admin panel at https://www.blogger.com/home and in the reading list, clicking on the “Add” button, insert the address of the blog you want to follow. You can do this procedure more than once after creating a blog.

3. We continue to create a blog. In the pop-up window, select the title, future blog address and template. I strongly advise you to think carefully about the domain name of your blog in advance so that you do not change it in the future. We will consider this point in great detail in. Changing a domain entails the loss of all links to your resource, which is very bad for SEO and promoting your blog. You are literally starting over. And if you plan to add your own second-level domain, do it as early as possible.

Blog setup
Let's look at the main features available to you in the blog admin panel.

- Blogger button returns you to the home page, where you see a list of blogs you've created and blogs you've added to your reading feed.
- Pencil opens the new message editor.
- Next document button allows you to view a list of all your blog posts.
- "View blog" Opens your blog's home page in a new tab.
Blog admin side menu and settings:
- Review opens you a graph of visit statistics.
- Messages— a list of all your blog posts, where you can create a new message.
- Pages— a list of all blog pages and the ability to create a new one.
- Comments- latest comments and Spam folder.
- Statistics
- Profit— allows you to set up advertising from Google Adsense on your blog and earn money on clicks.
- Company— allows you to set up advertising for your own blog using the Google AdWords service.
- Design- opens the blog template card where you can insert various widgets, gadgets and other design elements.

IN Template designer you can adjust various design elements of the template you select or download.

- In chapter "Sample" you can choose a template from a selection of standard templates, check how it looks on computers and mobile devices, and also make changes to the template code itself.
- Let's take a closer look at the section "Settings".
In the tab "Basic" you enter the name and description of the blog, which will be visible instead of the header. If you plan to upload a graphic header, then these fields do not need to be filled out. Also on this tab, you determine whether the blog should be available for crawling by search engines (of course, unless you are creating a personal project, closed from outsiders), you can change the blog address (I highly recommend not doing this without good reason) and configure HTTPS redirection ( if you don't know if you need it, skip it).

 In other tabs Settings very easy to figure out on your own. If any item raises questions for you, just click on the blue question icon next to the item you are filling out - and detailed instructions will be revealed to you.

Linking a custom domain to Blogger
Instructions from Google for linking a domain mentioned in the video.
This information is enough to create a blog. You will get used to the admin area and the message editor quite quickly. It just takes practice. We will consider other settings, including SEO optimization, in future lessons and in. Follow the school website for updates. All news will be here. And see you in the next lesson.
If you have any questions about the material, I will be happy to answer in the comments. And yes, since this lesson is part of the course that I give to my subscribers, the ability to comment only from Facebook is available here. Don't be alarmed. This is done intentionally for the convenience of students during the learning process.
Good day, dear blog readers. I’m starting a new series of articles about Blogger from the very basics.
Blogger is one of Google's services, so to create a blog on Blogspot you must have a Google account. A Google account combines all its services, including blogger.
If not, then Blogger registration occurs through Google registration.
And fill in all the fields:
 By clicking the “Next” button at the end, we are taken to a page with congratulations and a “Back to Blogger” button.
Now, to log into Blogger, you must be logged in to your Google accounts, and access the blogger itself either by directly typing the address http://blogger.com, or from any Google page through the “Services” sign:
 When you first log into Blooger, you will be asked to select a profile to display on your blog and to your readers.
The fundamental difference in profiles is that on Google+ the profile must belong to a real person, even if you use a pseudonym (no one will require a photocopy of your passport from you). A Blogger profile can be completely anonymous.
I don’t want to go into details of the advantages of a Google+ profile, the topic of my article is a little different, if you wish, you can find out on your own, but if you choose a Google+ profile, then your entire blog will be inextricably linked with this social network.
Your photos will be saved as albums on Google+, when you publish new material you will be asked to duplicate the post on your Google+ page, if your Google+ friends search for something on the Internet on a topic that you have blog posts on, they will Your article is shown indicating that you are the author.
If you choose a Blogger profile, then there may be fewer opportunities, but it certainly won’t make things worse.
If you are now having difficulty deciding on a profile, and you are not yet sure that you want to essentially combine two blogs into one (since Google+ is a social network that supports publishing content), then choose the Blogger profile. In the future, you can always change it to another one.
Once you select your Blogger profile, you will be asked to enter your nickname, the name that everyone will see on your blog:
- in a special gadget, if you install it;
- in the comments when you respond to your blog or other people's blogs,
those. you should choose a name by which you will be known as a blogger.
And now, being on the main page of the Blogger admin panel, we begin the most important thing, creating a blog on Blogger.
Creating a blog on Blogger
Click on the "New blog" button in the upper left corner, the "Create a new blog" window opens
We indicate the title of the blog as your readers will see it in the header. Even if you make a mistake now, it’s okay, the title can always be changed.
We indicate the blog address in the third-level domain:
moe-pridumannoe-nazvanie.blogspot.com
You also don’t have to worry if you make a mistake, the blog address can also be changed. Rather, click the “Create Blog” button.

I specifically left the Blogger.com address in the screenshot to once again emphasize that creating a blog on blogspot.com takes place at Blogger.com, and you must be logged in to your Google account. Without authorization in Google, you cannot register a blog.
So, the blog has been created, we are on the page Review.
What should we do if we made a mistake when entering a name or address?
How to change your blog name or address
The blog address or name can be changed in the blog settings. In the admin panel on the left in the menu is the last item Settings - General
On this tab you can change both:

Blogger provides for the installation of standard templates that are provided by developers in the blogger admin area, as well as the installation of templates from third-party developers.
The standard template changes on the tab Sample
 Here you can select the template you like right away, or by clicking on the “Customize” button, go to the template designer and select a template through the designer.
 In the template designer, you can not only change the template, but also customize it to your liking. But that is another story.
As I said above, you can install non-standard templates on your blog. But before installing, you need to find the template you like through a search on special sites.
Download the template to your computer, it can be an archive with several files, or there can be only one file, but this file must have an XML extension. Only it is installed on the blog. And nothing more.
There, on the tab Sample, in the upper right corner under the profile link, there is a "Backup and Restore" button
 A window opens where, by clicking on the "Browse" button, you can download a new template from your computer.
If your blog is more than a day old and you have made any customizations to the template, before uploading a new template, make a backup copy of the existing one. If suddenly you don’t like the new template, you can immediately download your old template.
How to delete a blog
Deleting a blog on Blogger is very easy, so give it some serious thought before you do it.
If there is even the slightest doubt, before deleting a blog permanently, it is better to close the blog from viewing and indexing for a while. A blog can exist “forever” and no one will see it. During this time, you will think about everything carefully.
If your decision is final, then we go to Settings - Other. First section Blog Tools - Delete Blog.
I can write endlessly about the Blogger platform, but I’ll end here for now. Only the best and most interesting things are ahead. Subscribe to blog updates to always be the first to know.
Here you can download unique Blogger Templates. The topics in this collection are more advanced SEO optimization.
Languages: English Russian.
Types: News, Magazine, Blog, Minimalism, Portfolio, One-page, Gallery, Grid, Online store, Business cards, Corporate sites.
Topics: Sports, Photos, Games, Cooking, Style and Fashion, Women's, Children's, Cars, Health, Travel, Tourism, Design, Home renovation, Interior, Nature, Animals, Dancing, Video, Music, Politics, Economics, Business, Forex, Art, Pictures, Wallpapers, Earnings, Real Estate, Fishing, Hunting, Software, Software, Android Gaming Applications.
Technologies: Jquery, AMP, Bootstrap, Ajax, Javascript, Responsive design.
Best blogger templates, users' choice

UberSpot is an excellent solution for those who value beautiful design, SEO optimization and effective functionality. In this theme you will find a number of cool and productive new products, for example, a new widget for Instagram, Sitemaps, Posts, Comments, etc. You can also take advantage of two different types of layouts.

Unstoppable "Niche Conqueror". This is the ideal solution for single-thematic sites and blogs. The idea when creating the theme was to implement endless navigation, the movement of which could be tracked by search engines. Thus, the new navigation system, unlike the previous ones, will not just increase the behavioral factor, but will also fully display it, which will entail an increase in the site’s position in the search. But that's not all, Unstoppable is ideal for resources whose traffic is mainly from mobile devices. Why? Because with the advent of the mobile first index SEO trend, Google began to value not only page loading speed, but also the ease of use of the site on mobile devices. And Unstoppable fully meets this criterion.

Designed on the basis of the new Blogger Themes from the series (CNES). Capable of solving many assigned tasks. You can use it with all widgets, or partially, as a personal information blog. The page loading speed will pleasantly surprise you.

BlogBoard is one of the best griders in 2018. Combines several styles at once. Can be used as a blog online store. It will do a great job of presenting your skills and services, so it’s also suitable for a portfolio.

Dionis has a simplified type of message delivery. Suitable for any niches and stories. Among the features we can highlight is a beautiful preloader (an animated picture before loading the main page), recommended messages pop up on the right side when scrolling the page.

This is a fast and flexible model that has absorbed several additions from social networks. An excellent option for those who value their time. Translated into Russian.

Mistik has four different styles. You can choose the one that you like the most. Easy customization of menus, colors and other elements allows you to create your own unique design.

NewsB is a lightweight news theme with a combined color scheme, simple and at the same time stylish widgets created for various topics and content categories. NewsB is fully responsive and seamlessly supported by all modern browsers. The full version includes today's latest blogger SEO settings, which will allow your site to increase its ranking in search engines even higher.

Minima Mag is a modern news template, with a responsive design, fast loading messages, stylish gadgets and of course a clean design that seamlessly combines three colors, which ultimately makes Minima Mag neat and elegant.

A stunning theme with a classic style designed for women's websites and blogs. Avicia is a professional theme with an elegant and modern design that can inspire and convey only positive emotions to readers.

Dream Press, is among the best blogger themes. In it you will see a modern, elegant, stylish and simple design. In general, all these qualities will help keep the reader on the site.

The only thing you need to know about ExGPress is that it has the most convenient functionality, comparable to a social network, which will provide your site with a high percentage of returns. To everything you can add SEO optimization, high loading speed and a large supply of space for gadgets and advertising. ExGPress was designed specifically for comfortable viewing of content and the best interaction with search engines, which is what makes it one of the best templates for blogger today. The other day they added a new feature to it: floating sidebars; when you scroll the page down or up, sidebars with widgets move along with the scrolling.

Grid Line is a modern and stylish blogspot template. All its elements are carefully selected, optimized and arranged in such a way as to maximize the reader’s attention on the content. Grid Line was created not only to successfully promote your web resource in search engines, but also to lift the spirits of its users and readers.