Buy Ship equipment and faction fit Eve online. Fits (Fit) of ships in EVE Online Ready-made fits for ships in eve
Slots, bays and attachment points
All ships in EVE, except shuttles and freighters, have equipment slots. They are divided into upper, middle and lower. Some ships additionally have a drone bay (drone bay). If you open the ship information window, you will find the size of the drone bay in the attributes tab. If there is 0 m³, then you do not have a dronebey. Its volume, indicated in cubic meters, limits the number and size of drones that you can place there. For example, a 10 m³ dronebay will fit one medium drone or two light ones. On all ships, except for Carriers, when learning the necessary skills, you can use up to 5 drones at the same time, while you can put as many of them into the dronebay as you like.
The slots are listed on the Fitting tab of the ship information window. To find out if you can fit a module, you need to check the Fitting tab in the ship info and in the info of the module itself. You can also see the slots available for installing equipment in the fitting window while at the station. As you noticed, the ships also have hardpoints, they differ in the type of equipment that can be installed in the slots - turrets or rocket launchers. The number of attachment points limits the number of rocket launchers or turrets that can be fitted into slots. There are also equipment for the top slots that don't require an attachment point, like the Nosferatu - they can fit into any top slot, whether it has an attachment point or not.
Attention! If your ship has 5 upper slots, where there are 2 attachment points for turrets and 2 for rocket launchers, you can fit 2 turrets, 2 rocket launchers and 1 Nosferatu or stuff Nosferatu into all slots, as you like, but install 4 rocket launchers or 4 turrets You can not.There are no attachment points for the middle, bottom and rig slots, here you need to focus only on the requirements for the slot indicated in the module information window.
Attention! While you can't increase the number or layout of your ship's slots (i.e., the middle slot module can only fit into the middle slot and nowhere else), there are ways to achieve a similar effect. Many slots have analogues installed in another slot. They work differently, but in the right direction. For example, if you want to increase the size of your hold, but there are no lower slots, then you can install rigs. If all the top slots are filled and you still need more damage, find modules that increase the damage of the type of weapon you need - Heat Sink for energy weapons, Gyrostabilizer for projectiles, Ballistic Control System for missiles or Magnetic Field Stabilizer for hybrids. If you need to increase the shield, but the middle slots are already occupied, consider an alternative for the lower slot. And so on.CPU/Powergrid/Calibration
The next thing you'll see on the ship or module's fitting tab are details about the CPU, Powegrid, and Calibration. This tab is available only by right clicking on the ship, the ship fitting window on the station has a different format. In order for the modules you need to work, you need to calculate the values \u200b\u200bof their CPU and Powergrid requirements in advance, the same applies to rigs and their calibration requirements.
To understand what is said on this subject in Russian localization, I switched the interface of one of the Alts to Russian. So CPU is the processor, Powergrid is the power grid, and Calibration is the calibration. Basically, you can understand. The fitting itself is translated as "Equipment Service" - also normal. Now in an accessible language - let's say your computer has a 1000W power supply that feeds disks, drives, a video card, cooling, and a motherboard. Each of these modules has its own energy consumption value - that's what Powergrid is. In the same way, each module needs a certain portion of the CPU resource - it's like opening the task manager and seeing what your processor is using. Calibration is a separate ship resource, the power of which is consumed only by rigs. I hope I made it clear for a general idea (approx. translator)
Advice: In the fitting's station window, you can see which modules are online and which are disabled - disabled are marked in red, working in green. Always check that all your patched modules are online before leaving the station. It is possible to online modules even in outer space - if you have enough CPU / Powergrid, then this will require 95% of the capacitor capacity.Capacitor - capacitor. Something like a battery - accumulates and consumes the energy consumed by some modules. (approx. translator)
There are three main ways to use the CPU and Powergrid more efficiently.
- Learn the skills of the Electronics and Engineering sections, which will directly increase the CPU / Powergrid values.
- Learn skills like Weapon Upgrades and Advanced Weapon Upgrades to lower module requirements, these skills are designed to do just that.
- Use certain implants that increase CPU/Powergrid values or lower the installation requirements of certain modules, such as turrets.
There are other ways to affect the CPU and Powergrid, such as:
- Skill Electronic Upgrades.
- Energy Grid Upgrades skill.
- Some ship control skills, for example, each level of the skill to control ships of the Covert Ops or Recon class gives a reduction in the CPU requirements of a module such as Covert Ops Cloak
- There are modules that increase the CPU and Powergrid, but take up a slot, such as modules in the CPU Upgrades section, Auxiliary Power Controls, Reactor Control Units, or Power Diagnostic Systems.
- Installing Ancillary Current Router rig to increase Powergrid or Powergrid Subroutine Maximizer to reduce CPU consumption for some modules.
Carefully study what you are going to install:
Follow the size. Perhaps you are trying to install a module on the ship that is simply too big for it. A number of modules are presented in the game in different sizes, the division into which is usually the following - small / medium / large / xlarge / capital, that is, small / medium / large / huge / capital. Please note that X-Large shield boosters are not capital modules, but XL turrets are. Modules are also divided into light / medium / heavy. Some modules that affect motors are 1mn/10mn/100mn, while other modules are sized in mm, such as calibers. All these divisions by size are connected with the division of ships by class - Frigate-Destroyers (frigates and destroyers) / Cruiser-Battlecruisers (Kruzaks and BC) / Battleships (battleships) / Capital Ships (capitals). That is, for frigates you are looking at small, light and 1mn modules. Each module of each size has a slightly different named counterpart, so there is always a choice. It is also important which turrets or rocket launchers you install. It's better to install smaller weapons and free up resources for the rest of the slots than to try to cram in a larger weapon that will gobble up the entire CPU/Powergrid.
T1, T2, Named
This is the question that separates the rich from the not-so-rich, the bold from the not-so bold in EVE: the option of modules or rigs. The range of options here is from simple, unnamed T1 to officer and T2 modules. In general, the higher the level, the stronger the effect, but the price is also higher. The order is: simple T1 - named - T2 - factional - officer - COSMOS items. In addition to the cost, there are other disadvantages. Some items are very rare, others have an increased installation requirement, this applies to T2 modules in conjunction with named ones.
Advice: If you compare 1mn Afterburner I, its named Cold-Gas I Arcjet Thruster version, and the T2 version of 1mn Afterburner II, you will see that the installation requirements and activation cost are the same for the T1 and named versions. The T2 version consumes more Powergrid and has a higher activation cost, but at the same time it gives a significantly higher speed bonus - 135%, as opposed to 105% for the regular T1 version and 120% for the named one.A "named" module is an extended version of the T1 module with a changed name. "II" after the module name means T2. There are no named T2 modules. Ships also often have a Tier 2 or factional variant, but in the case of Tier 2 ships, they are in a different class than Tier 1. For example, an assault ship is a T2 version of a T1 frigate. Faction items and ships have the name of their faction in their name, like Caldari Navy Raven, while officer items have the name of the NPC officer they belonged to.
Advice: You will also hear the words "Tier" and "Mark". "Mark" indicates that the module or ship has been upgraded from its base versions, but it's still not a T2. The difference between mark II and Tech 2 is that the upgraded versions marked as mark II are still crafted using base minerals as opposed to the higher materials needed to build nech 2, and blueprints for building them are available on the market and are sold NPC corporations. Another difference is that they are still named the same as the mark I version, such as Badger mark I and Badger Mark II, and the skill requirements are not as strong as in the case of T2. "Tier" means the level of skills required to ship control. For example, Ferox is a Tier I battlecruiser as it requires Battlecruisers 1, while Drake is Tier 2 as it requires 2nd.Combination and Combination Penalties
"Combination" refers to the simultaneous use of two or more modules or rigs on a ship. For some modules this is possible (for example, for armor repo - armor repairers), for some it is not (for AB - afterburners). Some modules are subject to a penalty when combined. This does not mean that something terrible will happen, just the second identical module will work with a little less efficiency than the first, and the third - with a little less than the second, and so on. The module description tab usually contains the exact values of the misalignment penalties.
Advice: The exact numbers of fines are the subject of heated discussions and rather complex calculations. However, I will spare you these details. As a rule, the use of two modules / rigs is quite justified. three - depends on the situation, the effect of using more than three identical modules / rigs, taking into account penalties - is minimal.Active and passive modules
Some modules work continuously after installation, others require manual activation directly in space. The difference is that manually activated modules require capacitor energy, while passive ones do not (there are exceptions, however, such as projectiles, which are active modules, but do not need a cap). The cost of activation of active modules is indicated in the "Attributes" tab. If the module has both an active and a passive version, then the passive one is usually less effective than the active one.
Rigs - Rigs
Rigs are like implants for your ship, which means that once installed, they cannot be dismantled, but only destroyed. Packing a ship also destroys installed rigs. Most rigs, along with advantages, also have disadvantages, which are indicated in the attributes tab.
Right and Wrong Fits
If the "Basics" section is about things you can't ignore, then here are some tips about fitting ships in EVE that you may or may not listen to. None of the following is mandatory, but it's still worth listening to.
Ship fitting
Opening the fitting window
To see the fitting window, click on the fitting icon in the Neocom panel on the left. You can use the fitting only at the station that has the fitting service module installed, it is available at almost all stations and you will see its button along with the rest of the station services.
Advice: You can open the fitting window while in space by pressing Ctrl + Shift + F, if you have not changed the values of the keyboard shortcuts. You can only change the fitting at stations, near Capital Ships or at POS using the POS Ship Maintenance Array, but you can simply view the fitting anywhere. Another way is to right-click on the ship's captain and select Show Info. On the attributes tab, you will see the current resists and other information that takes into account the effect of active modules.When opening the fitting window for the first time, you will see a welcome page (unless you have disabled the welcome pages option earlier), which is where you will find a link to the fitting tutorial. It is recommended that you study it if you are using a station fitting service for the first time.
How do I equip the ship and how does the fitting window work?
Make it a rule to equip your ship based on the tasks that it will have to solve, and not try to build an ubermobile in the style of "and a reaper, and a gamer on the pipe." Carefully study the advantages and disadvantages of each module and figure out how its installation will affect the overall idea. For example, if you are going to aggressively lean in PvP, then Warp Core Stabilizer will most likely not suit you, because it gives a significant penalty to the speed of target acquisition. However, some close Kruzaks can afford such a module, since its effect is not so important for them.
Almost every ship in EVE Online can be fitted with modules that give capsuleers a wide range of upgrades over stock. It's kind of like armor and weapon upgrades in other MMO games. So, you can open the fitting window of the active ship at each station. With this window you can install/uninstall modules and rigs. With the Apocrypha expansion, the Fitting Manager Tool has been added to the game, allowing quick use of pre-saved setups, either personal or corporate, which will be discussed in more detail below.
The modules are divided into three levels of slots - upper, middle and lower. As a rule, the upper slots are used for mounting guns, the middle slots for tank modules and shield upgrades, and the lower slots for gun and armor upgrades.
Slots available for installing modules and rig installation points are highlighted in white. To install, simply drag and drop the module into the appropriate slot. The slot icon on the module must match the empty slot icon. For the top slots, this is an icon in the form of a three-pointed star, for the middle slots, a double dash, and for the bottom slots, a vertical bar. Another way to install a module is to right-click on the module and select "fit to active ship" in the menu that appears - install on the current ship.
To remove a module, simply drag it from the slot to your hangar or hold. Other ways - RMB on the module and select "Unfit" or the "Strip Fitting" button in the fitting window.
Attention: To “remove” rigs means to destroy them, so be careful where and why you fit them.on the right side of the window you see various indicators informing you about such things as the ship's capacitor, its reload time, in the lower right corner - the available CPU and Powergrid. Capacitor is the available energy of the ship, it decreases and increases during the flight, depending on which modules are working at a particular moment and consuming energy. CPU values show how busy the CPU is and has a finite limit, although skills, implants, modules and rigs can change this value in both directions, the same applies to the Powergrid value. In total, all modules and rigs installed on the ship must fit within the available CPU / Powergrid, if not, then you simply won’t be able to activate any of the equipment.
Statistics panel
The statistics panel also displays other characteristics of the ship, the values of which can be influenced by various modules and rigs, your skills and implants. The statistics panel is divided into several sections describing the different parts of the ship. Each of these sections can be expanded/collapsed to save space. And remember that all these figures are indicated taking into account the influence of specific skills and implants on this particular ship.
The subsystem slots are in positions 7-9 of the new fitting window and are not displayed unless you are in a Tier 3 ship (tengu, legion, loki, proteus). There are five slots for subsystems, according to the number of subsystems themselves. A T3 ship must have any variant of all five subsystems in order to be assembled and be able to leave the dock.
Fitting manager
The fitting manager is located in the upper right corner of the fitting window and allows you to save the current settings or load existing ones. With it, you can instantly equip the ship with modules and rigs without having to manually install each separately. If you have the required role in the corporation, you can save the fitting for use by all members of the corporation if they need it. Of course, you must have all the necessary modules available in order to be installed on the ship.
- "Remove" simply removes all modules from your ship to the hangar without affecting the installed rigs. Rigs are destroyed when removed, so you must do it yourself.
- With the "Save" button you will save your current setup for personal or corporate use. If you want to save for a corporation, you need the Fitting Manager role. Before saving, you can specify a name and description for a particular configuration.
- “View” will show you all previously saved setups, from here you can “try on” any setup if you have modules and rigs in your hangar.
Tech 3 subsystems
With the release of the Apocrypha expansion, players were able to fly Tech 3 ships. These ships are assembled from interconnected parts attached to the hull - subsystems, which can be assembled and disassembled as you like. In order for the T3 ship to function, it is necessary to assemble 5 subsystems in the hull - electronics, defensive, engineering, offensive and propulsion (electronics, defense, engineering, attack and engines). By changing subsystems, you can change and appearance, and characteristics of the ship.
As you can see in the screenshot below, subsystems are shaped like pentagons to distinguish them from rigs and regular modules. See the article T3 ships for more information on building and using these ships.

Races
As you may have noticed, each of the four races builds their own ships. The key point here is that each race has its own understanding of what ships should be for the most efficient use.
Amarr - Amarr
Amarr ships are very well protected and prefer armor tanking. Mostly they are equipped with energy weapons, which are divided into pulses (pulse lasers - Pulse Laser) and beams (beam lasers - Beam Laser). Energy weapons require a huge amount of capacitor energy, which is reflected in the configuration of Amarr ships.
Caldari - Caldari
Caldari ships are known for their powerful shields and use a combination of missile and hybrid weapons for offensive purposes. Hybrid weapons are further subdivided into Blasters and Railguns, which also use capacitor energy, but not to the same extent as Amarr energy weapons. Some Caldari ships are excellent Electronic Warfare platforms, in particular through the use of ECM modules that disable enemy targeting systems, reset all currently locked targets and prevent new ones from being acquired for a while.
Gallente - Wikiwand Gallente
Gallente ships primarily use armor tanks for protection and specialize in short-range combat using hybrid guns and drones. They are known for their blasters that deal impressive damage. Gallente ships can also be used for tanking with a shield (Eos or Myrmidon) and for dealing any type of damage with drones.
Minmatar - Wikiwand Minmatar
Minmatar ships are considered the most versatile and at the same time the most difficult to control. Everything is used on them - tanking with a shield, armor, rockets, drones, turrets. Projectile weapons are placed in the turret slots on them (projectile weapons - small arms, throwing weapons), subdivided into machine guns (Auto-cannons) and artillery (Artillery). Minmatar ships tend to be fast and agile, allowing them to avoid damage at the expense of their speed.
Dealing Damage
In this section, we'll take a quick look at five ways to deal damage to an opponent. This is done by three types of turrets - energy, hybrid and projectiles, missiles and drones.
To destroy or drive out the enemy, the ship is equipped with modules to deal maximum damage and is able to perform this task only due to its firepower. And although the best defense is an attack, attacking ships may not be able to cope with the enemy if he greatly outnumbers them. Such ships are good in the fleet or with the support of other ships.
Any ship that has damage bonuses for certain weapons is suitable for this role, although a ship with both damage bonuses and a large number of upper and lower slots is a better choice. For example, Megathron, Harbinger or attack aircraft (assault ships) are good, capable of inflicting powerful damage to frigates.
Advice: There are four types of damage: EM, Thermal, Kinetic and Explosive. EM is the best at damaging shields, while Explosive is the best at armor. Thermal and Kinetic deal medium damage to both shields and armor, with Thermal being better for shields and Kinetic for armor. This is related to the ship's resistances, detailed information about which you will find in the attributes tab in the ship information window.Resists - resistances - this is the resistance of shields, armor or ship structure to each type of damage. Specific resistance numbers mean what percentage of each type of damage is able to reflect each of the ship's defense levels - shields, armor and structure. (approx. per.)
Energy Turrets - Energy Turrets
They are a favorite type of weapon for Amarr ships.
- beams (Beam Lasers) - good distance, good damage, average tracking
- pulses (Pulse Lasers) - close range, very good damage, good tracking
Equip: Crystals (Frequency Crystals)
Support modules:
- Heat Sinks (increase rate of fire and damage)
Support rigs:
- Algid Enegry Administrations Units (reduce CPU requirements)
- Enegry Ambit Extensions (increase the falloff spread within which a target is guaranteed to hit)
- Enegry Burst Aerators (increase rate of fire)
- Enegry Collision Accelerators (increase damage)
- Enegry Discharge Elutriations (reduces capacitor energy consumption by turrets)
- Enegry Locus Coordinators (increase range)
- Enegry Metastasis Adjusters (increase tracking speed)
Effective against: shields (with EM and Thermal damage).
Not as effective against: armor
Advantages: do not consume ammunition, high damage to shields, thanks to the quick replacement of crystals, they can quickly change the battle distance.
Flaws: Only EM and Thermal damage, high energy consumption of the capacitor
Hybrid Turrets - Wikiwand Hybrid Turrets
Used on Caldari and Gallente ships.
- Railguns (long range, medium damage, poor tracking)
- Blasters (the shortest distance of all turrets, huge damage, good tracking)
Equip: hybrid charges
Support modules:
- Magnetic Field Stabilizers (increase damage and rate of fire)
- Tracking Enhancers (increase the speed of tracking, which improves the chances of hitting the enemy)
- Tracking Links (increase tracking and max distance)
- Tracking Computers (increase tracking and maximum distance)
Support rigs:
- Algid Hybrid Administrations Units (reduce CPU requirements)
- Hybrid Ambit Extensions (increase falloff - the spread within which a target is guaranteed to hit)
- Hybrid Burst Aerators (increase rate of fire)
- Hybrid Collision Accelerators (increase damage)
- Hybrid Discharge Elutriations (reduces capacitor power consumption by turrets)
- Hybrid Locus Coordinators (increase range)
- Hybrid Metastasis Adjusters (increase tracking speed)
All of the above rigs have the negative side effect of increasing the Powergrid requirements when placing turrets.
Good against shields and armor with Kinetic and Thermal damage, but since Kinetic and Thermal deal moderate damage and hybrids don't have EM and Explosive damage, they are pretty mediocre weapons. That is, hybrids are good against everything, but not excellent against anything in particular.
Advantages: use less caps than energy turrets.
Flaws: charges take up a lot of space in the hold, take longer to recharge than lasers, and consume capa.
Projectile Turrets
Favorite weapon of the Minmatar ships
- artillery (long range, high damage, low rate of fire, poor tracking)
- machine guns (short range, low damage, high rate of fire, good tracking)
Equip: projectile charges
Support modules:
- Gyrostabilizers (increase damage and rate of fire)
- Tracking Enhancers (increase the speed of tracking, which improves the chances of hitting the enemy)
- Tracking Links (increase tracking and max distance)
- Tracking Computers (increase tracking and maximum distance)
Support rigs:
- Projectile Ambit Extensions (increase falloff - the spread within which a target is guaranteed to hit)
- Projectile Burst Aerators (increase rate of fire)
- Projectile Collision Accelerators (increase damage)
- Projectile Locus Coordinators (increase range)
- Projectile Metastasis Adjusters (increase tracking speed)
All of the above rigs have the negative side effect of increasing the Powergrid requirements when placing turrets.
Good against: armor mainly with Kinetic and Explosive damage, less effective against shields.
Advantages: do not use a capacitor, high rate of fire of machine guns, impressive alpha-strike (that is, an enemy ship can be destroyed from the first volley)
Flaws: frequent reloading, charges take up a lot of space in the hold, the lowest damage per shot among all turrets
Missile launchers - Launchers
There are three types of missiles in the game: the first ones need to capture a target and hit a specific target, the second ones are designed to intercept attacking missiles, the third ones do not need a captured target and work on the friend / foe principle, attacking the nearest attacking enemy. Missiles can deal any of four types of damage.
They are most commonly installed on Caldari and Minmatar ships.
Options:
- frigate class: rocket launchers - Rocket Launcher (very low damage, high rate of fire, short range)
- frigate class: standard settings - Standard Launcher (weak damage, high rate of fire, medium range)
- cruiser class: assault launchers - Assault Launchers (weak damage, higher rate of fire than standard launchers)
- cruiser class: heavy assault launchers - Heavy Assault Launchers (good damage, short range)
- cruiser class: heavy launchers - Heavy Launchers (medium damage, medium range)
- battleship class: cruise launchers - Cruise Launcher (high damage, low rate of fire, very long range)
- battleship class: siege launchers - Siege Launcher (low torpedo speed, huge damage)
- capital class: Citadel launcher (torpedo and cruise) - Citadel Launcher (extreme damage, low rate of fire, long range)
Equip: Rockets, missiles, citadel torpedoes, cruise missiles, torpedoes, defensive missiles, friend-foe missiles
(note per. - I honestly do not know how to translate Rockets and Missiles so that they are different concepts)
Support modules:
- Ballistic Control Systems (increase rate of fire and damage)
Support rigs:
- Bay Loading Accelerator (increase rate of fire)
- Hydraulic Bay Thrusters (increase rocket speed)
- Rocket Fuel Cache Partitions (increase flight time)
- Warhead Calefaction Catalysts (increase damage)
- Warhead Flare Catalysts (reduce target speed impact)
- Warhead Rigor Catalysts (reduce target signature size factor)
All of the above rigs have the negative side effect of increasing CPU requirements during installation.
Good against both shield and armor.
Advantages: do not use a capacitor, deal any type of damage, can be extremely long-range, always hit if the target is within reach and has a speed below the speed of the rocket, are able to fire missiles "friend or foe" without locking the target and, most importantly, constant damage.
Flaws: long flight times (which is why many people say that missiles are not suitable for PvP, since every second is precious here), often lower rate of fire than turrets, reload time to change damage type.
Drones
Drones are small robots that are launched into space from a special drone-hold (dronebay - dronebay) and controlled using a special interface in the overview. Drones perform many tasks, such as repair, mining, electronic warfare, but here we will only talk about combat drones that deal damage.
Used by all, but more common on Gallente and Minmatar ships
Options:
- light reconnaissance drones - Light Scout Drones (very fast, weakly protected, but due to speed - hard to hit, low damage)
- medium scout drones - Medium Scout Drones (medium speed and damage, more protected than light drones, but not as fast and therefore more vulnerable)
- heavy attack drones - Heavy Attack Drones (very slow, high damage, well protected)
- sentry drones - Sentry Drones (stationary, high damage and long range)
- fighters - Fighters (used only on carriers and motherships)
Equip: do not require ammunition
Support modules:
- Drone Control Unit (each installed module allows you to control one additional drone, installed only on carriers and maserships)
- Drone Link Augmenter (increases the distance at which drones can be controlled)
- Drone Navigation Computer (increases the speed of drones)
- Omnidirectional Tracking Unit (increases drone fire range and tracking)
Support rigs:
- Drone Control Range Augmenter (increases the distance at which drones can be controlled)
- Drone Durability Enhancer (increases the security of drones)
- Drone Scope Chip (Increases the optimal firing range of drones)
- Drone Speed Augmenter (increases the speed of drones)
- EW Drone Range Augmenter (Increases drone control distance, but has lower efficiency and lower calibration cost than Drone Control Range Augmenter)
- Sentry Damage Augmenter (increases sentry drone damage)
All the rigs mentioned above reduce the amount of CPU as a side effect.
Not very effective against shields. They deal any type of damage, don't need ship resources like CPU/Powergrid/Capacitor, charges or slots. Disadvantages: Can be damaged or destroyed, the next group of drones can only be launched after the previous one returns to the dronebay, making it difficult to change the type of damage. Ships designed for drone warfare have fewer slots than their conventional counterparts.
Tank
(note per. - The ability to withstand huge damage and still not be killed / destroyed in most MMORPG's is known as "Tank", or "Tank")
There are three main types of tanking - shield, armor and structure, while the shield tank is divided into passive and active, there is also another, not so well-known method - tank speed (speed-tanking). Of all the above, tanking by structure is practically not used due to its extremely low efficiency. A speed tank is essentially not tanking in the usual sense of the term, that is, it is not the ability to take huge damage, but rather avoid it due to the fact that the guns are not able to damage the ship due to its speed or cause only partial damage, but in fact it is also tanking.
Advice: While speed tanking is often combined with shield and armor tanking, we don't advise you to tank both if the ship isn't fast enough.Capacitor - Capacitor
Capacitor energy is used by many modules. Self-healing of the capacitor takes a certain time, but there are modules that affect its volume, they are divided into:
Modules that directly increase the base capacitor capacity:
Modules: Capacitor Batteries
Advantages: increases the total capacitor volume and, since the regeneration time remains the same, increases the regeneration per second value.
Flaws: high CPU/Powergrid requirements
Riga: Semiconductor Memory Cell
Modules accelerating the regeneration of the capacitor:
Modules: Capacitor Rechargers, Capacitor Flux Coils, Capacitor Power Relays
Advantages: Capacitor recharges faster
Flaws: Capacitor Flux Coils reduce the overall volume of the capacitor, making it recharge faster. Capacitor Power Relays reduce the frequency of the shield booster.
Riga: Capacitor Control Circuits
Modules that add energy either by taking it away from another ship, or using special charges for this, which are preloaded into the hold:
Modules: Nosferatus/Energy Vampires, Capacitor Boosters, Energy Transfer Arrays
Advantages: Energy Vampires drain energy from the enemy ship, thereby weakening it and strengthening the player's ship. Capacitor Boosters provide an instant energy boost.
Flaws: Vampires only work at a certain distance, and batteries for Capacitor Boosters take up a lot of space in the hold. Once the charges for Capacitor Boosters have run out, the module is practically useless.
Fitting directions
Electronic Warfare - electronic warfare
The ship, which will be used for electronic warfare, is equipped with modules that affect either its own electronics or the electronics of the target. There are four categories of modules in this section:
- ECM (Suppression of Guidance Systems) and their countermeasures ECCM (Protection against Countermeasures);
- Tracking Disruption (tracking violation) and opposition to the tracking Computer (tracking amplification);
- Sensor Dampening (suppression of sensors) and counteraction Sensor Boosting (gain of sensors);
- Target Painting (increase in the signature of the ship) - has no counteraction
As a rule, all races in EVE can use any kind of electronic warfare, but at the same time there are ships that have bonuses for certain types of it. Another category are modules that allow you to delay the ship either by slowing down its speed or preventing it from going to warp.
NPC hunting (PvE)
The established term for this role is "hunting" or "hunt", "ratting" being a purely English term.
Ships equipped to destroy pirate NPCs for bounties are usually fit to effectively destroy a specific type of NPC. They are equipped with certain resistances that help to keep the damage of a certain type characteristic of this NPC, as well as the right weapon, the most effective for this NPC. This distinguishes them from ships equipped for PvP, where all damage types and all resistances have to be taken into account.
- The most commonly used ships for hunting are the Raven, Dominix and Drake, although most ships can also be used for hunting. The presence of additional top slots (for installing tractor beams and salvagers), as well as a large dronebay, make almost any ship suitable for hunting.
- Electronic combat modules are almost never used, with the exception of Target Painters, which allow you to increase the damage dealt, especially when using a battleship.
- Afterburners are useless on large ships and where you have to cover long distances on missions or complexes. Microwarpdrives do not work in deadspace and complexes, and also reduce your ability to use an active tank.
- There are many configuration options for a hunter ship - from weakly protected ones with huge DPS (damage per second - damage per second) to heavily tanked ones with barely enough DPS to destroy the target.
Tacklers (PvP)
The task of the tackler is to keep the enemy in place while the rest of the fleet destroy him. Target holding is essential in almost all PvP options, and almost always Tacklers fly cheap ships.
- almost any ship can be used for tackling, but frigates or interceptors are most commonly used for this role.
- The tackler's primary weapon, the warp disruptor or warp scrambler, is used to prevent the enemy from going into the warp. Warp scramblers also prevent him from using Microwarpdrives, greatly reducing his mobility.
- Stasis Webifier (mesh) slow down the ship you are tacking, allowing fleet members to destroy it faster or prevent the enemy from reaching the gate and leaving, even while under the effect of Warp scramblers (scramblers)
- installing Afterburner or Microwarpdrive will help you get closer to the target within the disruptor range faster, while at the same time you reduce incoming damage due to the increased speed of the ship
- using Sensor Boosters or Signal Amplifiers increases target acquisition speed, making it possible to tack targets that quickly enter the warp.
- The pinnacle of a tackler's career are Interdictors and Heavy Interdictors, capable of generating entire spheres (Warp Disruption Fields) that prevent all ships in their area of effect from going into the warp.
Sniper
The task of the sniper is to destroy the target from a distance of 100–200 km, often used in large fleets.
- you need a ship capable of using long-range weapons and, preferably, with bonuses for the combat distance. Examples: Megathron, Hound or even Eagle
- guns that deal instant damage (hybrids, lasers, or projectiles) or missiles (usually cruising). Fleet coms usually prefer to use ships armed with instant damage weapons, as missile platforms take time to damage the enemy and usually work on secondary targets.
- weapon upgrades of the selected type
- sensor boosters with range scripts in case of an electronic warfare attack
Ship for solo PvP
Such ships are difficult for novice players, but the possible production is worth it. Every time you leave the station, you risk your ship, encountering superior enemy forces in the hope of finding a helpless victim somewhere and taking everything from her.
- these are usually Force Recon (recons) or Heavy Assault Ships (HAKs), but in principle any fast ship can be used for solo PvP.
- if you are already flying solo, you should install a Warp disruptor or a Warp scrambler - there is no one to tack for you.
- the priority task for you will be maximum damage to the enemy ship. Use different ammunition with different types of damage for different purposes.
- (Optional) EW modules can be very effective in solo PvP. For example, Tracking Disruptors and Remote Sensor Dampeners.
- often such ships use stealth modules, especially those that allow you to warp while remaining invisible - Covert Ops Cloaking Device II. The element of surprise allows you to kill the enemy, one by one.
- some solo ships use their capacitor as a trump card, using Cap Boosters to be able to use Energy Neutralizers or powerful active tanking.
Fleet support
There are not many options for support ships and they all fly only with the fleet. They provide bonuses such as increased speed for all ships in the fleet, repairs to nearby ships, or even ECM options such as knocking out targeting systems on enemy ships. If your ship has an extra upper slot, the support module installed there will always help the fleet.
- these are usually battlecruisers or command ships with gang assist modules installed. Also very important is the help of logisticians, who often become the primary targets for the enemy. Alternatively, these could also be EW ships such as Blackbird or Rook.
- support modules increase certain characteristics of the ships of the entire fleet. Battlecruisers can fit one such module, commands - more. Activating these modules gives bonuses to all ships in the fleet that are in the same system. Such ships usually have some protection and fairly powerful weapons.
- logisticians carry out remote repair of shields, armor, transfer capacitor energy or indicate targets. At the same time, logisticians are usually heavily tanked ships.
- EW ships are capable of incapacitating the enemy in many ways - preventing them from capturing a target or shooting down an already captured one, breaking the tracking of enemy guns, highlighting the target with painters, inflating the signature and allowing them to deal more damage.
Tank
The task of the tank is to resist the onslaught of several enemy ships while other members of the fleet attack them or perform some other tasks.
These are usually ships with bonuses to shield or armor like Drake or Onyx, they also often have high shield regen rates and no need for capacitor energy.
- You will need to increase the effective hitpoints (total damage a ship can take) with modules such as Extenders, plates, extender rigs, trimark rigs, resistances, suitcases ( damage control) or PDS (Power Diagnostic Systems).
- Such ships should be able to drain capacitor energy from enemy ships (energy vampires), which will allow them to use an active tank for longer.
Mission ship
Such ships are the most specialized and are well described in various manuals such as .
Each subsequent level of the mission is more difficult than the previous one.
- Frigate or Destroyer recommended for Tier 1 combat missions
- Destroyer, Cruiser or Assault ship recommended for Tier 2 missions
- For level 3 missions, a battlecruiser or HAK (heavy assault ship) is recommended
- For missions of level 4, a battleship (battleship) or a specialized BC / HAK (battlecruiser / heavy assault ship) is recommended
Install an armor or an active/passive shield tank for the duration of the missions, the battles there are quite long.
By asking your agent for the details of the mission, you will see which NPCs you will have to face, set resistances against the type of damage that these NPCs deal. Most Tier 1 ships need an extra buff to their tank. It will be easier for your capacitor to keep the resists working than the repair modules.
Consider using ranged weapons like artillery instead of machine guns or cruisers instead of torpedoes. You will not have to waste time getting close to the enemy at an effective combat distance, while you will remain out of reach for many enemies, which is very useful, especially on high-level missions. Try to use light drones and smartbombs in free slots to destroy enemy frigates and destroyers at close range.
If you need speed, use AB (afterburner), MWD (microwarpdrive) does not work in deadspace.
Complementing the rest
After equipping a ship for one main purpose, you may find that there are still free slots left, in which case try to expand the functionality of the ship by installing modules to fulfill another role. For example:
PvP: give the ship ECM, tackle modules, add a shield or armor, or just increase the speed to make it easier to get away
PVE: increase the damage for the selected target or strengthen the tank from the type of damage that the NPC will hit you with. Alternatively, install modules that will increase your profits - a beam tractor or salvagers.
Resource requirement
At first, you will lack the skills to use the best equipment on the ship. How to get out of this situation?
- Tech 2 modules are expensive and require a lot of skill to install and use effectively - try using the named Tech 1 counterpart instead of Tech 2. Low level T1 modules are less CPU/PG demanding and cost a penny, although named meta Level 4 modules are usually several times more expensive than T2 modules.
- before you try to make a ship what it can never be, study all of it strengths. For example, an armored Raven is usually a bad idea, as it has few bottom slots and it is much more profitable and easier to tank it in a shield, since it has enough middle slots.
- if you don't have enough CPU or Powergrid, try installing Co-Processor I, Reactor Control Unit I, Micro Auxiliary Power Core I (a.k.a. MAPC), or Power Diagnostic System I. Using these modules is often common on some ships , but on others it may be a sign of a bad fitting.
- learn general skills that increase the ability to use any ship, these are skills from the Engineering, Electronics, Weapon Upgrades, Navigation and Spaceship Command sections.
Typical beginner mistakes
What not to do:
- Don't fly what you can't afford to lose. You will lose ships.
- Don't fly what you can't afford to lose. No kidding, you will lose ships regardless of your skill level.
- Don't chase two hares, you'll end up catching neither. Eg:
- don't try to fit your ship into both the shield and the armor tank, taking both the lower and middle slots. One type of tank is enough.
- do not try to install different weapons, such as railguns along with blasters. You will be equally ineffective both at long range and at close range. Choose one thing and work from the chosen distance.
- Don't ignore the ship's initial bonuses, try to use them effectively. Install the correct racial weapons, work with ship bonuses, do not install anything that is not put on this ship (for example, guns from a frigate to a cruiser)
- Do not install extra modules that give a penalty for alignment (for example, 5 gyro-stubs - Gyrostabilizers). You will not receive special benefits, rather the opposite.
- Do not try to fit ships with a lack of middle slots into a shield tank and ships with a lack of bottom slots into an armor tank. For example, it would be a bad idea to fit the Abaddon shield.
- Don't fly blindly over lowsecs or zeros. You will lose your ship. Stay in highsec until you're ready for it. Then ask a more experienced comrade to accompany you, take an inexpensive ship and upgrade your clone.
What to do:
- Always learn how a certain ship fits. Learn from the mistakes of others and you won't make your own.
- Feel free to experiment with the ship's equipment. If something doesn't seem to work well enough for you, try something else. use EFT for theory or test server, Singularity, if you want to try your ideas in practice, only then use on the main one.
Conclusion
Believe it or not, this is only the beginning. There are a lot of things in the game that have not been covered in this guide, and the explanations provided are just the basics. Consider that we gave you a brush and paints, told you how to use them, and what you draw on the canvas (your ship) depends entirely on you. The possibilities are endless and you will surely find your own perfect fit that suits you personally. Read the forums, chat with the pilots in the game, use the in-game help channels, and you can also find some tips on fitting in EVElopedia. Have fun!
The game is similar to a constructor with several levels, it becomes possible to create a unique vehicle with different capabilities, both for warships and civilians. Fitting or fittings in EVE online make it possible to equip your ship only as it is included in its basic characteristics. Despite this, hundreds of equipment variations can be made for each ship, each of which will have its own unique characteristics.
fit- a certain selection of modules (set) installed on the ship.
Mission Fits
For missions in EVE Online, you need to use different ships, depending on the level of the mission. In total missions are divided into 5 levels. Below we will analyze examples of fits for PVE and PVP missions modes. As well as the most optimal ship and feats on it for completing the mission up to level 3-4. To pass level 5, it is desirable to acquire allies.
Fits for PVE mode
In PVE mode, the best option for a ship is a drake. This ship is used by both newcomers to the world of EVE Online and players who have been plowing space for many years. The main mistake of beginners is pumping the tank's assets and an incommensurate increase in exp. Excluding these errors, the best option would be to use the passive of the tank with high shield regeneration.
An example fit suitable for PVE on the drake. Under the high power connector we put Heavy Missile Launcher II x 6. At low power we install two second Shield Power Relays. There are also two ballistics control systems. Batteries for the shield are sent to the middle level in the amount of two pieces. On resistors, the choice stopped at adaptive and EM. Next up are two Large Shield Extenders to increase the shield. Heavy Missile Launchers are used as cannons.
Fits for PVP mode
There is no ideal fit for pvp mode. The key role here is played by the style of combat and preferences in the ships used. Also, each pvp duel is unique in its own way, so feats for ships work well against some opponents, and may be completely useless against others.
Ready Fits
Choosing the right fit for yourself is not an easy task, it can take a lot of time. So it's not a bad idea use ready-made feats to suit your ship and combat style. Over time, this option can be improved based on the experience gained. And remember, different sets of items affect the final characteristics in different ways.
Gradually, everything changes, some feats that worked before become useless, while others gain success on the battlefield. It is important to always be aware of the trend and periodically change the builds used.
This is better to do. In this article, we will consider what body kit you need for these ships.
Exploration Equipment in EVE
Let's start with what equipment you need for this. Let's go through the slots:
High Slots
- Core Scanner Probes- probes for detecting coordinates of signatures.
- Combat Scanner Probes- these probes also allow you to determine the coordinates of ships and structures in space.
- Sisters Core Scanner Probes- have a small bonus to the strength of the scan.
- Probe Launcher: probcomet, a module that launches scanning probes into outer space. Without it, no scanning is possible.
Variations of this module:
- Core Probe Launcher I- the easiest variation, requires the Actrometrics I skill.
- Core Probe Launcher II- T2 variation, gives an additional 5% to the strength of the scan. True, demanding in terms of skill - Actrometrics V.
- Expanded Probe Launcher I- This option allows you to launch Combat Scanner Probes. The module is demanding in terms of CPU and energy, so it will not fit into every ship.
- Expanded Probe Launcher II- variation of T2 of the previous module.
- Sisters Core Probe Launcher- fractional cork launcher, gives an additional 10% to the strength of the scan. The disadvantage is that it costs decent money (25-30kk).
- Sisters Expanded Probe Launcher- Factional Probe Launcher.
In most cases, Core Probe Launcher I and Sisters Core Scanner Probes will suffice.
Mid Slots
- Relic Analyzer I: module for hacking containers on relic sites. Requires the Archeology I skill. T2 variation: Relic Analyzer II, requires the Archeology V skill. If you decide to take exploration seriously, then you need to pump it into V. Yes, it's about two weeks, but, believe me, the difference is dramatic, because it increases the coherence to 110 units. So it's worth investing and pumping it.
- Data Analyzer I: module for hacking containers on data sites. Requires Hacking I. Variation T2: Data Analyzer II, requires Hacking V. Similar to the module for hacking relics. Some time ago, the dates were awakened, so the loot from them is also not weak.
- Scan Acquisition Array I: An upgrade that increases the scan speed. Requires Astrometrics Acquisition II. Variation: Scan Acquisition Array II, much more demanding as it takes about three weeks to pump from IV to V.
- Scan Pinpointing Array I: An upgrade that reduces the error in determining coordinates by 10%. Requires Astrometrics Pinpointing II. Variation: Scan Pinpointing Array II which is skill demanding (requires V).
- Scan Range Finding Array I: An upgrade that increases scan power by 5%. Requires Astrometrics Rangefinding II. Variation: Scan Pinpointing Array II which is skill demanding (requires V). It takes more than forty days to pump it.
- Cargo Scanner I- a module for determining the contents of a container before it is hacked, requires the skill CPU Management I. The thing seems to be necessary, but there are two points. Firstly, if you find out that there is, say, 50kk loot in the cont, and then you screw up the hack, then you will be upset. And so you can always tell yourself that there was junk (and it happens sometimes). The second point is more pragmatic. Slots are not superfluous and it is better to put some kind of upgrade that improves the scan or combat kit.
Now for equipment that is not directly related to scanning.
High Slots
Cloaking device- a thing vital for exploration. The question is which device to choose. For safe movement between systems, it is better to take the Covert Ops Cloaking Device, which will allow you to warp in a state of invisibility. In other cases, such as scanning in the BX homework, this is not required. You can get by with simpler variations.
Mid Slots
Afterburner or Microwarpdrive A: Speed is everything, no matter what you do. Sometimes, the distance between containers exceeds a hundred kilometers, so dragging from point to point at normal speed will be hard. Again, if you get into a fight, then you also need to be fast (or be dead) here. What to choose? Afterburner will allow you to get out of the scrum radius and warp while the MIA is blocked. On the other hand, the Ministry of Internal Affairs gives a more significant increase in speed - more than 2000 m / s, if we are talking about a frigate. Therefore, you will move between contacts much faster.
If you use a hybrid fit that allows you not only to break the contacts, but also the ships of competitors, then you can shove modules to strengthen the shield, or scramblers and grids into the midslots.
Low Slots
If you have an armored ship, then modules to enhance armor will go here. If you do not have enough CPU or power, then install the appropriate upgrades. Another option is to stuff warpstabs in there so that they can't catch you, or speedboats to fly faster.
rigs
- Small Emission Scope Sharpener I: Increases Relic Module efficiency by 20% and Virus Strength bonus by 10. (40% and 20 units for the T2 version of the module).
- Small Capacitor Gravity Upgrade I: Increased scan power by 10% (15% T2 version of the module).
- Small Memetic Algorithm Bank I: bonus to the strength of the virus 20% (40% and 20 units of the T2 version of the module).
- Small Signal Focusing Kit I: speed up scan by 15% (20% for module version 2).
Ship Fits for Exploration

First, an important caveat. Using faction cruisers or T3 for pure exploration is heresy and stupidity. Breaking containers with a ship costing 600-700kk (or even more) is irrational in terms of possible losses and potential benefits. Moreover, flying an Astero fitted only for scanning and hacking is also not right. Therefore, only frigates with bonuses for scanning and hacking will be considered below.
Further, the fit will directly depend on where you live. If you live in the Empire and surf BX or lowsec, then this is one fit. If you permanently live in VX and you have a hangar with several ships and a bunch of body kit in the warehouse, then this is different.
In case you live in VX permanently, I recommend using two different ships. One is purely for scanning, the other is for breaking containers. The fact is that if you have, say, a static in C1-C3, then it is easier to scan for signatures, return and transfer to another ship. A sharpened scanner can cope with the task faster than a station wagon that both scans and breaks. Again, it is better to set rigs for a clear task. The second point is that I would not use T2 frigates for this case and would not put a carpet shred. An attack is possible at any time, so the task of minimizing losses is always relevant. In addition, T1 versions have some advantages. For example, Magnate has four lowslots where you can put warpstabs and thus solve the Scrum problem.
Now for specific feats. Let's start with a clean scanner.
Fitting for scanner (Heron)
Ship: Heron
High Slots
Prototype Cloaking Device
Sisters Core Probe Launcher (or Core Probe Launcher II if skills permit), Sisters Core Scanner Probes.
Mid Slots
Scan Acquisition Array I
Scan Pinpointing Array I
Scan Range Finding Array I
Scan Range Finding Array I
Scan Range Finding Array I
Low Slots
Warp Core Stabilizer II
Warp Core Stabilizer II
rigs
Small Capacitor Gravity Upgrade I
Everything is simple. They warped from under the POS field to the safe spot or to the neighboring system, released the plugs and went to the clock. Scanned, zabukali and back. MIA and afterburners are not needed. Maybe someone will say that there are stubs too, but who knows, anything can happen on the way to the exit from the hole.
Fitting for container cracker on relic and data sites
As a contact breaker, Magnate is a good choice. This frigate has four lowslots, where you can put four warpstab. This will reduce the chance of you being scolded, and the afterburner will give you a chance to stomp out of the net radius and fly away. Fit next:
High Slots
Prototype Cloaking Device
Core Probe Launcher I
Mid Slots
1MN Afterburner II
Data Analyzer II
Relic Analyzer II
Low Slots
Warp Core Stabilizer II
Warp Core Stabilizer II
Warp Core Stabilizer II
Warp Core Stabilizer II
rigs
Small Emission Scope Sharpener I
Let's move on to ships and fittings for surfing the systems.
Fitting for exploration and hacking relic and data sites
Ship: T2 Explorer preferred (Anathema, Buzzard, Helios, Cheetah). Which one to choose depends on how good you are at assessing the system for danger and how often you click on the subscan. In my subjective opinion, it is better to choose Buzzard or Helios, since they have 5 midslots. You can shove not only two analyzers, but also upgrades for scan power. So, a fit for a lonely exploration of systems in lowsec, zeros and VX.
Ship: Buzzard
High Slots
Covert Ops Cloaking Device
Core Probe Launcher I, Sisters Core Scanner Probes
Mid Slots
5MN Microwarpdrive I
Data Analyzer II
Relic Analyzer II
Scan Range Finding Array I
Scan Acquisition Array I
Low Slots
Nanofiber Internal Structure II
Micro Auxiliary Power Core I
rigs
Small Memetic Algorithm Bank I
Small Memetic Algorithm Bank I
So what do we have? A nimble boat that can safely move both between systems and in contacts on the relic. Nanka and the Ministry of Internal Affairs can accelerate it to 2300 m / s and more, which will greatly speed up the processing of the signature. Disadvantage: if you are scolded, then you will not be able to escape. Therefore, when flying on such a fit, look around more often.
Exploration tactics. We fly into the system, conduct an assessment, and if the system is without suspicious ships, we fly to the safe spot. We let out corks and go to the cloak. Vyskanie signatures, booze, pick up traffic jams. We start to break, looking at the podscan.
Mixed Feats: PvP and Exploration

The most interesting and, most likely, controversial. Hybrid fits that can be used to explore, break and engage in PvP. Everything is pretty simple. We take a frigate in a PvP kit and put a module for breaking dates or relics in one of the midslots. It will be worse for scanning, although breaking on it will be quite comfortable. What ships are best suited for such purposes? In my opinion, the choice is between the T1 and Astero racial frigates.
The advantages of T1s include that they are cheap and most often not expected to attack. If Heron or Imicus suddenly appears on the subscan, then hardly anyone will expect an attack from him. These frigates are usually used by beginners for their first trips. At the same time, seemingly harmless Heron can be fit so that he will give out 90-100 dps. A cannon in a highslot, five evil drones in a hangar - this is quite enough to dismantle a comrade on a ship of the same class. The disadvantages include the fact that against the same Astero it will be difficult for such a frigate to oppose something. Biting variant Imicus presented below:
High Slots
125mm Gatling AutoCannon II, Republic Fleet EMP S
Core Probe Launcher II, Core Scanner Probe I
Mid Slots
1MN Y-S8 Compact Afterburner
X5 Enduring Stasis Webifier
J5b Enduring Warp Scrambler
J5b Enduring Warp Scrambler
Low Slots
Micro Auxiliary Power Core II
400mm Rolled Tungsten Compact Plates
rigs
Small Ancillary Current Router I
Small Trimark Armor Pump I
Small Trimark Armor Pump I
Hobgoblin II x4
Warrior II x4
Now for Astero. Of course, this is the best option for hunting explorers. Nimble, ragged, having the largest dronebay in its class - 75 cubic meters. There you can pack 15 light drones. The tactics here are simpler than a steamed turnip. We scan for dates and relic sites, leave convenient beeches and wait for some "fearless space explorer" to fly into our light. So he flew in, showed up and goes to break contacts. We sneak up to the distance of the scammer or grid and disintegrate at the moment when the fearless explorer is busy breaking into the container. This is the most convenient moment. Lochim, scrum, launch drones, ..., profit.
Here is a variant of the combat fit on Astero(however, under a different tactic than described above):
High Slots
Small Infectious Scoped Energy Neutralizer
Mid Slots
1MN Y-S8 Compact Afterburner
J5b Enduring Warp Scrambler
J5b Enduring Warp Scrambler
Small Electrochemical Capacitor Booster I, Navy Cap Booster 200
Low Slots
Navy Micro Auxiliary Power Core
400mm Crystalline Carbonide Restrained Plates
Reactive Armor Hardener
Energized Adaptive Nano Membrane II
rigs
Small Trimark Armor Pump II
Small Trimark Armor Pump II
Small Ancillary Current Router II
Drones:
Hornet II x5
Hornet II x5
Acolyte II x5
The disadvantages of Astero include cost and recognition. A normally fitted frigate will cost 100-110kk, and any gang of two or three of the same ships can dismantle it for parts. On the other hand, experienced explorers know that Astero flashing on the subscan is a signal to get out.
It seems like everything. Of course, one can argue about feats and ships ad infinitum. So if you have a desire - share your thoughts in the comments.
EVE is a fairly complex game, which is obviously why players have created quite a few programs to make their lives easier.Unfortunately for those who are not familiar with English for one reason or another, the interface of these programs is in English.
I'll start with what my friends are interested in, and continue with what seems interesting to me.
If you have questions about any specific program - write, I'll think about it.
I.EFT or EVE-Fitting Tool
1. Installation.
EFT allows you to fit a ship before you buy it, view parameters such as DPS, defense, speed, and more. On off. EVE website, there is a link where you can download it. http://myeve.eve-online.com/ingameboard.asp?a=topic&threadID=548883 Obviously, the author has not got a website yet, so I have to take links from there.Download the ZIP archive, unpack it to any directory on the disk, and the program is ready to go.
It is launched using EFT.exe, if a new version has been released, it is enough just to overwrite new files on top of the old ones.
All variations you create will be stored in the setups directory, for example if you've run a Minmatar Rifter fuse, all data will be in a file called Rifter . Quite convenient if you want to share with someone.
However, if you make multiple variations for the same ship, they will all be written to the same file.
If you want to add someone else's version to yourself, then you should not rewrite your file, just open it with any text editor and copy the additional data.
The file structure is extremely simple, first comes the name of the variant, and then all installed modules are listed in text form.
Move the cursor to the very bottom, and insert an additional setup , just in case, make sure that the name does not match those that already exist.
2. How to add your character.
To do this, you need a User ID , and an API Key.You can get them here https://support.eveonline.com/api , in the process you will need to enter the login and password of your EVE account.
If the API falls into other hands, then it can track almost everything that happens to you in the world of EVE, so handle it with care. In principle, EFT has a built-in profile with all skills at level 5, you can use it, or change it as you need. A matter of taste.
After we got the API , we launch EFT , and click on CTRL + C , or exit to the Character Editor through the View menu.
Click on the Import button
Then on the small icon on the right side Create New Character , name it something, select in the Character menu what we just created (in this example test ) and get something like the following picture:
This article is deprecated and no longer in use. Please visit PYFA , an alternative fitting tool, for current info.
The EFT project has been abandoned by Gripen, its author, since March 2016. Fitting stats on a variety of modules and ships have been changed since that time, and so EFT can now generate inaccurate fits. Use of EFT is no longer recommended.
| EVE University offers a class on: |
|
EVE Fitting Tool, or EFT, is one of the most widely used 3rd party applications by players. It allows you to create and experiment with different ship fittings without the need to be in the game. By adding your character information, it can let you know if you meet the requirements for the fitting or what skills you lack for the proper fit. The step-by-step visual guide below is aimed at providing you with a good understanding of how to use the program and interpret the information it displays.
To download EFT you should follow the link in the opening post of this thread on the official EVE online forums. Do not download EFT from anywhere else.
content
Step One: Importing Your Character
The first thing you will want to do after starting EFT is import your character information. This can be done by opening the "Character Editor" under the "View" menu option or pressing Ctrl + C.

By default, EFT provides you with a "All level V" character. To use your own skill set, first click the "Create new character" icon just to the right of the drop down menu.

This will open a new window to type in your character"s name. After hitting "Ok", the drop down menu will select and display your newly created character.

To import the current skills from your character, click the 3rd small icon, named "API skill import".

On this screen, you will need to input your character's API key which can be obtained here: if you have existing API for this purpose or if you want to create a new one . When you have input the information, click "Next" which will pop up another window allowing you to select the character information you want to import.

Keep in mind, this only imports your character"s current skill information and does not anticipate any future training. It will not import any implants your character has either. However, you can add implants by clicking the "Implant" button and browsing the trees available. When you have found the right implant, double-click it to add it to your character's stats. Active implants are displayed by a green check mark.

One other useful thing to know is that you can modify your character"s skill levels manually. This is very helpful if you want to compare ship stats with your current skill level versus any anticipated training.

Just remember that you can use the "Quick import" button to "reset" your skills back to their original state should you forget which skills you modified.
Now that you have added your character, it is time to work with your ships.
Step Two: Using the Ship Window
To open a ship window, click the "File" menu tab and select "Open ship browser..."

This will open the selection window where you can browse all the different ships available. Clicking a ship will show its stats and bonuses to the right.

Once you start adding and saving fits, you will notice that each selection will indicate the number of setups that you have for that ship type. When you have found the ship you want to fit hit "Ok". The ship window will open up and if you do not already have any fits for that ship it will ask you to create a new one. Click "Yes", type in the name you want to save the fit under, and hit "Ok".

From here, you will want to familiarize yourself with the display. You can select the character you want to work with in the drop down box at the top. Mousing over the various icons in each section will display specific information. For example, mousing over the question mark in the top left will display the ships information and bonuses.

The icons under "Defence" and "Targeting" will also indicate the ability to right-click and alter the displayed information or variables.

Once you are comfortable with the display, you can start fitting your ship.
Step Three: Fitting Your Ship
On the left side of the EFT screen, it will have various categories which can be expanded to find different modules.

You may also search for specific types by typing the name in the search window at the top. In certain categories you can show faction or other specific modules by clicking the buttons at the bottom of the window.

To load a module, click and drag the module into the appropriate slot on the ship window. When a module is loaded you will notice that it will change various stats on the right side of the ship window. You can overload or place a module offline by clicking the icon to the left of the module itself.

Right clicking the module will allow you to change ammunition types and view other info.

Clicking "Show Module Info" will pop up a window displaying the various stats and requirements to fit the module.

You will notice that it gives the price for the module itself. As you load a module onto the ship, it will automatically pull the average price information from the EVE-Central database if you are on an active internet connection. As you fit more and more modules, the ship window will calculate the estimated total cost for that fitting in the bottom right. Keep in mind that not all modules have price data loaded on the EVE-Central site and it may not be completely accurate depending on the region you are in.
Some ships have the ability to carry drones. If you wish to add those to the fitting, click the "Drones" button at the bottom right of the ship window. From here you simply click and drag the drones you wish to fit. To put them online, click the check box.

When you have finished loading all the modules you wish to fit to a ship, the display window will indicate if you have the proper skills. The color icon next to your characters name will either be red or green. If it is red, you can mouse over to show which skills you still need to be able to fit the modules.

Keep in mind that even though you may have the required skills, they may not always be enough to fit the modules effectively. Other things such as the Powergrid or CPU requirements may still hinder you from flying with that fitting. If this is the case, it will show the overage in the top right.

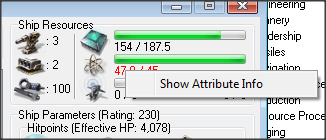
To get some suggestions on what skills or other modules can make up for the difference, right click the attribute and select "Show Attribute Info", then "Affected by".

Once you have finished creating a fitting, you have a couple of options. If you wish to work with the same ship, you can click the arrow down icon next to the "Current Setup" drop down menu to manage the setups.

It also features options to export the setup to various formats. If you are finished working with that ship type, click the X in the top right of the ship window to close it and save your setup.
That"s all there is to it! EFT when used properly is a very useful tool to create your own ship setups and help you further develop your character in game. As EFT is updated, this page will be updated to reflect those changes. Feel free to add your own useful tips and tricks as needed below.
Other Useful Tips
Importing fits from EVEMon
EFT offers the option to import saved ship setups that you may find online or pull from EVEMon. To do so, open the "File" menu and click "Import fit from XML...".

In this window, you can specify where your saved XML files are, import them, and also export your current setups into one large file.
Export/Import fits between EVE and EFT
From EFT to the Game
EFT offers the option to export files in XML format that you can import in game.
When you have a fit open in EFT, click the drop-down menu to the right of the name of your fit, and select Export to XML. The default EVE file path for fittings under Windows is "...\My Documents\EVE\fittings", so save it there. In game, go to the Fitting Management window (by opening up the fitting window (ALT+F) and clicking the Browse button near the bottom right). The Fitting Management window has an Import button, and the rest should be obvious.
From the Game to EFT
There's an Export button in the game's Fitting Management window, which (guess what) exports all your fits in a single XML file. Export fittings in game first, then in EFT, go to File -> Import/Export to Eve -> Open XML File Manager to look at the exported XML files.
Importing fits via clipboard
Fits can be imported from text format via the clipboard. Copy the fit (for example from the wiki or a forum post) to the clipboard by marking and pressing CTRL-C. Click on the EFT window to give the focus to EFT. A dialog will appear, asking if the fit should be imported to EFT.

DPS charts
If you wish, EFT also offers the ability to compile DPS charts based on ship setups that you have saved. To use this function, you would need to have multiple ship windows open each with a different setup selected. From here, open the "File" menu and click "New DPS Graph". This will pop up a new window.

Right click to select the attacking and defending ships. The graph will display your DPS versus the range of the targeted ship.

You can also adjust the velocity at which the ships are traveling and clicking on the line will show the transversal velocity of the two combating ships.
Adding damage profiles
It "s possible to add damage profiles to your defense icon, in order to see how your tank/ehp will act against specific damage type proportions.
The syntax is as follows:
DamageProfile=Name,EM,THERM,KIN,EXPL
Below you will find a list of damage profiles for various NPC factions and several popular ammunition types. To use them in EFT just copy/paste the following at the very end of your config.ini file in your EFT directory.
- NOTE: EFT must be closed when modifying the .ini file.
DamageProfile= Angel Cartel,480,0,719,3058
DamageProfile= Blood Raiders,613,570,60,0
DamageProfile=EoM,0,618,1718,0
DamageProfile= Guristas Pirates,0,570,3504,0
DamageProfile= Mercenaries,90,634,424,108
DamageProfile= Mordu's Legion,0,30,70,0
DamageProfile= Rogue Drones,86,91,281,964
DamageProfile= Sansha's Nation,1945,1598,0,0
DamageProfile= Serpentis,0,1627,1320,0
DamageProfile=Amarr,1204,1349,0,0
DamageProfile= Caldari,0,795,944,0
DamageProfile= Gallente,25,781,1127,0
DamageProfile= Minmatar,615,310,815,1633
DamageProfile= Antimatter,0,5,7,0
DamageProfile= Null,0,6,5,0
DamageProfile= Spike,0,4,4,0
DamageProfile= Multifrequency,7,5,0,0
DamageProfile= Scorch,9,2,0,0
DamageProfile=Aurora,5,3,0,0
DamageProfile=EMP,9,0,1,2
DamageProfile= Phased Plasma,0,10,2,0
DamageProfile=Fusion,0,0,2,10
DamageProfile= Barrage,0,0,5,6
DamageProfile= Tremor,0,0,3,5
DamageProfile=EM,1,0,0,0
DamageProfile=Thermal,0,1,0,0
DamageProfile=Kinetic,0,0,1,0
DamageProfile=Explosive,0,0,0,1
With these damage profiles you"ll be able to see how effective your tank is against specific enemies/weapons. Both your DPS tank and your effective HP ratings will be recalculated based on the damage type you use, by default EFT is using a balanced damage profile (which is the reason why the numbers might differ from the numbers shown by the ingame fitting screen, as the ingame fitting screen is using your lowest resists to calculate the effectiveness of your tank).
Creating an All Level X Character
Occasionally you may prefer to test all level X values without having to change everything using the drop-down menus. Within the Character Editor, select the character and click the second button from the left for "Rename\Duplicate character." Enter the name All level X (or something similar) and click OK. Go to your EFT directory, then into the Characters directory. Open up the character file for your new All level X with Notepad (or some other basic text editor program), then use the replace all function to change the 5s to your target level. Save the changes and you"ll have an "all level X" character for your theorizing pleasure. This will accept otherwise impossible sets of skills (eg you could have weapon upgrades to 3 and advanced weapon upgrades to 3 even though advanced weapon upgrades has a prerequisite of weapon upgrades 5).


