Light cruisers of the Sydney class. In general, Australian laws don’t have to be followed, the main thing is to communicate this in small print. That same fight
HMAS Sydney
Historical data
Total information
EU
real
doc
Booking
Armament
Same type ships
General information
HMAS Sydney became the first light cruiser of the type to be built Amphion(which is why it is sometimes called type Sydney). What is characteristic is HMAS Sydney was laid down a few days after the laying of the first ship of this type - HMS Amphion, but entered service almost a year faster than its sisterships due to the higher quality work of the shipyard. An interesting fact is also that the ship was laid down under the name HMS Phaeton and was intended for service with the Royal Navy, but during construction was transferred to the Australian Navy and renamed HMAS Sydney. In exchange for 3 cruisers of the type Amphion Australia handed over a seaplane carrier to the mother country HMAS Albatross .
The ship is also called Sydney (II), as it was the second ship of the Australian Navy with that name. Besides this ship's name Sydney worn:
- HMAS Sydney (1912)- Town-class light cruiser
- HMAS Sydney (1948)(when bookmarking - HMS Terrible) - aircraft carrier type Majestic
- HMAS Sydney (1980)- frigate type Adelaide
On November 19, 2015, another ship was laid down HMAS Sydney- destroyer type Hobart, which should come into operation by 2020.
History of creation
Predecessors
Communications, detection, auxiliary equipment
HMAS Sydney became the first Australian ship to be equipped with the British-made Type 125 sonar. Also on board were 4 × 47 mm Hotchkiss rapid-fire salute guns.
Modernization and refurbishment
In the summer of 1940, the ship underwent minor modernization - the number of 7.62 mm Lewis machine guns was reduced to 9, and the 7.62 mm Vickers machine guns and 47 mm Hotchkiss saluting guns were removed. In December 1940, as part of a minor repair, demagnetization equipment was installed on the cruiser.
Service history
Pre-war period
- HMAS Sydney completely completed the tests and left Portsmouth on October 29, 1935. Immediately after leaving the port, he receives orders to go to Gibraltar to join the 2nd Cruiser Squadron of the British Navy, whose task was to enforce economic sanctions against Italy.
- In January 1936, the cruiser underwent maintenance in Alexandria, and in March HMAS Sydney was reassigned to the 1st Cruiser Squadron, where he continued to monitor compliance with sanctions against Italy and participated in British naval exercises.
- With tensions easing, the cruiser set sail for Australia on July 14, 1936, arriving at the port of Fremantle at the end of July. On August 8, the ship visited Melbourne, and on August 11, it visited Sydney, after which it was named.
- In Australia, the cruiser spent most of her time on exercises and training cruises. At the beginning of August 1939 HMAS Sydney was in the port of Darwin. Due to the worsening situation in the world (which served as the beginning of World War II), the cruiser received orders to arrive in Fremantle, where she arrived on August 22, 1939.
Service early in World War II
 HMAS Sydney in the port of Fremantle, 1939
At the time of Britain's entry into World War II, September 3, 1939, HMAS Sydney was at his base in the port of Fremantle. Its crew was transferred to wartime staff and increased to 645 people. First combat missions HMAS Sydney were patrolling and escorting ships in Australian waters.
The cruiser participated in Indian Ocean patrols until the end of 1939, when she was ordered to return to Sydney for docking and Christmas layover. On February 8, 1940, the ship again arrived on combat duty to the western shores of Australia. From February to April 1940, the ship escorted convoys off the coast of Australia and in the Indian Ocean.
May 1, 1940 HMAS Sydney returned to Fremantle after escorting another convoy and received orders to proceed to Colombo at maximum speed. Having stopped in Singapore to refuel, the ship arrived in Colombo on May 8, 1940. However, on May 12 she received orders to sail to the Mediterranean Sea, and on May 26 she arrived in Alexandria, where she joined British forces in the Mediterranean.
Service in the Mediterranean
At the beginning of June 1940 HMAS Sydney participated in the exercises of the 7th cruiser squadron, where she quickly gained a reputation as a well-prepared and, most importantly, successful ship. June 10, 1940 Italy declared war on Great Britain. HMAS Sydney at that time he was in Alexandria and received orders to immediately go to sea to search for the Italian fleet and ensure the safety of navigation in the eastern Mediterranean and the Aegean Sea. During the patrol, the ship never encountered the enemy.
June 21, 1940 HMAS Sydney took part in hostilities for the first time - the shelling of the Italian port of Badria. The ship's artillery fired at the military base for 22 minutes. At the same time, a Supermarine Walrus seaplane launched from the ship was mistakenly attacked by British aircraft. Pilot T.M. Price managed to land the plane, but it was beyond repair.
On June 22, France signed an armistice with Germany, which meant that French ships were to be disarmed under the supervision of German and Italian forces. The command of the British fleet ordered to prevent the French fleet from crossing over to the German side at any cost. In Alexandria, where he was at that time HMAS Sydney, the entire British fleet was ordered to aim its guns at the French ships and be ready to open fire. However, the conflict was resolved peacefully, the French ships were disarmed and their crews were reduced to 30%.
June 28, 1940 HMAS Sydney participated in the pursuit of 3 enemy destroyers discovered by allied aircraft. Realizing that they could not escape pursuit, the destroyer commander Espero sacrificed his ship to allow the remaining 2 destroyers to leave. After a long fight HMAS Sydney sunk Espero and, having picked up 47 surviving Italian sailors, set off for Alexandria. On June 30, the ship was attacked by Italian aircraft and once again confirmed the reputation of a lucky ship without receiving any damage.
July 9, 1940 HMAS Sydney participated in the battle off Calabria, where she acted together with the rest of the cruisers of the 7th squadron.
July 18 HMAS Sydney left Alexandria with the destroyer HMS Havock in the direction of Athens, where they were supposed to join the flotilla of British destroyers in the Aegean Sea and defend the northern coast of the island from the Italian fleet. Crete. July 19 radar HMAS Sydney discovered 2 Italian cruisers trying to avoid a collision with the British fleet. As it turned out later, the Italian cruisers Bartolomeo Colleoni And Giovanni delle Bande Nere went to Libya with a load of fuel and ammunition placed directly on the decks. The Italian ships suspected the presence of British destroyers and decided to turn back to the shores of Italy when they suddenly encountered HMAS Sydney and the accompanying destroyers. HMAS Sydney managed to sink Bartolomeo Colleoni and seriously damage Giovanni delle Bande Nere with virtually no damage. This battle went down in history as the Battle of Cape Spada.
After this significant battle, the cruiser carried out patrol and convoy escort missions until the end of 1940. So, July 27, 1940 ship with HMS Neptune participated in the sinking of an Italian tanker Ermioni, and on September 3-4, 1940, disguised as an Italian light cruiser of the type Condottieri, fired from the sea at the air base in Scrapanto.
After minor repairs carried out in Malta, on January 8, 1941, the cruiser received orders to return to the Australian coast. The plans were to carry out a large-scale modernization of the cruiser (mainly it consisted of strengthening air defense) and rotate Australian ships in the Mediterranean Sea. The cruiser's immediate task was to protect the coast of Australia from German raiders and the Japanese fleet. Along the way HMAS Sydney Several times he was involved in escorting merchant ships and searching for German raiders in the Indian Ocean. On February 5, the ship arrived at its base in the port of Fremantle.
During 8 months of service in the Mediterranean, the cruiser's crew lost only one sailor, who died due to illness.
 HMAS Sydney in combat camouflage
Service off the coast of Australia

The ship is in camouflage as of August 1941.
- On February 9, 1941, the cruiser arrived in Sydney, where its crew was greeted as heroes. After a short renovation, HMAS Sydney departed for Fremantle 27 February 1941. and received tasks to accompany convoys and conduct patrols in the Indian Ocean.
- April 19, 1941 The ship carried the Australian delegation to Singapore for a secret meeting of representatives of the British Commonwealth, the Dutch East Indies and the United States.
- Already May 15, 1941 The cruiser arrives in Singapore again, now with the task of escorting transport ships that were delivering troops to Singapore.
- All summer 1941 HMAS Sydney was engaged in escorting convoys in the Indian Ocean.
- On September 19, 1941, after being painted in a new camouflage, the cruiser left Melbourne for Fremantle with the task of patrolling the west coast of Australia.
- During October 1941 The cruiser traveled the entire western and northern coast of Australia, escorted convoys, and carried out reconnaissance of minefields.
Finally, on November 17, the cruiser received orders to return to Fremantle, where she was scheduled to arrive on the evening of November 20.
Death

Battle scheme
November 19, 1941 the cruiser met with an unknown merchant ship, which was sailing at a speed of 14 knots towards the coast of Australia. The cruiser commander made an unacceptable mistake and approached an unknown vessel, which introduced itself as a Dutch transport Straat Malacca, at a distance of 1.3 km. For almost an hour the ships exchanged flag signals until at 17:30 it became clear that the unknown ship was a German auxiliary cruiser Kormoran .
After a half-hour battle at close range, the opponents dispersed. Kormoran received serious damage to the engine room, in addition, a fire started on the ship, which threatened the ammunition magazines, so at 18:25 the commander ordered the crew to abandon ship. Surviving crew members Kormoran stated that they saw a glow on the horizon from a fire on board HMAS Sydney until 22:00.
As it turned out later, HMAS Sydney, having received severe damage, retained controllability and tried to approach the shore, but at a certain moment lost buoyancy, capsized on the left side and sank.
Of the 645 crew members who were on board at that moment, none survived. This was the largest loss of the Australian fleet in its entire history, and HMAS Sydney became the largest Allied ship to be lost along with its entire crew during World War II.
Search for remains HMAS Sydney

Remains of the cruiser (computer reconstruction)
After all possible deadlines for the ship's arrival in Fremantle had passed, the command of the Australian fleet began the search for the missing cruiser. November 26 HMAS Heros discovered a damaged empty lifeboat, which was identified as a lifeboat with HMAS Sydney.
The Royal Australian Navy received its baptism of fire on November 9, 1914. In the battle of Cocos Island, the cruiser Sydney sank the German raider Emden, forever leaving her name in naval history.
In this battle, the Australians paid for the death of Russian sailors from the cruiser Zhemchug, sunk by Emden on October 28, 1914. At the beginning of the First World War, a German squadron consisting of two armored and four light cruisers operated in the Pacific Ocean, among which was the Emden, built in 1908, a light armored cruiser with a displacement of 3,592 tons, armed with 10 4.1-inch caliber guns. Being the last of the German cruisers to have steam engines, it developed a relatively low speed (24.1 knots). This raider's combat career, which lasted only a little over three months, was so successful that he forever reserved his place in naval history. Painting by artist A. Burgess - Burning "Emden" On the thirty-first of July 1914, the "Emden" left the port of Qingdao, a German naval base in China. It was obvious that only a few days remained before the largest European states entered the war, and the captain of the German cruiser Von Muller chose to meet her on the high seas. On August 2, the Emden crew learned that Germany had declared war on Russia and the very next day, having learned that France had joined Russia, the captain of the German cruiser Von Muller began hunting for the ships of the Allied powers. Cruiser "Emden" On the Fourth of August, near the island of Tsushima, "Emden" met the Russian steamer "Ryazan" with a displacement of 3,500 tons, heading to Nagasaki. The Ryazan, which had about 80 passengers and some cargo on board, tried to evade pursuit into the waters of neutral Japan, sending radio signals for help to Vladivostok. Having jammed the radio signals of the Russian steamer, the Emden, after an hour-long chase, overtook it and forced it to stop with a series of 12 warning shots. When prize crew officer Julius Lauterbach boarded the Ryazan, the Russian captain tried to feign complete ignorance of the German language, but Lauterbach, laughing, reminded him that just a month ago they had a lively conversation in one of the bars in Qingdao... Von Muller, while impressed by the speed of the new Russian steamship (ironically, built in Germany), he decided to keep it for later use as an auxiliary raider. Subsequently, the Germans installed eight 4-inch guns on the Ryazan, removed from the old gunboat Kormoran, and equipped the newly-made raider with a crew from the same ship. On August 27, 1914, he was included in the Pacific squadron of Count von Spee under the name “Cormoran II” *. Having failed to achieve any results, the newly minted raider was interned in December of the same year in the port of Guam. On August 12, the Russian cruisers Askold and Zhemchug, which at one time took part in the naval battles of the Russo-Japanese War, were attached to the Anglo-French squadron under the command of Admiral Gerram, whose main task was to search for and destroy German cruisers. Russian ships took part in the hunt for coal miners of von Spee's squadron and escorting English and French transports... Meanwhile, the Emden captured and sank one transport after another. On September 22, the raider managed to shell the Indian port of Madras and cause serious damage to its oil storage facilities. As a result of the shelling, 5 port workers were killed and 12 were injured. On October 26, 1914, the Pearl arrived in Penang (an island off the northwestern coast of Malaya) for a boiler cleaning stop. Contrary to the advice of Admiral Gerram, who warned of the need to take increased precautions, the captain of the Zhemchug, Cherkasov, left the cruiser on October 27 to spend the night on the shore. The cruiser's torpedo tubes were unloaded, and only 12 shells were stored near the guns. The number of sailors on watch was no more than usual... Cruiser "Pearl" The captain of "Emden", meanwhile, correctly calculated that the cruisers of the allied squadron would have to call at ports from time to time for repairs and replenishment of water and coal. The most convenient place to anchor was Penang Bay, and von Muller decided to try his luck. On the morning of October 28, 1914, the Emden, carrying a false funnel and disguised as the British cruiser Yarmouth, entered Penang Bay. The only large warship at anchor was the "Pearl", turned to port towards the entrance to the bay. At 5.13, the Emden raised the German flag and opened fire, and at 5.18, from a distance of about 360 meters, it fired the first torpedo, which exploded in the stern of the Russian cruiser’s hull. Half of the Pearl's shells were stored near the stern gun, which was disabled when a lifeboat, torn off by an enemy shell, fell on it. Another six shells were stacked at the N2 gun on the starboard side. The gun crew dragged the shells to the bow gun and returned fire, but to no avail - one of the shells flew over the Emden and hit an anchored cargo ship. At 5.28, having turned 180 degrees, the German cruiser fired another torpedo from the port side from about 700 meters. The hit of this torpedo turned out to be fatal for the Pearl - the cruiser exploded, broke in half and sank. Eighty-nine Russian sailors were killed and 143 were injured. The death of the "Pearl" was costly for two of its officers - Captain Cherkasov and Senior Lieutenant Kulibin. For criminal negligence, they were sentenced to imprisonment (3.5 and 1.5 years, respectively) and stripped of their officer ranks, awards and titles of nobility. The French gunboat D'lberville was also in the bay. She began to fire at the Emden, but it avoided the battle, as its signalmen saw a warship a few kilometers from the entrance to the harbor, which they initially mistook for a cruiser. Deciding that the small gunboat would not get away from him, von Müller concentrated his attention on the larger enemy ship. It was the French destroyer Mousqet, rather carelessly approaching the entrance to the bay. When the distance between him and the Emden decreased to about two miles, the Emden fired a broadside salvo. Only now did the destroyer realize who they had to meet. "Mousqet" turned sharply to the left and went full speed, trying to get away, but it was too late. According to the recollections of the senior officer of the Emden, H. Mücke, already on the third salvo, German sailors noticed 5 hits on the hull of the enemy ship. Then there was a terrible explosion, apparently from the detonation of one of the magazines, and a thick cloud of smoke and coal dust enveloped the entire rear half of the destroyer. The French sailors managed to fire two torpedoes and several shells at the Emden, but it was too late - ten minutes after the start of the battle, the Mousqet sank. The fate of his ship was shared by the captain, who was severally wounded... When rescue boats from the Emden approached the place of the destruction of the destroyer, the French sailors, frightened by stories about the cruel treatment of prisoners of war by the Germans, tried to escape by swimming, although there was no hope of getting to the shore. The Germans managed to pick up 36 French sailors. Meanwhile, Emden's signalmen noticed another destroyer leaving the bay. He tried to chase the German cruiser, but it left him behind behind a wall of tropical rain. Among the rescued French sailors there were many wounded. The Germans provided medical assistance, but three of the wounded died aboard the German cruiser and were buried at sea with full military honors. The funeral ceremony was attended by a platoon of the Emden team in full dress, a rifle guard and all the officers. Von Müller made a short speech in French - the chivalrous attitude of the warring parties towards each other during the First World War was common... Later, after the Germans landed the prisoners ashore in the port of Saban, another wounded French officer died in a coastal hospital . On the Askold they learned about the tragedy of the Pearl in Bombay, where on October 31 he brought the next transports from Colombo. The cruiser's sailors were deeply affected by the death of their comrades, with whom they had served together for many years in the Siberian Military Flotilla. But “Askold” was not destined to avenge the death of his comrades, although he more than once went to sea in search of the German raider. After the sinking of the Pearl and Mousqet, the Emden cruised in the waters of the Indian Ocean for about two more weeks. In total, he chalked up 22 sunk and captured ships. The passengers and crews of the merchant ships were not harmed; they were treated exceptionally generously and transported ashore as soon as possible. The raiding activity of the Emden became a serious problem for the fleets of the Allied powers. In addition to material damage, it also undermined the prestige of British, French and Russian sailors, who for two months could not catch the annoying German raider. However, the Emden was soon destroyed by an inevitable accident... Early in the morning of November 9, 1914, the captain of the Emden, Von Muller, landed a sabotage party on Cocos Island with the aim of destroying the local radio station. The island's military contingent recorded the coded radio signals of the German raider and soon noticed an approaching unfamiliar ship. The radio operator managed to transmit an alarm signal, after which the island's radio station went silent... Von Muller did not know that two weeks earlier, a convoy with soldiers of the ANZAC Corps departed from the coast of Western Australia, heading under the guard of a British, Japanese and two Australian cruisers to Alexandria. The SOS signal transmitted by the Cocos Island radio operator was received by the convoy ships. The commander of the Japanese cruiser Ibuki asked for the honor of going to the aid of the island's garrison, but the captain of the British cruiser Silver, leading the convoy, did not risk leaving the convoy without this powerful armored cruiser. He radioed the order to the Australian cruiser Sydney, which was closest to the island (about 80 km) to the island at full speed. "Sydney" is the newest cruiser with a displacement of 5,700 tons, was built in 1913 in Scotland and transferred by the British fleet to the Australian. Most of its experienced sailors were British, and, in addition, the crew included about 60 Australians who were undergoing combat training on the ship... Cruiser Sydney At 9.15 in the morning, the signalman reported to Von Muller that a four-pipe ship had appeared on the horizon. The captain of the Emden realized that he would have to fight with one of the Allied cruisers. There was so little time left that he had to leave the sabotage group on the shore and go out to sea to meet the approaching enemy ship. Von Müller felt quite confident, as he initially mistook the Sydney for the British light cruiser Newcastle. In fact, the Australian cruiser was superior to her German opponent in speed (27 knots), armor protection and armament: she carried eight six-inch guns firing 100-pound shells. The Emden's fast-firing 4.1-inch guns weighed only 38 pounds. Sydney's captain Glossop decided to open fire from a distance of approximately 8.5 kilometers, since, based on the technical information available to him, he believed that at such a distance he would be out of range of the Emden's guns. However, the first shells of the German cruiser fell into the water just 180 meters from the Sydney, already when the distance to the Emden was about 9.5 kilometers. So at 9.40 am the battle began between the two cruisers. At first, luck favored the gunners of the Emden: their shells damaged the deck superstructures of the Sydney, several sailors were killed and wounded. However, only a few minutes passed, and Sydney’s heavy shells began to cause one serious damage to the German cruiser after another: the radio station was destroyed, the steering and rangefinders were disabled. The forward funnel and mast were blown away by the explosions and fell overboard, taking with them the fire control tower. There were many killed and wounded in the crew, and there was no one to replace them, since three officers and forty sailors from the sabotage group remained on the shore. 40 minutes after the start of the battle, both fire control stations on the Emden were destroyed. The ship was burning, but continued to return fire to fire. By 11 o'clock, only one gun was operational on the German cruiser. Von Müller decided to disengage from the battle and throw the ship onto the reefs to save the surviving crew members. "Sydney" tried to cut off the "Emden's" path to salvation and fired the last salvo from a distance of about 5 kilometers, but it was too late - after 15 minutes the burning ship landed on the reefs. Glossop left the helpless Emden alone and headed towards the coal carrier Buresk, which was located near the battle site - a British ship that had previously been captured by the Emden on its way from Australia to the UK. However, when the prize crew boarded the transport, it was already too late - the German sailors opened the seams and the ship quickly sank. At 4 o'clock in the afternoon "Sydney" returned to "Emden". He had to fire two more salvos at the helpless German cruiser before a white flag appeared on her mast. The victory cost the Sydney team 4 killed and 12 (according to other sources, 8) wounded team members. The losses of the Emden crew were much heavier - 8 officers and 126 sailors were killed, 65 were wounded (according to other sources, 8, 111 and 52, respectively). Thus ended the dizzying career of the German raider (in the photo on the right - the ruins of Emden). In his report to the British Admiralty, Captain Glossop praised the behavior and actions of the 60 young Australian sailors who were training on his cruiser. In this battle, the Royal Australian Navy received a baptism of fire, and the cruiser Sydney paid for the dead Russian and French sailors and for the ships sunk by the Emden.Fregatten Captain Theodor Detmers lowered his binoculars in thought. Their enemy - strong, fast and deadly - was slowly tearing up the Pacific waves with a sharp bow some one and a half kilometers from his ship. Confident in his abilities, the enemy blithely approached the one whom the commander of the Australian cruiser "Sydney" mistook for the harmless Dutch merchant "Straat Malacca". The cruiser flashed its spotlight persistently and demandingly: “Show me your secret call sign.” The supply of tricks and tricks has run out. The word was with the guns.
From bulk carrier to raiders
Having lost almost its entire merchant fleet as a result of the First World War and the subsequent Treaty of Versailles, Germany had to rebuild it anew. By the beginning of World War II, the German merchant fleet reached 4.5 million gross tons and was relatively young - a large number of ships and vessels were built in the 30s. Thanks to the widespread use of Diesel engines, the Germans managed to create ships with a long cruising range and autonomy. On September 15, 1938, in Kiel, the motor ship Stirmark was launched from the stocks of the Germanienwerft shipyard, which belonged to the Krupp concern. It and the similar “Ostmark” were built by order of the HAPAG company for long-term commercial transportation. "Stirmark" was a large ship with a displacement of 19 thousand tons, equipped with diesel engines with a total power of 16 thousand hp.
The ship failed to begin its career as a peaceful cargo ship. The readiness of the completed Stirmark coincided with the aggravation of the political situation in Europe and the beginning of the war. The Navy Department had plans for a capacious ship with a long cruising range and mobilized it. At first they thought of using it as a transport, but then they found a more effective use for the Stirmark. It was decided to convert it into an auxiliary cruiser, since it had all the data for this role. The newest bulk carrier received the index “auxiliary vessel 41”. Soon, “ship 41” was transferred to Hamburg, to the Deutsche Wert plant, where it took the vacant place after the auxiliary cruiser “Thor”. In all accompanying documentation, the future raider began to be designated as “auxiliary cruiser No. 8” or “HSK-8”.

Theodor Detmers, commander of the Cormoran
On July 17, 1940, 37-year-old Corvette Captain Theodor Detmers was appointed its commander. He was the youngest commander of auxiliary cruisers. He entered the navy at the age of 19 - first he served on old training ships. After receiving the officer rank of lieutenant, he stepped onto the deck of the cruiser Cologne. The further journey was carried out on destroyers. In 1935, Detmers received command of the old G-11; in 1938, the corvette captain arrived at a new duty station, on the newest destroyer Hermann Schoeman (Z-7). He met the war while commanding this ship. Soon, the Hermann Schömann was undergoing repairs, and its commander received a new assignment to an auxiliary cruiser preparing for a voyage. "HSK-8" was prepared hastily - it did not receive some weapons and equipment planned for installation. Unlike its predecessors, the raider was supposed to be equipped with a radar, but due to technical difficulties (the equipment often broke down), installation was abandoned. New 37-mm automatic anti-aircraft guns were not installed - they took the old ones. Sea trials were successfully carried out in mid-September. On October 9, 1940, the auxiliary cruiser named Kormoran officially joined the Kriegsmarine. Detmers later recalled that for a long time he could not decide on a name for his ship. In this, he was unexpectedly helped by Gunther Gumprich, the future commander of the auxiliary cruiser Thor. While the Cormoran was standing at the shipyard wall, Detmers met with Rukteshel, the commander of the Widder, which had just returned from a campaign, with whom he discussed plans for a breakthrough into the Atlantic. It was decided that the Cormoran would break through the most dangerous, but also the shortest place - the Dover Canal. In winter, the Denmark Strait, according to the Germans, was clogged with ice. However, soon a radiogram arrived from the trawler Sachsen, a weather reconnaissance station located in these latitudes. The trawler reported that there was a lot of ice, but it was possible to pass through it. The breakthrough plan was changed in favor of passing through the Denmark Strait.
In November 1940, the raider moved to Gotenhafen, where final refinement and additional equipment was carried out. On November 20, Grand Admiral Raeder visited the ship and was pleased with what he saw. The Kormoran was generally ready for the trip, however, the mechanics were concerned about the completely untested power plant. It took time to finally complete all the tests, and Detmers did not want to wait. The Cormoran's final armament was six 150 mm guns, two 37 mm guns and four single-gun 20 mm anti-aircraft guns. Two twin-pipe 533 mm torpedo tubes were installed. Additional armament included two Arado 196 seaplanes and an LS-3 torpedo boat. Taking advantage of the large size of the Cormoran, 360 anchor mines and 30 magnetic mines for the boat were loaded onto it. The raider was instructed to operate in the Indian Ocean, African and Australian waters. Reserve region - Pacific Ocean. As an additional task, the Kormoran was entrusted with the mission to supply German submarines located in southern latitudes with new torpedoes and other supplies. The raider took into its hold 28 torpedoes, a large number of shells, medicines and provisions intended for transfer to the submarines.
To the Atlantic
On the way to the Denmark Strait, the raider encountered bad weather. On December 8 he arrived in Stavanger. On December 9, having replenished supplies for the last time, he went to sea. On the 11th, the Kormoran was made up as the Soviet motor ship Vyacheslav Molotov, but fears were unnecessary - no one found the raider. Having withstood a severe storm, during which the 19,000-ton ship rocked violently, the auxiliary cruiser sailed into the Atlantic on December 13. The storm subsided, visibility improved - and on December 18, the first smoke of an unknown ship was noticed. However, the raider had not yet reached his "hunting" area, and the stranger got away with impunity. Soon the command changed its instructions and allowed Detmers to act immediately. The raider was moving south - according to the calculations of the mechanics, its own fuel reserves, if used rationally, should have been enough for at least 7 months of the voyage. At first, the Cormoran had no luck in searching for prey: only a Spanish cargo ship and an American ship were spotted from it. On December 29, an attempt was made to lift a reconnaissance aircraft into the air, but due to the pitching, the Arado floats were damaged.
The account was finally opened on January 6, 1941. As an initiative, the Greek steamer Antonis, transporting coal for British freight, was stopped. After the appropriate procedures, removing the crew and 7 live sheep, as well as several machine guns and ammunition for them, the Antonis was sunk. The next time luck smiled on the Germans on January 18. Just before dark, an unknown steamer was spotted from the raider, moving in an anti-submarine zigzag. Detmers knew that such actions were prescribed by the British Admiralty for civilian courts - similar instructions had recently been captured by the Atlantis raider. Having approached to a distance of 4 miles, the Germans first fired flares, and then, when the steamer, which turned out to be a tanker, did not react, they opened fire. The Briton (and there was no longer any doubt that it was him) broadcast the RRR signal. The third salvo hit the target and the radio went silent. When the Cormoran came closer, a cannon suddenly roared from the tanker, managing to fire four shots, after which the raider, which resumed fire, set fire to the stern of its victim. Boats began to be lowered from the British Union - that was the name of the unlucky tanker. The surviving part of the crew was rescued, and the ship was sent to the bottom. Detmers was in a hurry to leave the area as soon as possible - the alarm signal raised by the British Union promised unpleasant meetings. The Australian auxiliary cruiser Arua was heading to the site of the tanker's sinking at full speed; it managed to catch eight more Englishmen from the water, who shed light on the events that took place here. In British documents, the as yet unknown large raider was named "Raider G".
The command ordered Detmers, who caused the commotion, to go south to meet with the supply ship Nordmark, transfer all torpedoes and supplies for submarines to it, and then head to the Indian Ocean. "Nordmark" was actually a comprehensive supply ship - its storerooms, fuel storage facilities and cabins were used by a large number of German ships and vessels operating or passing through the southern latitudes: the "pocket" battleship "Admiral Scheer", auxiliary cruisers, submarines, blockade runners and other vessels provision.
Between the Cape Verde Islands and the equator on the afternoon of January 29, a ship resembling a refrigerator was spotted from the Cormoran. Pretending to be a “peaceful merchant,” the raider waited until the ship came closer and raised the signal to stop, at the same time Detmers ordered full speed. After the stranger did not react in any way, the Germans opened aimed fire to kill. The refrigerator broadcast an alarm and stopped. Boats were lowered from it. The Africa Star was indeed carrying 5,700 tonnes of frozen meat from Argentina to the UK. Its crew was taken on board, and the Germans were forced to scuttle the Africa Star - it was damaged as a result of the shelling. The refrigerator was sinking slowly, and a torpedo was launched to speed up the process. As the raider's victim raised the alarm, the Cormoran left the area at full speed. Already at night, the signalmen examined the silhouette, which was identified as a merchant ship. The received order to stop was ignored, and the auxiliary cruiser opened fire first with illumination and then with live shells. The enemy initially responded from the stern cannon, which, however, soon fell silent. The steamer stopped the cars - the boarding party discovered that it was the British ship Eurylochus, heading with 16 dismantled heavy bombers to Egypt. "Eurilochus" lost its course and stayed away from the shore. Enemy radio stations buzzed on the air like an angry, disturbed hive, and the Germans again had to expend such a valuable torpedo to quickly deal with their prey.
Taking on board the crew of the Eurylochus, the Cormoran set out to rendezvous with the Nordmark in a special area called Andalusia. On February 7, the meeting took place. The Nordmark was accompanied by the refrigerator ship Dukeza, a trophy of the Admiral Scheer. The next day, the raider received 1,300 tons of diesel fuel, and 100 beef carcasses and more than 200 thousand eggs were shipped from the refrigerator. 170 prisoners and mail were sent to Nordmark. On February 9, the reloading was completed, and the Cormoran finally set off for the Indian Ocean. On the way to the Cape of Good Hope, Detmers met the raider "Penguin", who carefully "herded" an entire captured whaling flotilla. Captain zur See Kruder offered one of the whalers as a scout at his beck and call, but his colleague refused. The trophy was not fast enough, in his opinion.
Bad weather prevented the deployment of a mine bank at Walvis Bay (Namibia). On February 18, an accident occurred in the engine room. Due to bearing failures, diesel engines No. 2 and No. 4 failed. Detmers sent an urgent request to Berlin with a request to send at least 700 kg of babbitt by submarine or another blockade runner for the manufacture of new bearing liners. He was promised to fulfill this request as quickly as possible, and the trip to the Indian Ocean was temporarily cancelled. The raider was ordered to operate in the South Atlantic for now and wait for the “package”. While in the engine room specialists were making new bearing parts from available supplies, on February 24 Penguin contacted Detmers and offered to transfer 200 kg of babbitt. On February 25, both raiders met and exchanged necessary materials and films for the team’s entertainment. The Cormoran, meanwhile, continued to suffer from constant breakdowns in the engine room. The reserves allocated by Penguin should have been enough for the first time. On March 15, a meeting took place with one of the ward submarines, U-105, to which several torpedoes, fuel and provisions were shipped. The raider has had no luck with hunting so far.

Kormoran refueling a submarine
The long break in the search for new prey ended on March 22. "Cormoran" captured a small English tanker "Agnita", sailing in ballast. The ship was in very mediocre condition and was sunk without regret. The most valuable loot was a map of the minefields near Freetown indicating safe passage. Three days later, almost in the same area at 8 am, a tanker was spotted traveling in ballast towards South America. He did not respond to the demand to stop - fire was opened. Since the ship gave the impression of being new, Detmers ordered to shoot more carefully so as not to cause severe damage. After several volleys, the fugitive stopped the cars. The raider's catch was the large (11 thousand tons) tanker Canadolight. The ship was almost new, and it was decided to send it with the prize shipment to France. The prize successfully reached the mouth of the Gironde on April 13th.
The consumption of fuel and provisions was quite extensive, and Detmers went to a new meeting with the Nordmark supply. On March 28, the ships met, and the next day two submarines arrived here. One of them, U-105, transferred the long-awaited babbitt to the raider, which, however, turned out to be not so much. Detmers' plans included a rendezvous with another support vessel, the Rudolf Albrecht, which left Tenerife on March 22. Having replenished the fuel, the Cormoran met with a new supply on April 3, but, unfortunately, there was no Babbitt on it. “Rudolph Albrecht” donated a lot of fresh vegetables, fruits, newspapers and magazines, a live pig and a puppy. Having said goodbye to the tanker, the Cormoran left for the southeast.
On April 9, smoke was seen from the raider astern - some ship was moving on the same course as it. After waiting until the distance was reduced, the Germans dropped their disguise. Once again the British ignored orders to stop and not use the radio. The Kormoran opened fire, scoring several hits. The cargo ship Craftsman stopped. A large fire broke out at its stern. The boarding party was unable to immediately send the Englishman to the bottom - he did not want to drown. It was all about its cargo - a giant anti-submarine net for Cape Town harbor. And only after being hit by a torpedo, the rebellious Craftsman sank. The next day, the raider's radio operators received a pleasant radiogram: Detmers was awarded the rank of frigate captain. On April 12, the Germans intercepted the Greek ship Nikolaos D.L., loaded with timber. And again there was some shooting. Having taken the prisoners, the Kormoran planted several 150-mm shells under the waterline into the victim, not counting the charges that had been detonated earlier. The Greek sank slowly, but Detmers did not use a torpedo on him, believing that he would sink anyway.
The time had come to replenish fuel again, and the Kormoran once again went to the meeting point with the Nordmark. On April 20, a whole group of German ships met in the ocean. In addition to the Nordmark and Cormoran, there was another auxiliary cruiser, Atlantis, with the supply ship Alsterufer. Detmers' ship received 300 tons of diesel fuel and two hundred 150-mm shells from the Alsterufer. The operation of the diesel engines was more or less normalized, and the raider finally received the order to proceed to the Indian Ocean, where, having said goodbye to his compatriots, he headed on April 24.
In the Indian Ocean
In early May, the ship rounded the Cape of Good Hope. The waters of the Indian Ocean greeted the Cormoran with a strong storm that raged for four whole days. While heading north, the weather began to gradually improve - the raider repainted itself, disguised as the Japanese ship Sakito Maru. On May 9, it became known about the death of the auxiliary cruiser Penguin, after which an order was received to meet at an appointed place with the supply ship Altsertor and the Penguin scout, the former whaler Adjutant. The ships met on May 14, and much to the displeasure of Detmers, by order of the command, he had to pump 200 tons of fuel to the Altsertor. The supplier, in turn, replenished the crew of the Cormoran with members of his team to replace those who went to France on the tanker Canadolight.
Then monotonous everyday life dragged on. For almost a month, the Cormoran sailed the Indian Ocean without encountering any targets along the way. On June 5, the camouflage was changed again - now the raider looked again like the Japanese transport Kinka Maru. The ship's Arado went on reconnaissance flights twice, but both times to no avail. Once we came across a brightly illuminated ship, which turned out to be American. Another time, an unknown passenger ship was startled by a smoke production unit that suddenly started working. Seeing that the hunt was not going well, Detmers decided to try his luck in a mine war - 360 mines were still waiting in the wings and were a dangerous and burdensome load. On June 19, the Cormoran entered the waters of the Bay of Bengal, the shores of which were replete with large ports. At the exit from them the Germans planned to lay out their mines. This primarily concerned Rangoon, Madras and Calcutta. However, even here the raider was unlucky. When no more than two hundred miles remained to Madras, smoke first appeared on the horizon, and then the silhouette of a large ship, similar to an English auxiliary cruiser, began to emerge. This kind of meeting was not part of Detmers' plans, and he began to leave at full speed. For an hour, the unknown person pursued the raider, then gradually fell behind, disappearing over the horizon. The Germans were really lucky - it was the British auxiliary cruiser Canton, which mistook them for the Japanese. The mine laying near Calcutta was also canceled due to a hurricane raging in the area.
The long streak of bad luck finally ended on the night of June 26, when the watch noticed a ship. Traditionally, the Germans demanded to stop and not use the radio. However, the discovered ship continued to follow as if nothing had happened, without attempting, however, to go on the air. Having tapped the unheeded orders several times in a row with a signal searchlight, the raider opened fire, achieving almost 30 hits in seven minutes. The ship began to burn intensely, and a boat was lowered from it. The Germans stopped shelling. When the sailors were lifted on board from the boat, it turned out that the stranger was the Yugoslav cargo ship Velebit, which was sailing in ballast. At the moment of contact, the captain was in the engine room, and the officer on watch did not know (!) Morse code and could not understand what some ship wanted from him. Yugoslav was burning intensely, so Detmers did not finish off the crippled ship and moved on. A few hours later, already at noon, smoke was noticed again. Some ship was heading towards Ceylon. Under the cover of a rain squall, the Cormoran crept up to its victim at a distance of 5 miles. Once again the Germans demanded a stop and not to go on air. However, the Australian Mariba, transporting almost 5 thousand tons of sugar, did not even think of obeying, but immediately radioed an alarm signal. The raider's guns thundered, and soon the Australian was drowning, lowering the boats. Having picked up 48 crew members and finished off the victim, the Cormoran hastily left the area. The raider went south, into deserted and rarely visited waters, where he remained until July 17. Preventative repairs of diesel engines and electrical equipment were carried out. Having lost its relevance, Japanese makeup was replaced. Pretending to be a Japanese neutral was already too suspicious, and even dangerous - at night you would have to walk with the lights on. In addition, the neutral ship did not have to suddenly change course, avoiding approaching any suspicious ship, which could be a British cruiser.
The auxiliary cruiser was disguised as the Dutch merchant Straat Malacca. For greater realism, a wooden model of the gun was installed at the stern. In a new image, the Cormoran moved towards the island of Sumatra. Sailing in the tropics introduced certain difficulties in storing provisions. For almost ten days, the crew, replacing each other, was busy sifting through the ship's flour reserves, which turned out to contain many bugs and larvae. The cereal reserves turned out to be completely unfit for consumption. In contrast, shelf-stable products in numerous refrigerated chambers were well preserved. Continuing to move southeast, on August 13, 200 miles north of Carnarvon (Australia), visual contact was made with an unknown ship, but Detmers, fearing the presence of warships nearby, ordered not to pursue the stranger. The raider set off on the way back, in the direction of Ceylon.
On August 28, 1941, the Germans saw land for the first time after leaving Norway - it was the top of Mount Boa Boa on the island of Engano, which is located off the southwestern coast of Sumatra. The Indian Ocean was deserted - even seaplane flights did not bring results. Only on the evening of September 23, the watchmen, to the great joy of the crew languishing from the monotony, discovered the running lights of a ship sailing in ballast. Although these were signs of a neutral, Detmers decided to examine him. The stopped vessel turned out to be the Greek Stamatios G. Embirikos, sailing with cargo to Colombo. The crew behaved obediently and did not go on air. At first, Detmers wanted to use it as an auxiliary minelayer, but the small amount of coal in the Stamatios bunkers made this problematic. After dark the Greek was sunk by demolition charges.
The raider cruised in the western Indian Ocean until September 29. The need to replenish supplies forced the Cormoran to meet with another supply ship. It was the Kulmerland, which left Kobe on September 3. The rendezvous was to take place at the secret location "Marius". Arriving there on October 16, the raider met with the supply man waiting for him. The auxiliary cruiser received almost 4 thousand tons of diesel fuel, 225 tons of lubricating oil, a large amount of babbitt and provisions designed for 6 months of voyage. The prisoners, five sick crew members and mail followed in the opposite direction. “Kulmerland” parted with the raider on October 25, and “Kormoran” began another engine repair. When the mechanics reported to Detmers that the vehicles were in relative order, the frigate captain again set off for the Australian coast to lay mine banks off Perth and Shark Bay. However, the German command reported that a large convoy was leaving Perth under the protection of the heavy cruiser Cornwall, and the Cormoran moved towards Shark Bay.
The same fight
On November 19, 1941, the weather was excellent and visibility was excellent. At about 4 o'clock in the afternoon, the messenger reported to Detmers, who was in the wardroom, that smoke had been seen on the horizon. The frigate captain who climbed onto the bridge soon determined that it was a warship coming to meet the raider. The Australian light cruiser Sydney was returning home after escorting the liner Zealandia, which was transporting troops to Singapore. The Sydney has already distinguished itself in combat operations in the Mediterranean, having sunk the Italian light cruiser Bartolomeo Colleoni in the battle off Cape Spada. However, in May 1941, the commander of the light cruiser, Captain 1st Rank John Collins, who had extensive combat experience, was replaced by Captain 1st Rank Joseph Barnett, who had previously served on shore. In many ways, this probably decided the outcome of the future fight.

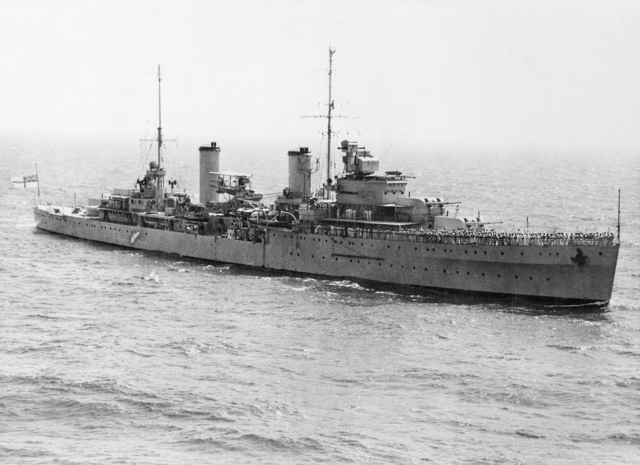
Australian light cruiser Sydney
Sydney was a full-fledged warship, displacing almost 9 thousand tons and armed with eight 152 mm guns, four 102 mm guns, and twelve anti-aircraft machine guns. The torpedo armament consisted of eight 533-mm torpedo tubes. There was a seaplane on board. Detmers did not lose his presence of mind and ordered a turn to the southwest so that the sun would shine directly into the Australians' eyes. At the same time, the Cormoran set off at full speed, but soon diesel No. 4 began to act up, and the speed dropped to 14 knots. About an hour after discovering the raider, the cruiser approached to a distance of 7 miles on the starboard side and ordered an identification with a searchlight. "Cormoran" transmitted the correct call sign "Straat Malacca" "RKQI", but at the same time it was raised between the funnel and the foremast so that it was practically invisible from the cruiser approaching from the stern. "Sydney" then demanded to indicate the destination. The Germans answered: “To Batavia,” which looked completely plausible. To confuse the pursuers, the raider’s radio operators began broadcasting distress signals that the Dutch ship was being attacked by an “unknown warship.” Meanwhile, the cruiser was approaching - its bow turrets were aimed at the pseudo-merchant. The Australians periodically broadcast the "IK" signal, which, according to the international code of signals, meant "prepare for a hurricane." In fact, the real "Straat Malacca" should have responded with "IIKP" according to the secret code of signals. The Germans preferred to ignore repeated requests.
Finally, “Sydney” began to get tired of this protracted comedy, and it signaled: “Indicate your secret call sign. Further silence can only make the situation worse.” Game over. Each Allied merchant ship had its own individual secret code. The Australian cruiser had almost caught up with the Cormoran and was almost on its beam, at a distance of just over a kilometer. In response to a request at 17:30. The raider lowered the Dutch flag and raised the Kriegsmarine battle flag. In a record time of six seconds, the camouflage shields fell. The first shot missed, and the second salvo of three 150 mm and one 37 mm gun hit the Sydney's bridge, destroying its fire control system. Simultaneously with the second salvo, the Germans discharged their torpedo tubes. The main battery of the cruiser began to respond, but the sun was shining in the gunners' eyes, and he went down with the flight. 20-mm anti-aircraft guns and heavy machine guns began to fire, preventing the cruiser's crew from taking positions according to the combat schedule. At such a distance it was difficult to miss, and the Germans slammed shell after shell into the Sydney. The seaplane was destroyed, then the Kormoran transferred fire to the main caliber bow turrets - they were soon disabled. The fired torpedo hit the bow of the cruiser in front of the bow turret. The bow of the Sydney sank heavily into the water. The raider was fired on by the stern turrets, which switched to independent aiming. The Australians missed the target, but three shells hit the Kormoran. The first pierced a pipe, the second damaged the auxiliary boiler and disabled the fire main. A fire started in the engine room. The third shell destroyed the main diesel transformers. The raider's progress decreased sharply.

One of the 150 mm Kormoran guns
Sydney had it much worse - the cruiser suddenly turned back on course. It was clear that the cover of Tower B had been thrown into the sea. The Australian walked some hundred meters behind the stern of the raider - he was completely engulfed in fires. Obviously, the steering on it was badly damaged or disabled. The opponents exchanged ineffective torpedo salvoes, and Sydney began to move away at a 10-knot speed, moving south. The Cormoran fired at him as long as the distance allowed. At 18.25 the battle stopped. The raider's position was critical - the fire was growing. The engine room personnel fought the fire until almost all but one sailor died. The fire was approaching the mine hold, where almost four hundred mines lay, which the Cormoran carried with it throughout the entire campaign, but was never able to get rid of them.
The Fregatten captain realized that the ship could no longer be saved and ordered explosive cartridges to be placed near the fuel tanks. Life rafts and boats began to be lowered into the water. The first raft launched capsized, killing nearly 40 people. At 24 hours, having taken the ship's flag, Detmers was the last to leave the doomed Cormoran. After 10 minutes, the explosive cartridges went off, the mines detonated - a powerful explosion destroyed the stern of the raider, and at 0:35 a.m. auxiliary cruiser sank. More than 300 officers and sailors were on the water. 80 people died in the battle and drowned after the raft capsized. The weather worsened and life-saving equipment was scattered across the water. Soon the coasting steamer picked up one boat and reported this to the command of the Australian Navy, who immediately began a rescue operation. Soon all the Germans were found, although some had to hang out on rafts for about 6 days.

Sydney's main caliber turret. Photos taken by the Australian expedition that discovered the remains of the ships
There was no news about the fate of the Sydney, except for the broken lifeboat thrown ashore two weeks later. The search, which lasted almost 10 days, yielded no results, and the cruiser Sydney was declared dead on November 30, 1941. For many years the mystery of his death remained unsolved. The captured Germans, who were thoroughly interrogated already on the shore, talked about the glow of the fire that they observed in the place where the cruiser, engulfed in flames, had gone. Only in March 2008, a special expedition of the Australian Navy discovered first the Cormoran, and then the Sydney, about 200 miles southwest of Carnarvon. The former opponents lie not far from each other - 20 miles away. A layer of water of 2.5 kilometers reliably covered the dead sailors with its cover. What events took place in the compartments and decks of the Australian cruiser engulfed in flames, and how the drama that laid this ship to rest at the bottom of the Pacific Ocean ended, we will obviously never know.
Ctrl Enter
Noticed osh Y bku Select text and click Ctrl+Enter
On November 19, 1941, the cannonade of war thundered off the coast of Australia. After a brutal but short fight cruiser Australian Navy " HMAS Sydney"was sunk by a German raider" HSK Kormaran" None of the 645 people were saved. The body of one of the sailors washed ashore several months later, the rest could not be found. The cruiser took the secret of her death with her to the bottom. This is the worst tragedy in the history of the Australian Navy.
Why the Australian team cruisers went missing, but hundreds of Germans survived. Only after the discovery of the wreckage of the cruiser on the ocean floor did the sunken ship lift the veil of its mystery.
For the relatives of the deceased cruiser, the past decade has not lessened their grief, and the events of 1941 still haunt them.
In 1940, the cruiser " HMAS Sydney"under the command of Captain John Collins, she also sank a light cruiser of the Italian Navy. The cruiser returned to Australia as a real hero. The welcoming people on the shore rejoiced, and the ship became a real symbol of the Australian Navy. One of the first to congratulate the Australian sailors was the Prime Minister of Australia. When he came aboard, the crowd went into raptures. The next evening there was a grand parade, which was attended by many people.
After being laid up for several months off the east coast, he was transferred to Western Australia. And on November 19, 1941, the ship was sunk by a German raider " HSK Kormaran" All the newspapers in the country wrote about this incident, and along with the bitterness of the loss came suspicions of a conspiracy.
Disappeared for many years cruiser raised many questions and conflicting versions of the death. Some suggested that the Germans violated the rules of war and took the ship by surprise, and then shot the surviving sailors to hide the evidence. When the war ended, relatives of the victims demanded an explanation, but the floodgates of secrecy were opened only 30 years later, thanks to the creation of the Sydney Foundation, which organized a research expedition to search for the wreck of the ship.
Behind the big name of the fund is its chairman Ted Graham and his four associates. For many years they knocked on doorsteps until they collected the $5 million needed for the research expedition.
German raider "HSK Kormaran"

« HSK Kormaran"This is a warship disguised as a harmless Dutch cargo ship" Straat Malacca" As a rule, raiders raised their real flag at the last moment before attacking. It was the newest and largest raider in the German Navy. Behind the harmless silhouette were hidden large-caliber guns, torpedo compartments, and in the holds were more than three hundred torpedoes intended for Australian ships and vessels.
In 1940, German raiders approached the shores of Australia and sank several cargo ships and three more cargo ships were sunk in the Indian Ocean. So quietly the war approached Australia.
In March 1941 raider entered the Pacific Ocean on a combat mission, the ultimate goal of which was the west coast of Australia.

November 17, 1941 cruiser " HMAS Sydney» escorted the transport « Zelandia» to the Sunda Strait. After which the ship headed for the port of Fremantle where it was supposed to arrive in 3 days, but this did not happen. Thorough searches that were conducted in the territory of the supposed zone of the ship's destruction did not lead to anything. The cruiser and its crew were missing. Soon, on November 28, lifeboats with Germans appeared on the remote beaches of Australia. A " Centaur"arrived at the Australian port of Carnarvon, towing two boats with the crew of the raider" HSK Kormoran", in which, among other sailors, there was the captain of the ship. The captain of the passenger ship did not allow the Germans on board, fearing that they might seize the ship. The arrival of the surviving raider sailors was bad news. They reported that they were engaged in a battle with a "class" cruiser Perth” and this confirmed the worst fears of the Australians. After 10 days, the search was canceled, which was resumed only 66 years later and brought good luck.

Wreckage of the cruiser " HMAS Sydney"lie at a depth of 2468 m. They were discovered by a famous researcher who found the remains of the cruiser" Hood" And " Bismark" But the only question remains unanswered - how the German raider managed to sink the Australian cruiser, as a result of which the ship sank and why no one was saved. The answers lie on the ocean floor.
Disguised as a Dutch merchant ship raider « HSK Kormoran"Headed north. Having met him cruiser « HMAS Sydney" took the same course, giving a signal with a search spotlight. But the captain of the German ship Theodor Detmers had an advantage - he knew that his enemy was in front of him, but his colleague, the commander of the cruiser John Burnett, did not know what kind of ship he was pursuing. A cunning German captain reported on the radio that he was being pursued by some military vessel so that the enemy would believe that it was real. With every minute the distance between the ships was reduced. With every meter, the cruiser lost the advantage of its firepower. Soon the cruiser was already within range of the raider's guns. A few minutes later, the captain of the German ship gave the order to remove the Dutch flag and raise his own. The salvo and the first shell exploded not far from the cruiser. The next one hit the navigation bridge, destroying the artillery post. This shell most likely killed the ship's commander, John Burnett, and everyone in the control room. At the same instant, the cruiser responded with a counterattack, but missed. The German captain then took 10 degrees to starboard and aimed two torpedoes, which took 65 seconds to reach the target. The raider's powerful cannons fired with merciless accuracy. They struck the middle part of the hull, destroying the aircraft, bow guns and torpedo compartments, depriving the cruiser of the ability to resist.
The first torpedo struck below the waterline near the bow of the cruiser. It was this blow that turned out to be fatal for the ship. The cruiser turned towards the raider with the goal of ramming it, but the camouflaged cargo ship escaped. Cruiser " HMAS Sydney"was on the verge of death and finally launched two torpedoes, but missed again. The German machine gunners continued to pour fire on the flaming ship, which was already heading towards the shore. The next morning more than seven hundred people and two ships were missing. 318 German sailors ended up on lifeboats. The entire crew of the cruiser, 645 people, perished in the depths of the sea. Researchers lowered the underwater vehicle to the wreckage and found no traces of the German crime; they only saw evidence of how bravely the sailors fought.
monument to the dead sailors of the cruiser "HMAS Sydney", in western Australia

Now both ships lie on the bottom as silent witnesses to a tough naval battle. Having received several hours of footage, the Australian government will conduct an investigation, but the main thing is that a place on the map has appeared for the loved ones of the dead sailors.
Material from Wikipedia - the free encyclopedia
| Sydney-class light cruisers | |
|---|---|
Light cruiser Hobart |
|
| Project | |
| A country | |
| Main characteristics | |
| Displacement | 6830…7105 (standard), 8815…9090 t (full) |
| Length | 161.5/171.4 m |
| Width | 17.3 m |
| Draft | 5.6-5.8 m |
| Booking | Belt - 76 mm; traverses - 32 mm; deck - 32 mm; cellars - up to 89 mm; towers - 25 mm; barbettes - 25 mm |
| Engines | 4 TZA Parsons |
| Power | 72,500 l. With. (53.3 MW) |
| Travel speed | 32.5 knots (60.19 km/h) |
| Cruising range | 7000 nautical miles at 15 knots |
| Crew | 570 people |
| Armament | |
| Artillery | 4 × 2 - 152 mm/50, 4 × 2 - 102 mm/45 ("Sydney" - 4×1) |
| Flak | 3 × 4 - 12.7 mm machine guns |
| Mine and torpedo weapons | Two four-tube 533 mm torpedo tubes |
| Aviation group | 1 catapult, 1 seaplane (Perth had no aviation weapons) |
Sydney-class light cruisers- a type of light cruiser of the Australian Navy during the Second World War. A total of 3 ships were built: "Sydney" ( Sydney), "Hobart" ( Hobart), "Perth" ( Perth). They were an improved version of the British Linder-class light cruisers. During construction, the Phaeton was transferred to the Royal Australian Navy and renamed Sydney. Unlike sisterships, it was built by a private enterprise and was manned first, which is why the ships of the Improved Linder project are called the Sydney class.
The only modern light cruisers of the Australian Navy in World War II.
History of creation
At the suggestion of the chief mechanic of the fleet, an echelon arrangement of the power plant was introduced. The alternation of engine and boiler rooms made it possible to get rid of the danger of simultaneous failure of all machines or all boilers when adjacent compartments were flooded, which automatically deprived the ship of its speed. This arrangement was implemented in most foreign fleets. It was used on Arethusa-class cruisers, and at the beginning of 1932 the Admiralty ordered the Lindera project to be reworked accordingly.
Design
Light cruiser Sydney
The project was a reworking of the Lindera project. The sketch was ready in July 1932. With the same basic parameters (armament, armor, speed and cruising range), the displacement increased to 7250 tons. The main ones were the composition and placement of the power plant. The number, type and power of turbines have not changed, but instead of six boilers, four with increased steam capacity remain. They were located in two boiler rooms and as a result, the new ships became two-pipe. In the bow boiler the boilers were positioned side by side, and in the stern boiler they were installed in tandem to free up space for the corridors of the external propeller shafts. Each group of boilers operated its own turbines. Compared to the Linder, the power plant has become 110 tons lighter, and thanks to the improved design of cruising turbines, efficiency has improved, the fuel supply has also increased - all this has increased the cruising range.
Like the Linders, the standard displacement of all cruisers turned out to be less than the design displacement (Emphion - 7040 tons, Apollo - 7003 tons, Sydney - 7198 tons).
Power plant
The main power plant consisted of four Parsons turbo-gear units and four Admiralty-type three-collector steam boilers. All boilers had steam superheaters, fuel and air heaters. The scheme is echelon; the boilers are located in pairs in two boiler rooms, in the bow boiler room the boilers were located side by side, in the stern in tandem to free up space for the corridors of the external propeller shafts, and the TZA - in two engine rooms. The operating steam pressure in the boilers is 24.61 kg/cm² (24.29 atm), temperature - 343°C. Each group of boilers operated its own turbines. Compared to Linder, the power plant has become 110 tons lighter. The total length of the machine and boiler rooms increased by 2.7 m and reached 57.3 m. As a result, the length of the hull between perpendiculars and the greatest length increased by 2.36 m. In July 1935, Sydney entered testing. In preliminary tests, she showed 32.137 knots with a displacement of 8138 tons, and then at the measured mile off Cape St. Abbs she developed 33.05 knots. with a displacement of 7105 tons and a machine power of 72,340 hp. With.
Representatives
Modernization
"Sydney". Until her death, the cruiser did not undergo any major upgrades.
"Hobart". In October 1942, the catapult was dismantled; two four-barreled “pom-poms”, eleven single “Oerlikons”, radar types 279, 272, 282, 283, 284 and 285 are installed.
During the repair of battle damage (August 1943 - January 1945), nine single Oerlikons were removed (the remaining two were moved to a new location) and replaced with three twin 40-mm Hasemeyer/Bofors Mk.IV installations (two on the bow superstructure and one on the poop), five 40-mm Bofors in single Mk.HI mounts and two twin Oerlikons. In total, the light anti-aircraft weapons consisted of eight 40 mm/40, eleven 40 mm/56 and four 20 mm/65 machine guns. The front 102 mm turrets were moved from the aft superstructure to the forecastle section. Instead of the previous anti-aircraft director, two new ones were installed on the lower tier of the bow superstructure. Radars of types 279, 272 and 284 were removed, new types 281 B, 276, 277 and American SG-1 and FC-1 were installed. To maintain stability, in May 1943, 175 tons of ballast were placed in the hold, of which only 75 tons were later left.
After the war, the “X” turret was removed from the cruiser, and two quad 40-mm Bofors were mounted in its place. Between 1953 and 1956, Hobart underwent conversion into a training ship.
"Perth". In April 1940, during repairs in Sydney, a 53-foot catapult was installed, which was removed in February 1941 in Alexandria, and a four-barreled 40-mm pom-pom from the damaged cruiser Liverpool was mounted in its place. At the same time, or a little later, a type 286 radar antenna appeared on the top of the main mast.
On July 19, 1941, before the ship returned to Australia, the pom-pom was dismantled and replaced with a 53-foot catapult from Agex. At the same time, four 20-mm Oerlikons were installed (two on turrets “B” and “X”, two more replaced the anti-aircraft machine guns on the bow superstructure, while the aft machine gun was preserved).
Notes
Literature
- Nenakhov Yu. Yu. Encyclopedia of cruisers 1910-2005. - Minsk, Harvest, 2007.
- Patyanin S.V. Dashyan A.V. et al. Cruisers of World War II. Hunters and Defenders - M.: Collection, Yauza, EKSMO, 2007.
- Conway's All the World's Fighting Ships, 1922-1946.- Annapolis, Maryland, U.S.A. : Naval Institute Press, 1996.
- M. J. Whitley. Cruisers of World War Two. An international encyclopedia. - London, Arms & Armour, 1995.
- Smith P.C. Dominy J.R.. Cruisers in Action 1939-1945. - London: William Kimber, 1981.
Links
 |
This is a preliminary article about classes and types of ships and vessels. You can help the project by adding to it. |


