Micro doesn't work well in cs 1.6. Connecting a microphone and setting up voice communication in Counter Strike
For those gamers who spend a lot of time playing Counter game Strike 1.6 is well aware that not only well-honed skills are important here, but also the ability to work together, which often also depends on communication. Agree, few people read the chat, and there’s not enough time for it; if you play with your friends, then you can exchange a few words on Skype, it’s even easier; but if you are going to play with complete strangers, and winning depends on teamwork, then what should you do? Of course, in such cases you need to have an internal connection, which can then be turned off if not needed.
No matter how funny it may sound, first of all, check that the microphone is connected to the right socket, because it is precisely because of inattention that a variety of problems most often arise. If everything is in order here, then go to “Start”, then to the “control panel” and then to “Hardware”, and then adjust the sound there. As you can see, there is nothing complicated, you just need to take everything apart.
Once all the necessary settings are completed, feel free to launch the game and there, in the options, find the “Voice” tab, in which you need to check “Enable voice in the game”, under which there will also be two volume scales, which each player configures individually. You should also definitely test your microphone before playing. If the connection is still quite bad, check “Increase microphone sensitivity”, but if everything is fine, then you shouldn’t do this, it can only get worse!
Setting up a microphone via the console
As for the commands in the console, you, as an experienced player, should already know that there are settings that can only be set through the console and nothing else! For every professional these are just basic things!
Using an example, we will show you how easy it is to set up a microphone in Contra. So, to change the volume of your voice, you need to enter “voice_scale x”, where x is the number you need. Such a useful function as reducing absolutely all sounds except the speaker’s voice is activated using “voice_overdrive N”, where in place of the letter “N” enter the value 1 or 2. And finally, you can regulate the decrease in volume thanks to “voice_overdrivefadetime x.xxx”, where the X's, of course, are replaced with the necessary numbers.

This seems to be all the necessary information for setting up excellent communication in the game Counter Strike 1.6. Listen to the tips and make your game much better and more enjoyable!
Articles for cs go
sandwich
02.05.17
17 928
1
Welcome to the project site. Sandwich is with you and today we will talk about setting up a microphone in cs go. Many of you have probably encountered the problem that sometimes the microphone does not work in the game or you are hard to hear. After reading the cs go guide: setting up a microphone through the console in the cs:go game, you can easily set up your microphone. Below there are console commands that you need to copy and paste into the console with your value.
Console commands for setting up a microphone in cs go:
voice_loopback 1- if we indicate the number 1, then you will hear yourself. I recommend that you enable this command and create an empty cs go server where you will configure it. It will be much clearer for you, then indicate 0 and disable this option after all the settings.
voice_scale X- the command will allow us to adjust the volume of all players in cs go. Where X is a value from 0 to 1, in increments of 0.01, that is, we can specify the parameters: voice_scale 0.30, it’s up to everyone. If you want to completely mute the players, I recommend visiting the game menu and muting the players there.
voice_overdrive X- it often happens that loud shots, footsteps, explosions are heard, but no information is heard from an ally. The voice_overdrive command will allow you to reduce the noise of gunshots, explosions and other noises. The command only works when someone starts speaking into the microphone, and the extraneous noise immediately decreases. Write the value 10 to the console and all unnecessary sounds will decrease by 50% when someone speaks.
voice_overdrivefadetime X- will allow you to determine the time in seconds at which the sound attenuation effect will be effective. I recommend setting the value: 0.4
voice_maxgain X- makes the sound of your allies much better, the sounds are smoothed out. I recommend the value: 3, but it is better to conduct an experiment on public pages.
voice_avggainX- removes noise that can be heard from you. Value from: 0.1 to 0.5
voice_fadeouttime X- this command allows you to fade out your voice, I recommend setting the value: 0.1
snd_restart- it happens that some maps have their own music, which can interfere. If you don’t want to hear music, I recommend that you write the command in the console: snd_restart, it will turn off the music for you.
snd_show- did you like the music that plays on the server? Write this command: snd_show to the console and any sound on the server will be shown from which folder it was taken.
This concludes the microphone setup, I hope you have configured your microphone. If you have any questions, ask in the comments, I will be happy to answer them. If you have anything to add to the cs go guide, I recommend that you write in the comments what I forgot to write, I will add to the article, and I will thank you. Hmm, I almost forgot, if you play with skins in cs go, I recommend reading the article that reveals the secrets of skins, it’s quite interesting, article
Voice communication is a key link necessary for a serious game in counter-strike 1.6. When playing in public, many will not notice the difference, except that it becomes much more fun to play, but well-coordinated team play is impossible without good communication. If you want to participate in clan wars and eventually go to championships, you need to master it.
Microphone settings
In some cases, it is not necessary to have headphones with a microphone; if you have a modern laptop, then it should have a built-in microphone by default; such a microphone works flawlessly, since it is part of the native hardware.
If you have a PC, you can use headphones with a built-in microphone or a webcam. Connect them to the required connector and you can start setting up.
The entire action of launching a microphone in KS lasts for a few simple steps:
1) Launch the game
2) Go to game options (options)
5) Adjust the sound recording volume as you wish, this is done by scales with sliders
6) Click on the test microphone button in the recordings. If anything, turn up the volume.
7) Even if the volume is not enough for you with the sliders turned up to the maximum, you can use the “Boost microphone gain” function.
You can now use the voice feature in the game to use it hold down the k key, then a loudspeaker icon will appear on your player interface (depending on the build) and you can talk. If you release the key, the function will be interrupted, this is understandable; voice noise would distract players if the connection worked constantly.
If the microphone in the game does not work, you should check its functionality:
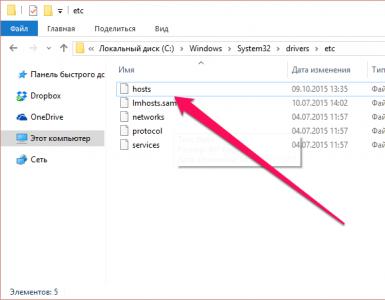
On older systems, like Windows XP, you need to select the volume tab on the right side of the taskbar and go to its properties. Among the sections in the volume controls, find the microphone and check the box next to it. Now the volume tab will display a microphone volume slider, set the volume you need and in the additional settings enable the MIC boost option.
On modern systems, like Windows 7 and 8, there is no access to properties in the volume tab. Therefore, go to the control panel, then to the equipment and sound tab, go to sound and select “Record”;
If you don't have a microphone set as your default recording tool, now is the time to do it. Using the “microphone” icon, right-click and select its “properties”, after which we make the necessary changes.
To check the functionality, you can listen to your own microphone, to do this, select listen and start listening to the sound from the selected microphone, after you clicked apply, you can experiment with the volume.
Fine-tuning the sound output through the microphone is possible through the levels tab.
The mIRC client is a convenient free program, somewhat similar to the console in CS, where you can write scripts, commands and easily sit in closed channels to communicate with teammates.
The procedure for installing it is as follows.
First you need to download the client
Launch the launcher and install it on your computer
Everywhere is empty, because you need to select a server, select the bookmark of the same name.
We write irc.quakenet.org 6669 to the server address
Add the address to the list indexed by the client using the ADD button.
Let's connect at the chosen address.
We connect to the channel, where we can find a partner to play or even a whole team.
For playing with premade
Mix.ru
Mix.rus
Promix
Hsmix
For team games
5x5
Csdm.ru
Pracc.ru
Alternative connection option
The first five points are identical to the previous one, so we boldly repeat them.
Instead of going to the servers tab, we enter a console command, enter the following: /s de.quakenet.org 6669.
To select channels later, we will also use the console, enter the command: /j ***, but instead of asterisks we enter the name of the channel, that is, for example: /jmix.ru. Immediately after entering, you can go to the desired channel.
Difficult channel search
Many people gather in cozy closed societies, almost like guilds, they sit on special channels, access to which is possible only after authorization. It’s not a fact that you will find what you need there, but usually seasoned mIRC users sit there.
As you can see, you need to do quite a lot, but all this is done once, so it’s better to be patient and see it through to the end, the advantage over other players without a connection is worth it.
It’s worth noting right away that authorization is optional and many players successfully play and form teams without it, since the capabilities of the channels are not limited. On the other hand, an authorized user has an exclusive right to his nickname, that is, it is something like a passport. To do this, we must enter the same information in the registration fields as when logging in, only then confirm it by clicking on the link from the letter that arrived in the mailbox.
Next we will be transferred to mIRC and we will have to enter the following: /msg [email protected] auth *nickname* *passwordname*. We can find them using the link that came to the mailbox, after which registration can be considered complete.
Search for players in MIRC
For easy navigation, mIRC has its own dictionary of established commands and concepts; it is constantly updated, so search latest versions in a search engine.
Here are the most established concepts:
Amsg message that is read by all players in the channel.
On/+ - means that you have the requested service enabled, + means I confirm
OFF/ - means that you have disabled the requested service - means negative.
Noob - for beginners in serious counter. Please note that good players in public matches can also be noobs.
Mid- average level counter games (i.e. high for public)
HS - high-skilled, i.e. high level games.
PRO level of eSports player's game
FFM- free for mix. The player is looking for other free players to play together.
Steam - Clarification that you have a steam version of CS (licensed)
TS and Ventrillo. Two well-known voice communication programs are the most popular among counter-strike players and are used by established teams.
PCW - training match.
X VS/V X. Where for x we take a number from 1 to 5, this means the rules for conducting a match, be it a duel, a battle of mixes or a full-fledged team deathmatch.
Example
So, we enter SEEK PCW or SEEK HS PCW into the chat, which means searching for a team for a training match, the prefix HS means highskilled, that is, you sign off on your own ability to play well and are looking for a similar team.
Alternatively, you can not join someone else’s mix/team, but create your own, to do this, create your own channel, in order to do this, simply write the join to the unoccupied channel name (/j *channelname*). Next, set a name or, in other words, a tag on your channel.
A tag is the name of a team, so CS players also call it a clantag.
Description:
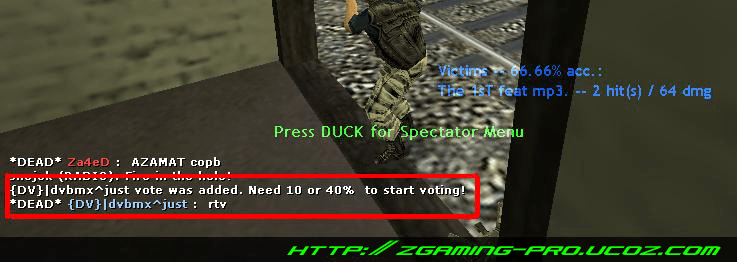
The plugin allows players on the server to organize votes for changing the map.
For voting to take place, a certain number of players must write "/rockthevote", "rockthevote" or "rtv" in the chat.
Maps will be automatically loaded from the maps.ini file (if one exists) or from the mapcycle file.
Installation:
1. Place rockthevote_custom.amxx to a folder plugins
2. Register rockthevote_custom.amxx plugin in plugins.ini file
3. Open configuration file amxx.cfg and enter the necessary variables there
4. Restart or change card
Variables:
amx_timevote- how many minutes will voting work from the start of the game on this map (by default - 5)
amx_howmanypercentage- what number of players (in percentage, 0 - 0%, 1 - 100%) should vote for changing the map (by default - 0.3, that is 30%)
amx_howmanypercentage- how many players should vote to change the map (default - 8). That is, if 30% of the players voted, but the number of voters turned out to be less than 8, then the map will not change (this was done so that if there is a small number of players, the rest do not get screwed because of two or three idiots)
amx_rocktime- the length of time (in seconds) allocated for the voting itself (by default - 10)
amx_directmapchange- the server will display a message in the center of the screen, let you finish the round and change the map (default - 0)
Steam UI - Metro for Steam:
Created - March 26, 2012
Current version is 3.8.4
Last updated - September 2, 2014
Updated - By the Author
Steam BroadCast Support - Unknown
Steam Music Player support - Yes
Steam Trading Cards support - Yes
Steam Big Picture Mode support - Yes
Description:
Skin for the Steam game client, made in the Metro style (Windows 8 / Microsoft, Metro UI).
:: Description::
Everyone probably knows the ready-made servers from the site c-s.ua, and everyone also knows their unpleasant inscription “*** CepBep Cka4eH C c-s.ua ***”. Well, I wrote a plugin that does exactly the same thing, only the message wakes you up;]
I made 2 types of plugins with 1 in 1 actions, like on c-s.ua. Type 1 - the message wakes you up as usual (under the radar). Type 2 - the message awakens in a new way, over time.
CVAR's:
reklamko_time "180" - interval between displaying HUD messages (in seconds)
reklamko "TEXT" - a message that is displayed in the game
[+]
reklamko_time_msg "5" - time in seconds for how long the inscription will hang.
Additionally:
- Let's open the source code (.sma)
- We are looking for the line set_hudmessage(0, 255, 255, 0.02, 0.18, 0, 6.0, 5.0)
- In the line, 0, 255, 255, these are the colors of the R G B format (you can change them)
- 0.02, 0.18, are the X Y coordinates where the inscription wakes up (you can change it)
Connection
First you need to connect the microphone to the computer; according to the standard, this is a pink Mini-jack (Ø 3.5 mm).
Now you need to make sure that the microphone is working.
1) Go to Start Menu => Control Panel => Hardware and Sound => Sound => "Recording" tab;
2) Find "Microphone" and make sure it is selected as the default recording device. Right-click on it and select "Properties".
3) Go to the "Listen" tab, check the "Listen with of this device" and click the "Apply" button. You should now hear your voice through the speakers.

When you are sure that the microphone is working, you can go to the “Levels” tab and adjust the microphone sensitivity for the best voice transmission:

Now you need to make sure that the microphone is working.
Go to the volume control menu; to do this, double-click with the left mouse button on the speaker, which is located in the Windows notification area (lower right corner of the screen).
Turn on the display of the microphone volume; to do this, go to “Properties” and check the box next to “Microphone”.


Set the microphone volume to maximum and uncheck "Off." You should now be able to hear your voice through the speakers.
If you can't hear the voice, turn on the display of additional options and click on the "Settings" button.

Uncheck/check the box next to "Mic Boost" and test the microphone again.

If you cannot hear sound, run the Audio Device Test Wizard. To launch the wizard, go to Control Panel -> Sound, Speech and Audio Devices -> Sounds and Audio Devices -> Speech -> Check...

Microphone settings in Counter-Strike 1.6
1) Launch the game;
2) Go to the menu (Options);
3) Go to the Voice tab;
4) Check the box "Enable voice in this game";
5) Set the volume controls “Voice transmit volume” and “Voice receive volume” as desired;
6) Click "Test Microphone" and check if the volume of your voice is loud enough;
7) If the voice is very quiet and the volume controls are at maximum, then check the "Boost microphone gain" checkbox to boost the microphone.

Console commands for setting up a microphone:
1) voice_loopback 1 – Enables playback of your own voice in the game.
2) voice_scale x – Speech volume level.
3) voice_overdrive N – Attenuates all sounds (gunshots, footsteps, etc.) N times when someone speaks. The optimal value is from 1 to 2.
4) voice_overdrivefadetime x.xxx – Time in seconds during which the effect of weakening ambient sounds will operate (see the previous command). Optimally 0.4.
5) voice_maxgain x – Smoothes out the speech voice. Bet from 1 to 5. Experiment while playing.
6) voice_avggain x – Voice wave averaging (noise removal). Set it to 0.5 - 0.1.
7) voice_fadeouttime x.xxx – Time at which your voice fades out. Leave it at about 0.1.
8) voice_enable x – 0 - disable voice in the game, 1 - enable voice in the game.
To make maximum use of your network traffic, write the commands ():
cl_updaterate 100
cl_cmdrate 100
rate 25000
Important. The Counter-Strike 1.6 server can use two codecs for voice processing:
Miles is an old and low-quality codec;
Speex is a more modern and high-quality codec.
Enable the Speex codec using the sv_voicecodec voice_speex console command and configure the voice quality:
sv_voicequality x – voice quality level
1 = 2400 bps, low quality
2 = 6,000 bps
3 = 8,000 bps
4 = 11,200 bps
5 = 15,200 bps, highest quality.
If you want to use the original, old Miles encoding system, write the console command sv_voicecodec voice_miles.
Now go to the server and press "K" when you speak you should see a picture of a speaker in the bottom right corner

Attention: DO NOT RELEASE THE KEY UNTIL THE END OF THE PHRASE. YOU CAN ONLY BE HEARD WHEN YOU HOLD "K" PRESSED.
Possible problems with a microphone and their solution:1. Check the connection
Mini-Jack
These types of errors are just a small oversight. Connecting your microphone to the correct jack on your sound card can sometimes be confusing or just plain wrong. Most analog microphone connectors have a Ø 3.5 mm mini-jack connector, are pink in color and belong to the corresponding pink connector on your audio device. Some devices are not color coded, in which case it is recommended that you refer to the user manual for your device. sound device to be absolutely sure that your microphone is connected to the correct port. Sometimes checking for this problem can save you many hours of troubleshooting.
USB bus
Try changing USB sockets. If you are using a USB port on the front of your computer, switch to one on the back. If you are using a USB hub, try not using the hub.
2. Check your drivers
This applies to both your microphone (if you're using USB) and your sound card. Sound card drivers play a key role, especially if you are running Windows Vista. Find out the manufacturer of your audio device (Realtek, Creative, SigmaTel, etc.) and visit their official website to download drivers. If you don't know where to find this information, check your motherboard's manual (for built-in sound cards).
3. Close conflicting applications
Programs such as TeamSpeak, Skype, Ventrilo, etc. can intercept the microphone signal. We recommend disabling these programs while playing to ensure that the game has full access to your microphone.
Poor voice quality
Feedback/Echo
Typically, echo can occur if you have your speakers turned on while using a microphone. It is recommended to use a headset with headphones to ensure your communication is clear to other players. Some cheap, low-quality microphones pick up sounds from all directions - including sounds coming from a stereo surround sound system (5.1, 7.1...). Turn down your audio devices and see if your voice quality improves.
In some cases, the headphone wires may have poor insulation, and the signal coming from the microphone wire may be transmitted to the speaker wire.