Creation of simple 3D models. VariCAD computer-aided design system
You will need
- - damaged HDD; - Personal Computer; - special utilities; - Internet; - computer skills.
Instructions
First of all, carefully remove the hard drive from the system unit. Do not throw it in the trash if it is physically damaged, since even in this condition of the disk, lost files can be recovered. Connect the removed drive to another computer or insert it into an external USB enclosure.
Next, use special utilities, which can be free or conditionally paid. Such utilities as O&O UnErasc, PC Inspector File Recovery 4.1 and Zero Assumption Recovery (or simply ZAR.) have proven themselves well. Using the O&O UnErasc and PC Inspector File Recovery 4.1 utilities, scan the disk and select the necessary files from the compiled list of lost data. Files, when using these utilities, can be restored completely if, when they were deleted, no information was written to the hard drive. Using the Zero Assumption Recovery utility, you can recover files even on a formatted hard drive.
File loss is often caused by damage to the sector tables in the Master Bool Record, i.e. master boot record. To restore them, download free simple programs from the Internet that effectively reconstruct the MBR using file structures. Programs such as: Active Partition Recovery or MBRlool 2.3.1 easily recover damaged sectors.
To avoid permanent loss of files, create an exact copy of your hard drive. To do this, purchase special program, for example, HDClone 3.2., which will copy the hard drive sector by sector.
note
Be careful when purchasing any programs, especially on the Internet, as some of them can pose a real threat to your computer.
Some utilities (shareware) restore files in several passes, so for quick recovery, purchase license key, for a fee.
Related article
Sources:
- Active Partition Recovery
- how to recover files from a damaged hard drive
Scratched CD/DVD disk, and the drive refuses to read it. This is a painfully familiar situation, isn’t it? Don't rush to throw away the disc unless you absolutely need the information it contains. It is possible to save data.

You will need
- toothpaste, Nero Drive Speed utility, AnyReader utility
Instructions
First, try cleaning the dental disc by slightly wetting it. Use a tissue or gauze for cleaning. Make movements slowly and be sure to move from the center to the edge along the radius of the disk, and back. Wash off the toothpaste, wipe the disc dry and try to open it.
Now reduce the speed at which the drive reads data from the disk. If you use the well-known Nero software package, then its distribution usually includes a utility called Nero Drive Speed. Or download and install a program like CDslow from the Internet. An important and necessary part of the interface of such programs is intuitive.
Launch the program. A wizard window will open in front of you, which will help you perform the required actions according to your data corruption case. You need to recover data from a laser disc, and therefore in the first step we select item 2 - “Copying information from damaged CD/DVD/Blu-ray/HDDVD/Audio CD/Audio DVD”.
Select in the file tree those that you want to recover from the damaged disk, tick them, and then click on the “Next” button.
In the 3rd step, select a folder to save files on your computer, check the “Save folder structure” checkbox in order to ensure the order of the files in their desired location relative to each other. In the list of copy settings profiles, select the recommended one (High-quality data recovery).
In the 4th step, the program will copy the files you selected. Please wait until the process is completed. And step 5 is to complete the copying.
Video on the topic
Sources:
- Source in 2018
Removable storage media have long become an integral part of the process of full-fledged work with computer system. How to find all connected removable hard drives?

Instructions
Call the main menu of the operating system Microsoft Windows by clicking the "Start" button and go to "My Computer" to perform the operation of identifying all removable hard drives on local computer.
Call the element’s context menu by right-clicking and select “Properties”.
Select the "Device Manager" tab of the dialog box that opens and identify the removable media you are using.
Make sure there are no yellow exclamation marks in the USB Controllers section. The presence of such icons may indicate the need to update the drivers of these devices. To perform this operation, call the context menu of the element to be updated by right-clicking and select the “Update driver” command. Select the Automatic option and press the OK button to confirm the command.
Return to the main Start menu for an alternative procedure for identifying all removable drives and correcting possible problems and go to Control Panel.
Select the "Storage Devices" group in the left pane of the disk window and select the "Disk Management" command.
Identify all removable drives used by the system and make sure that each of them is assigned the appropriate label - the letter of the drive name.
Call the context menu of the drive to be repaired by right-clicking and specify the command “Change drive letter or drive path” in the drop-down list.
Click the "Add" button in the dialog box that opens and select the desired drive letter value in the drop-down directory of the new dialog box.
Confirm your choice by pressing the OK button and wait for the autorun window to open.
Sources:
- What to do
- The computer does not see the hard drive
Tip 4: How to recover files from a damaged hard drive
There are many programs available to recover deleted data from a hard drive. When working with damaged hard drives, you must use highly specialized applications.

You will need
- - PC Inspector;
- -Dr. Web LiveUSB.
Instructions
When you are dealing with a damaged hard drive that operating system, you need to use special utilities. In this case, you will need to start the computer in DOS mode. Download the PC Inspector program from http://www.pcinspector.de/default.htm. It is distributed, so you will not have any difficulties activating it.
Create a boot disk or USB drive to be able to run the program before entering the operating system. You can use a ready-made utility, for example Dr. Web LiveUSB, adding the program you need to it. Insert the created DVD into the drive or connect the flash drive to the USB port. Turn on your computer and hold down the F8 button.
Select the desired device in the boot menu that opens. Launch PC Inspector. Select the item you need in the quick launch menu that opens. Considering the fact that you are working with a damaged hard drive, it is better to use the Find Logical Drive option, which is located in the Find Lost Drive section. This will let you out of the lost disk partition.
Wait for the hard drive scan to complete. Select the section you need. In this case, you need to be guided by the sizes of previously existing volumes. After restoring the partition, you can start the Windows operating system and continue working with the hard drive.
If you need to recover lost files, then open the Select Local Drive menu, located in the Recover deleted files column. Select the desired disk partition and click the Scan Drive button. After some time, you will be offered a list of files that can be successfully recovered. Save them using another partition on your hard drive.
They brought a DVD from the kindergarten with a recording of the matinee. Which, as luck would have it, but why be surprised, almost immediately began to “stutter” in several places. It was Friday evening, so there was no one to quarrel with or sort things out with. I really wanted to watch the matinee, but I had no desire to wait for Monday.
The topic of restoring scratched and/or unreadable disks is not new and has been relevant since their inception. But over the past three years, CDs and DVDs have almost completely gone out of use. The Internet and flash drives did their job. Therefore, I had to practically rediscover the world of everything related to optical storage media.
So, what do we have? DVD-R Printable with the UDF file system on which information is recorded in DVD video format.
Which “stutters” at certain time intervals when played on a DVD player and completely refuses to be copied through DVD drive computer. A quick glance at the work surface showed several scratches. Which most likely led to such sad results.
Differences in the principles of reading a DVD player and a computer
The player must produce a time-stable picture. And therefore it “swallows” faulty areas. That is, if something is not readable, then the player moves on. Therefore, on “worn out” discs, an unstable, crumbling picture and missing sound are possible. It is believed that a short-term loss of image or sound quality is less evil than a complete stop in the video presentation. That is, you as a viewer will not lose the essence.
The computer reads the disk not as a stream of information, but absolutely down to every byte. And the loss of any byte is critical for it and is considered an error. Which of course is true for programs and databases. But for images and sound this is not always possible. After all, even if there is no sound in the film for a couple of seconds, you most likely will not notice anything. And if you notice, it is unlikely to spoil the overall viewing experience.
Mechanical and software method of data recovery
The mechanical method involves influencing the media itself, that is, the CD. As a rule, this is grinding the surface to hide scratches and restore the correct angle of laser reflection. I myself witnessed how a “stuttering” disk, after washing in warm water, began to work like new. I will not dwell on this method in detail, since I have never resorted to it, and I have nothing to recommend. I'll just say that this method restoration of disk performance is a temporary phenomenon. Therefore, immediately after sanding it is necessary to create a backup copy.
The software method is more suitable for recovering data from music and video discs. When 100% reliability is not important. And it is produced with the help of programs and utilities that read the disk using special algorithms, trying to extract as much information as possible from it.
Ideally, both methods should be used. Software from the beginning. If it didn’t work out 100%, then mechanical and again software.
Programs for reading bad CDs
In this article I will only talk about free solutions. Since for one damaged DVD there is no point in buying a paid program. And free solutions may be less convenient and less functional, but for one-time recovery they bring the same result. Which is exactly what I need.
Recovery ToolBox for CD Free
The Recovery Toolbox for CD Free utility (official website) is designed to recover data from damaged media of the most common types today: CD, DVD, HD-DVD, Blu-Ray, etc. The program allows you to recover files of any type. The utility performs a full scan of damaged disks and saves as much information as possible. During the recovery process, Recovery Toolbox for CD Free applies a large number of different algorithms, which significantly increases the quantity and quality of recovered data. And most importantly, the program is completely free!
Insert the CD and launch the program Recovery Toolbox for CD Free and we see the interface for housewives. Which is undoubtedly a plus, since everything is clear and understandable without words. First of all, select a drive with an unreadable disk.
Next, select a location on the computer’s hard drive where we will copy data from the optical drive. 
Now select the folders and files that need to be copied from the DVD. In my case, select all, since I need to copy the entire disk. Click the “Save” button... 
And the copying process itself will begin, which can last for long time, up to several hours. 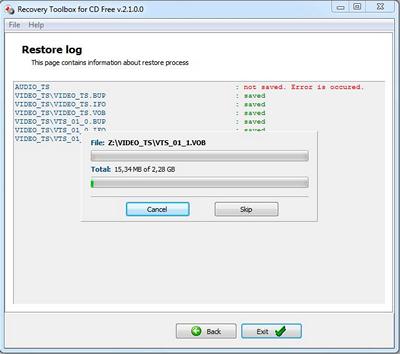
When the utility finishes running in the destination folder on your hard drive, you will get the maximum of what you were able to copy from the CD. 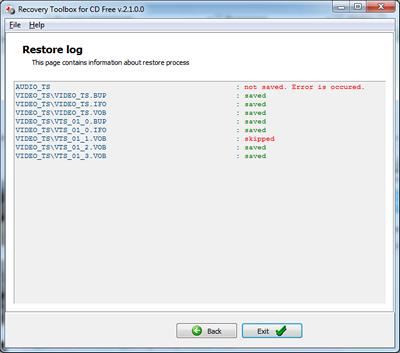
Non-Stop Copy
Non-Stop Copy is a utility for copying files from any damaged media. The program allows you to copy damaged files from any media, and information from unreadable sectors is replaced with zero bytes. It also tries to read information from poorly readable sectors in several attempts.
The program does not use any low-level methods for reading information, and thanks to this, it works correctly on any type of media and on any file systems supported by the operating system.
The latest version is dated 2006. But don’t be scared and look for something fresher. And now in 2013 she is doing an excellent job with her tasks. I personally tested the Non-Stop Copy utility on a Lenovo laptop running Windows 7 Ultimate x32 and showed excellent results.
You can download the program from the official website. There's also detailed instructions on its application. I noticed only one drawback in the interface functionality: you can only copy one file at a time. But this misunderstanding is easily resolved by the batch file that the author provides as part of the program distribution. By the way, the program does not require installation and, accordingly, does not damage the operating system.
We launch the program and select the unreadable file and the location where we will save it. Then press the “Start” button. 
At first, the program performs a quick copy of the entire file, without stopping at problem areas. Approximately the same way we do a DVD player. The picture below clearly shows the unreadable data. 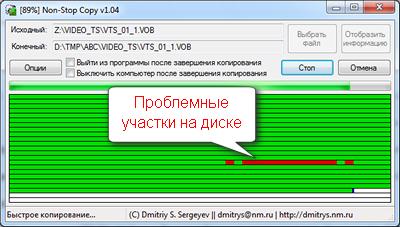
Then all the computing power of the program's algorithms is turned on to minimize the presence of red sectors. This process can take several hours and in the end you will get something like the following picture. 
As you can see, instead of solid red fields, there are only lonely red lines. That is, data loss is quite insignificant and quite acceptable when copying video data.
I would especially like to dwell on the program control buttons. During the copying process, two buttons become available to you: “Stop” and “Cancel”. The functionality is not entirely clear from their name. The “Stop” button completely stops the copying process, while all data about the state of the process at the time the copying was stopped is saved. The final file after stopping is the same size as the original file. It contains everything that was copied, and parts of the file that were not copied or that could not be copied are replaced with zero bytes.
The “Cancel” button completely cancels the copying process, and everything that was copied is deleted. In general, this button is provided in case you need to quickly stop the process and at the same time you are no longer interested in its result. For example, pressing the “Stop” button at the very beginning of copying a fairly large file can lead to some delay in stopping, due to the “overwriting” of the uncopied part of the file with zero bytes. The “Cancel” button in this case will stop the process immediately.
That is, if you are tired of waiting, but you need the data, then click “Stop”, and if you don’t need it, then “Cancel”. And the best part is, if you clicked “Stop”, you can subsequently continue copying from the same place.
A computer and the loss of one’s personal files is a fairly common problem that almost every computer user has encountered. If you find yourself in this situation, then we would certainly recommend that you trust the specialists and take the hard drive to a workshop. If you do not have the capabilities for this, or the data on the disk is not of particular value, or just for the sake of idle curiosity, you may well, at your own peril and risk, try to “bring back to life” a broken hard drive with your own hands, having familiarized yourself with this article.
Video tutorial on this topic:
restore Here we will look at recovery broken Seagate Momentus 2.5"" hard drive from a laptop followed by copying user data from him.
information For this you will need: a small screwdriver for loosening and tightening the bolts on the hard drive case and a regular office eraser.
data The most common failures of modern hard drives are: first - oxidation of the contact pad of the controller board; the second is the “sticking” of the read-write head outside the parking zone. We will consider ways to eliminate them further.
broken The first way. Unscrew the microcircuit from the surface of the hard drive unit. This is the so-called controller board. We turn it over and look for group of contacts, which connect to the contacts of the HDA of the hard drive (i.e., to the contacts of the block from which we just unscrewed it). Quite often these contacts become dirty and oxidized, which causes the hard drive to fail. If there is a coating on them, take a stationery eraser, with which eliminate pollution. We put the controller board, and then the hard drive itself in place and check its functionality. If the computer starts up normally, congratulations! If everything remains unchanged, then most likely the reason lies in the inoperability of the controller board itself, or a malfunction in the HDA of the disk. In our case, cleaning the contact pad did not give any results, so we move on to the second method.
hard The second method. Unscrew the bolts of the HDA cover. Don't forget that there may be additional bolts hidden under the hard drive information sticker! In our case, there was one bolt under the sticker. Having disconnected the cover from the block, checking the position of the read-write head. She should not be above the surface of the magnetic disk, if we see otherwise, carefully move the head to the extreme position (away from the magnetic disk) so as not to scratch the surface of the disk or damage the read-write head itself. We assemble the hard drive in reverse order, install it in the computer and supply power. By these actions we restored the hard drive and copied the information stored on it to a third-party medium, we hope that everything will work out for you.
disk We strongly do not recommend that you count on the continued permanent use of a hard drive whose HDA has been opened. All the steps described in the article are designed to help you recover files from it and copy them to another medium.
Has your laptop suddenly crashed? You can't boot Windows, or even run a recovery system from a CD. It is possible that the laptop is so damaged that it is impossible to boot Windows. What to do in such a situation to restore necessary files?
There are two possible solutions this problem and we will look at both. The first thing you need to do is remove the hard drive from the laptop. While this may seem like a daunting task, it is actually a fairly simple process. At the bottom of your laptop you can see a plastic case that covers your hard drive and RAM. Some laptop models have icons showing where the hard drive and memory slot cover are located. The hard drive is usually located under a large rectangular cover.
Open the cover using a Phillips screwdriver. Typically the cover is held in place by 1-2 screws. Once you lift the lid you will see a 2.5 inch portable hard drive. The hard drive is connected to motherboard through 2.5 IDE or SATA interface. Open all the mounting screws that hold the hard drive and simply pull it out of the connectors.
The next thing to do is determine the type of hard drive. This can be done using the image below, it shows the difference between IDE and SATA drives.
HDD 2.5" IDE (PATA) interface |
HDD 2.5" SATA interface |

Once you have determined the type of your hard drive, you can recover data using one of two methods:
1. You can connect your laptop hard drive to USB external enclosure"pocket" as shown below. These adapters are available for both IDE and SATA interfaces. They cost about 80-100 UAH. This is the easiest way to recover data like a laptop hard drive will work like external usb drive. Simply insert the hard drive into the adapter case and connect it to any USB port on another computer. The drive will be detected as a regular drive. Open "My Computer" in Windows and you will see familiar partitions on the disk that you had in your laptop. Just copy the necessary files or folders from your laptop’s hard drive to your computer’s hard drive. This completes the recovery of your data.

USB to SATA 2.5 adapter
2. This method assumes that you have access to a desktop PC that has an IDE or SATA interface. If your laptop has hard drive with SATA interface, then it can be connected directly to the SATA connector of the computer. SATA connector for data transfer and power connector, exactly the same as on a laptop and system unit.
Recovering data from a portable drive is a very simple procedure, just like connecting a flash drive to a computer.
Recovering files from HDD IDE 2.5
If your laptop has a 2.5" hard drive with an IDE interface, you will need a special cable to convert the 2.5" IDE to a 3.5" connection.

Adapter ide 2.5 to 3.5
Connect the 2.5 IDE side of the cable to the hard drive from the laptop and the 3.5 side to a free one IDE connector on the computer. Once the hard drive from the laptop is connected to the computer's motherboard, you can turn on the PC and you will see that a new hard drive has been detected. After that, this disk can be viewed and all data can be transferred to another partition.
Hello! Yesterday morning a friend called me and said that he killed his external hard drive. Hitachi (HGST) Touro Mobile 1TB. Which he bought about two months ago. Moreover, it reset all movies, photos, videos and programs, thereby freeing up the computer's hard drive. And now this external hard drive has stopped working and there is only 600 GB information that is very sad (especially photos).
But external HDD It stopped working for a friend for a reason :). It happened like this: the hard drive was connected to the computer and stood on the system unit, a friend wanted to relax and put his feet on the system unit, or rather on the external hard drive that stood on the system unit. And as it turned out later, the hard one began to whistle, but Andrey (that's my friend's name), I didn’t hear it because the music was playing very loudly. It whistled for a reason; it immediately stopped working. After disconnecting and connecting, it was no longer possible to open it. A message appeared indicating that formatting needed to be done.
Message: “You need to format the disk in drive G: before you can use it.”.

But what kind of formatting is there, so much necessary information. We thought about it and came to the conclusion that first of all we need to check for errors (and they clearly appeared there, most likely it has already begun to crumble). The standard disk error check in Windows 7 refused to check this external HDD. And in general, when you right-clicked on it, terrible freezes began. The method described in the article did not work.
Then a boot disk was used, which contains a lot of programs for testing and restoring hard drives. Utility chkdsk it started from the boot disk and even started checking our external HDD. But before reaching halfway, the check froze completely.
Another good utility Victoria The boot disk didn't even identify the problematic hard drive. But the problem there was that it was connected via USB, (I just now remembered that Victoria is also available for running under Windows, I could have checked it that way).
Other utilities that a friend tried to check an external hard drive with, or didn't define it, or gave errors when starting a scan. This means that it will be impossible to find or close damaged sectors.
And then a serious decision was made to format the external hard drive. If Windows writes that it needs to be formatted, then perhaps this will give some results.
A friend formatted this HDD and, oddly enough, it was formatted and started working normally. Files were copied and read from it. But the information disappeared and something had to be done about it.
And then a small and free utility came to the rescue Recuva, which we also noticed on that boot disk. A friend downloaded it from the Internet and he returned all the necessary information, which was deleted from the external hard drive during the formatting process.
He provided some figures: in total he restored approximately 200 GB. 15000 photographs, 10000 songs and 250 films (why does he need so many films? :)). And also 15 archives. He restored all the basic information. Since this process is not very fast, it did not restore unnecessary information.
As it turned out, this little miracle called Recuva saved my friend from depression and minor injuries that he could have received from relatives and friends for missing photos :). In fact, the program is good and a friend persuaded me to write an article about it, or rather instructions for data recovery using Recuva. That's what I'll do now.
The program is very simple and it is very easy to understand, especially since there is a wizard that starts when you open the program and with the help of this wizard you can very easily recover lost information from external hard drive, flash drives, or a regular hard drive on your computer (you can even specify the folder in which you want to find and restore files). Yes, as you already understand, you can recover information not only from an external HDD, I just have an example on such a drive.
Recovering information using Recuva
First, we need to download and install the Recuva program. Version 1.46 You can download via direct link – .
Open the archive and run the installation file. Select Russian language and press several times "Further". I will not describe the entire installation process, it is very simple. And you won’t read it anyway :).
When you see a window like the one in the screenshot below, click "Ready".

The Recuva program should launch, and along with it a wizard that will help you recover the necessary information from your drive.
When you see the wizard's welcome window, click "Further".

Next, we need to indicate the type of files you want to recover. For example, if you need to recover only photos, then check "Images", if music, then "Music" etc. If you need to restore all files, then check the box next to the item "All files". I think everything is clear here, click "Further".

We select a location on the computer, a flash drive, an external hard drive, a partition, a folder, etc. Simply put, the device from which we need to recover information. You can select a recycle bin, a flash drive, and specify the location to search for files manually. For example, I showed how to choose local disk D. Press "Further".

We see a window in which Recuva reports that it is ready to search for files. You can also check the box next to “Enable in-depth analysis” (check may take longer, but is more effective) and press the button "Begin".

You will see a window similar to the one in the screenshot below. It will display the process of analyzing the disk and searching for files to recover.

After the program finishes searching, you will see a list of files that can be recovered. You just need to select the files you need, or all of them, and press the button "Restore". Then select a location to save the files and click "OK". That's all the files will be restored to the location you specified.
Please note that next to each file there is a circle. It can be green, yellow and red. As far as I understand, this sign indicates damage to a specific file. I tried restoring the file with the red icon and everything was restored.

That's how simple it is, you can recover deleted files. If you want to open a more advanced program interface, then click on the button “Go to advanced mode” (I highlighted it in the screenshot above).
In advanced mode, you can open the program settings, you can view the file before restoring (if possible), you can view a summary of the file, run a reanalysis, and select other locations for analysis.

Afterword
External hard drives and devices are cool and necessary. I just ordered a pocket for HDD 2.5, which I had left over from my laptop, I’ll also make an external one for myself, maybe I’ll write a review later. But do not forget that these devices, like all others, can fail, especially if you put your feet on them (hi Andrey) :).
But if it already happened that there were problems with the operation of the external HDD and you, as in our case, had to format it, then with the help of the Recuva program, there are chances to restore your information, but information can sometimes be very expensive and I’m not talking about money now. There are a lot of programs for data recovery, but we came across Recuva and really liked it, many thanks to the authors.
As always, you can leave your questions, advice and comments in the comments below. Take care of your information. Best wishes!
Also on the site:
Recovering information from an external hard drive (flash drive, local partition) using the Recuva program updated: April 17, 2013 by: admin