Installing linux next to windows. Installing Ubuntu next to Windows
Not so long ago, in an article about installing VMware, I promised to tell you how to install Ubuntu in a virtual machine. I keep my word! But, installing Ubuntu will not just be on a bare machine, but next to the installed Windows 7. If you are interested in the question of how to install ubuntu nearby with Windows, then read on!
If you are interested in installing Ubuntu on a PC, then the information in this post will also come in handy for you, since there is not much difference. Whether it’s on Virtual Machine or on a PC right away, installing Ubuntu next to Windows proceeds almost the same way!
Basically, in this article I describe exactly how I install Ubuntu on my computer next to Windows. Just using the example of a virtual machine in order to take screenshots so that it is clear and visual ... That's it :)
If you are tormented by what doubts, fear of spoiling something, then in this case it is all the more worth it, so to speak, to practice on a virtual machine, and then feel free to proceed with installing Ubuntu on your PC without fear of breaking something.
The process of installing Ubuntu next to Windows is not difficult, but it is worth being vigilant and paying attention to disk partitioning! You can accidentally download an already installed Windows 7, and in the end you will not get what you wanted.
Whatever happens, one rule to remember , and it’s too early to talk about it, you will learn about it as you read this article. The "rule" is a strong word, of course...
Preparing to install Ubuntu next to Windows.
There is nothing special or complicated here. We will need a bootable "USB flash drive" with Ubuntu. How to create it, you can read in the following post:
If you, like me, are going to install Ubuntu in a virtual machine, then you may need information on how to boot from USB in a virtual machine. You can read about it here:
Now that the "flash drive" with Ubuntu is ready, you can proceed to the next step of preparation. I want to note that I created a “flash drive” with the “UNetbootin” program, I recommend doing the same ...
On this moment We have:
- Computer (VM) with "Windows 7" installed.
- Hard disk (Virtual) 100GB.At the moment, our task is to prepare the disk for installing Ubuntu and create 3 partitions. Namely:
1) "/" - This is the root directory for Ubuntu itself - let's allocate 10GB.
2) "/home" - This is the home directory for files, "Photos, Videos" and others. For example, let's say 40 GB.
3) And the third partition, the swap partition. I will have it on 2GB.Since we already have Windows, and on the topic of the post, Ubuntu is installed next to Windows. Therefore, we will prepare a disk from under the Windows soma. To do this, we will use the standard utility, which is part of Windows "Disk Management".
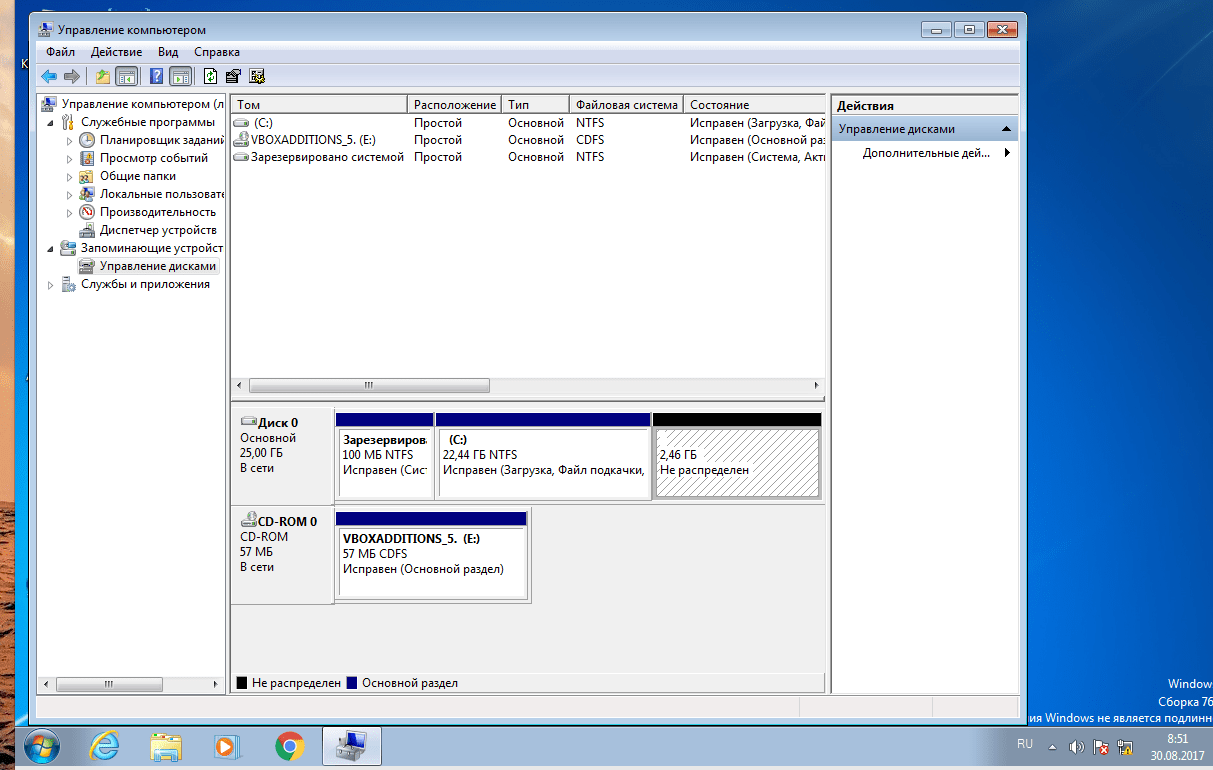
To run the utility, do the following. Right-click on "My Computer" in the context menu, select "Manage" and in the window that opens, select "Disk Management"
We see "Disk 0" here alone, this is our 100GB virtual hard disk. Click on it "RMB" (Right-click) and in the drop-down menu select "Compress Volume"
First of all, I will create a partition for Ubuntu itself, remember that in this case we have it at 10GB. Therefore, in the field compressible space size MB"We write 10000. Accordingly, we get a 10GB partition.
We press the "Compress" button and wait a bit, after which we get an unallocated partition!
Click on it "RMB" and select "Create a simple volume." The wizard for creating a simple volume will open, click the "Next" button further, just click "next" without changing anything, and in the next step check the box " Do not assign a drive letter or drive path»
Now create the other 2 partitions in the same way. Let me remind you, For the home partition "/home" 40GB and a swap partition of 2GB. In the end it will turn out like this. How many gigabytes you will have each section, it's up to you naturally)))
This completes the preparation for installing Ubuntu. Now you can continue on.
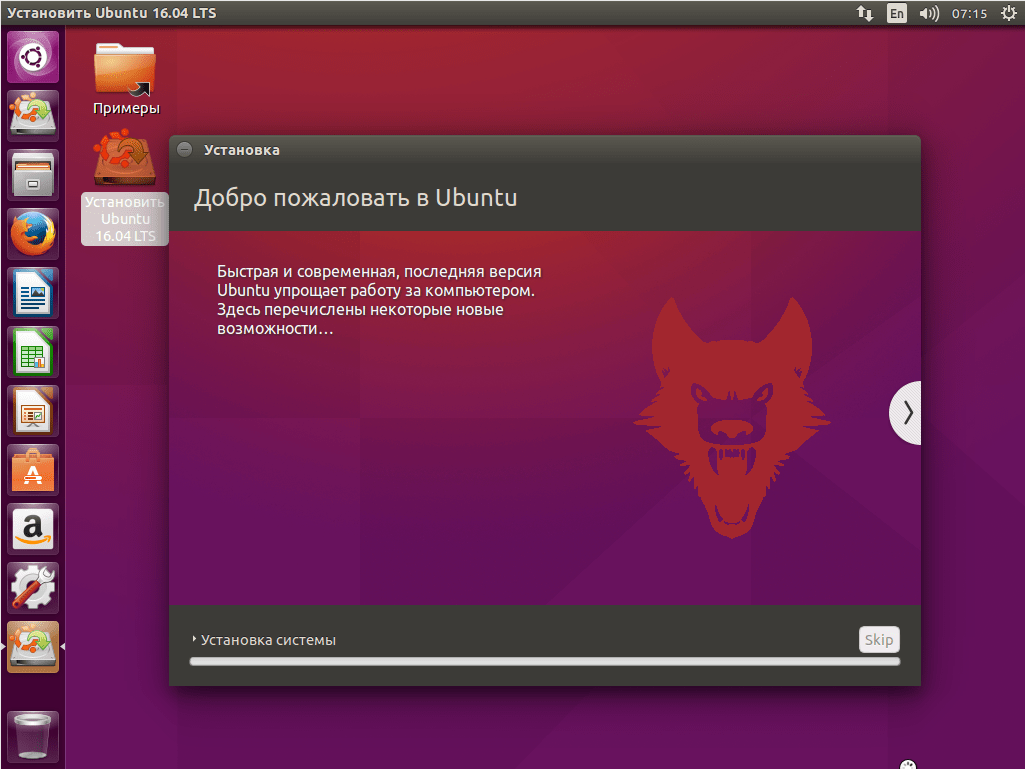
Now that everything is ready to install Ubuntu next to Windows! You can safely begin to perform the intended task. Boot from your flash drive. After loading, we see the following menus, select what is offered by default " Default» press Enter
Boot Ubuntu Live! Here we have the opportunity to get acquainted with Ubuntu without installing it. Take a walk through the settings, get acquainted with the system interface and much more.
As soon as we have played enough, we launch "Install Ubuntu ***" and proceed with the installation. The first step is to select a language, select Russian and click the "Continue" button
At the next step, if there is an Internet connection, then you can turn it off so that nothing is downloaded from the Internet during the installation process and it is not necessary to check the boxes below, since the whole thing can be installed after installing Ubuntu itself.
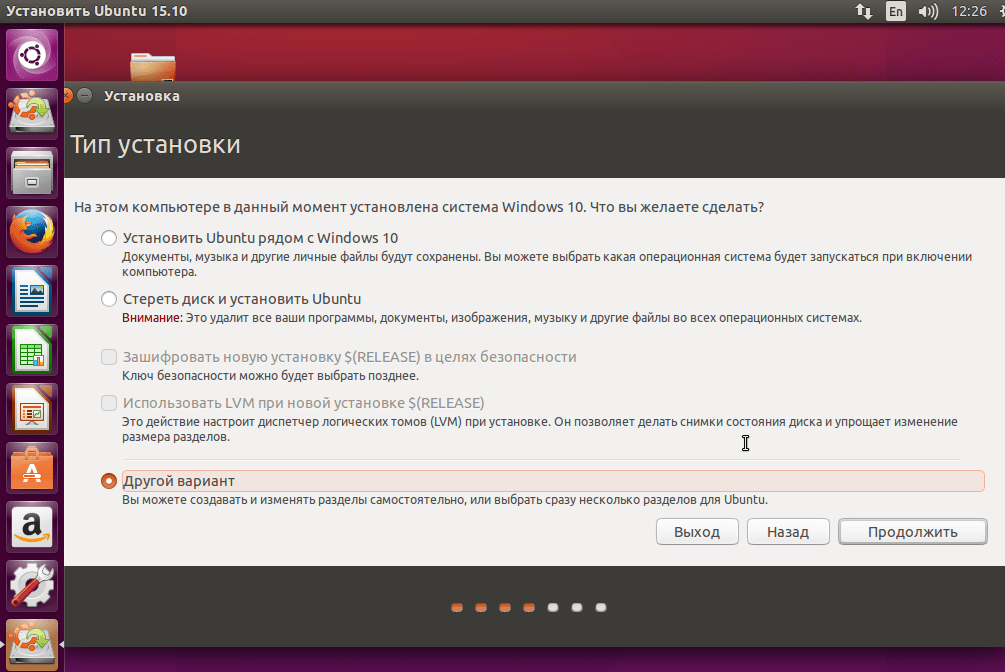
If you are installing Ubuntu on a PC, then most likely you will be offered a third option, immediately install Ubuntu next to Windows. In this case, we choose exactly " Another variant»
The next stage is the most responsible. Here we have to specify which section is needed for what. This is not difficult to do, but all exactly extra care will not hurt.
Remember about a certain rule that I mentioned at the beginning of the post? The thing is: Everything that is marked in the column " Type" How " NTFS"Do not touch, and then there will be no problems!
As you can see in the screenshot below, our “sda1” has the type “ NTFS”This is our local drive “C:\” Windows 7 is installed here. All other sections “sda3, sda4, sda5” need to be indicated what we need them for.
Let's start with "sda4", we have it on "10485MB", that is, 10GB. The Ubuntu system itself will stand here, respectively, this is the “/” partition. Let's point it out.
Select the "sda4" section with the mouse cursor and click the "Change" button in the window that opens, put the following:
— Use as: Ext4 journaling file system.
— Format Partition: the answer is positive.
— Mount point: Mount the partition "/" just select the slash "/"And finally, it remains to specify the swap partition, select "sda5" and set the following parameters: That is, just select "Swap partition" and that's it!
Now that everything is specified, select sda4 and click the "Install Now" button. And leave the device for installing the bootloader as it is.
Now, when the installation is completed, we will receive the following messages. Let's choose to restart the PC.
Now Ubuntu is fully installed! You can run it and get to work, study and much more!
First launch of Ubuntu
When your PC is rebooted, or just turned on, the bootloader will appear. It will now appear every time the Computer is turned on.
The first step is to launch Ubuntu, which we just installed next to Windows.
In the very last paragraph of the bootloader, we see the “sda1” section already familiar to us, it is not difficult to guess that if you select it, then it will start earlier installed Windows 7.
In custody!
This is how we installed Ubuntu alongside Windows. But the whole installation process took place on a virtual machine, as I said above, installation on real PCs is not very different, the principle is the same.
The long-standing rivalry between Windows and Linux has given rise to two absolutely irreconcilable camps of supporters of these operating systems. Indeed, both systems have advantages and disadvantages. Not all users have the opportunity to compare them, since the bulk of them use computers with pre-installed Windows. Another part of users is confused by an unfamiliar operating system and it seems to them easier from time to time to look for pirated keys on the Internet than to be faced with installing a new, even free, system. In fact, few of them realize that installing Linux is no more difficult than Windows, and moreover, there is the possibility of sharing them on one computer without any additional difficulties.
Before starting the installation, you must select a Linux distribution.
Choosing a Linux distribution
Linux is an operating system kernel that uses the features and developments of the Unix operating system. Linux is open software. This property of it served as the main catalyst for the development of the popularity of the platform.
IN pure form rarely, the Linux kernel is rarely used and more often serves as the basis for creating distributions that have different names and features depending on the purpose of their use. A distribution is the Linux kernel and the applications that define its functionality.
Most popular distributions:
- Ubuntu tops the list of the most popular Linux distributions for servers. It can also be installed on workstations.
- Debian is the leader in the content of applications and libraries;
- Parrot Linux is an indispensable distribution for sysadmins:
- LXLE is based on Ubuntu 16.04 - the most compact in terms of volume;
- Elementary OS is a great solution for workstations and laptops;
- Gentoo - for Linux connoisseurs, allowing the user to achieve individuality;
- Snappy Ubuntu Core - for IoT lovers;
- Red Hat Enterprise Linux (RHEL) - server distribution for corporate systems;
- CentOS - for small business, based on RHEL.
There are many other flavors of Linux that you can use to get the job done. Moreover, some distributions (Ubuntu, for example) can be used without installing directly from a USB drive. Such a drive can be carried with you and used on any computer. However, you need to understand that such use of the distribution kit significantly affects performance, especially if the installation is done on a flash drive.
If you managed to decide on the choice of distribution, then the next step will be working with the disk. Ubuntu 16.04.3 LTS will be used as an example
Disc preparation
First of all, you need to backup Windows. This will avoid unexpected troubles when making changes to the disk structure. To do this, you need to use the Windows Control Panel

You can also use the Control Panel to create a Windows restore point. All important information(work files, music and video) it is better to copy to external media.
Since it's about installing Linux alongside Windows 10 (or any other modern Windows version) you will need to make changes to the partition structure of the system disk. This allows you to organize the contents of the file system, providing additional protection for valuable user information in the event of a system reinstall, for example.
For better work Linux is better to use several partitions: system, user and partition for the swap file.
To allocate space for new disk partitions, you need to open the Disk Management snap-in. To do this, in the "Explorer" you need to right-click on the "This PC" icon. In the drop-down menu, select "Computer Management"

Then in the window that opens, select "Storage Devices" and "Disk Management". In the list of disks below, you need to select drive C, and by clicking on the partition that will allocate space for Linux, right-click on the menu item "Compress Volume"

A dialog box will pop up that will allow you to determine the size of the freed space

pressing the "Squeeze" button. At this point, the preparation of the Linux installation disk is complete. Now you need to move on to preparing the USB drive with the distribution kit.
Preparing the USB flash drive
You will need at least 1.5GB of storage to install Ubuntu 16.04.3. Other distributions will likely have different capacities. In the process of creating a bootable USB drive, all data on it will be erased. This must be taken into account if there are important files on the drive.
After downloading the Ubuntu 16.04.3 ISO image from the official website, you need to transfer it to the installation media using, for example, unetbootin for Windows. After launching this application, a window will open

in which you will be prompted to select the distribution image and the drive where the image will be transferred. Confirmation of the start of recording is made using the "OK" button. After the drive is ready, you need to proceed to the configuration Computer BIOS on which Linux will be installed.
BIOS setup
To configure the BIOS, you must restart the computer, and after new launch started, you must enter the BIOS by pressing the key indicated in the startup start screen (F2, Del or another). After entering the BIOS, you need to select the option to boot from a USB drive. It will look something like this:

After that, you need to make sure that the prepared drive with the distribution image is placed in the appropriate USB connector and proceed directly to the installation process.
Installing Linux (Ubuntu as an example). Some more work on the disc
If all the preparations were successful, then after the reboot, the boot disk will start and after a while a screen with different options for Linux will be available. You need to select the option - "Download without installation", since there is a need to carry out additional procedures with disk partitions. After booting Ubuntu, you need to enter Gpart in the search field and then open the "Gparted partition editor" application, which can manage disks.
In the window that opens, there is a list of disks, indicating their current parameters. If Windows 10 is already installed on the computer, then it will occupy the first partition of the disk. The next section will be for installing Linux. For drive C, this will look like /dev/sda1 and /dev/sda2, respectively. The designation sda2 says that:
- the first letter is this SATA, SCSI or USB drive (for IDE it will be hda2);
- the second letter is a disk;
- the third is the ordinal letter of the physical disk;
- digit - section number.
Similar to Windows Disk Management, you need to allocate 10 GB from this space to place the system partition in this space. This is done using the "Resize/Move" menu option. In the newly appeared section, it is necessary to select one more section, leaving in it a place for a section with paging and hibernation files in an amount equal to the size random access memory computer. If you do not plan to hibernate, then the volume of this section can be halved. The remaining space will be used for the user data partition.
The result of working with the disk will be three partitions for Linux:
- /dev/sda2 - system;
- /dev/sda3 - swap file;
- /dev/sda4 - home.
To complete the procedure, select "Apply All Operations" from the "Edit" menu.
In order to avoid damage to the installed Windows, you should not do any operations with the /dev/sda1 partition at this stage.
After completing operations with the disk and its partitions, you must restart the computer again and select the desired boot option in the Ubuntu screen that appears. After choosing to install the system, a dialog will appear that will check the network connection and offer to install third-party device drivers, after which several installation options will be offered:
- "Install Ubuntu alongside Windows 10" eliminates the work of creating additional partitions. The system will do it on its own.
- "Erase disk and install Ubuntu"
- "Other option" - a detailed installation option is offered.
The further scenario depends on the choice of these options, but leads to the appearance of a window in which you must specify user data: name and password, which are very important and must be remembered or written down. Next, the installation wizard will offer to transfer the settings to Ubuntu from the Windows credentials.
The next window of the installation wizard prompts you to make some additional settings and start the installation. To do this, you must select the "Install" button. This will start copying system files to disk and create a system. This will take some time, causing the following dialog box to appear asking you to restart your computer. Clicking on the "Restart" button makes the final reboot, after which you can start working with the installed Linux.
Installing Linux alongside Windows 10 UEFI
UEFI (Unified Extensible Firmware Interface) - new technology, which is the interface between installed operating systems and the BIOS. It involves creating an additional partition on the disk that controls the computer's boot scenario. And the presence of Windows 10 installed on the computer indicates that such a partition most likely exists, and at the time of installation, you should select this partition in order to install the bootloader there.
Linux boot
Once the installation is complete and rebooted, the initial screen will appear, and since Grub finds the Windows bootloader automatically, it provides several boot options that can be selected from the keyboard using the arrows and the Enter key:
- Ubuntu auto-boot unless another option is selected;
- Recovery mode for Ubuntu;
- memory test;
- Windows.
Before you decide to install Ubuntu as a second system, test the recovery of the Windows OS so that if something goes wrong, you won't find the backups unusable.
The reason for such a big effort: installing Ubuntu side by side with Windows can cause problems that are not only related to the Linux system. For example, the difficulties associated with the interaction modern options UEFI implementations.
Each manufacturer motherboards behaves in its own way and only tests for compatibility with Windows. Additional barriers to consider include signed bootloaders, fast startup, and power-saving mechanisms.
BIOS or UEFI?
Your computer's modern hardware is probably running UEFI firmware and Windows is installed in UEFI mode. If you have a PC or laptop for a long time, there may be a classic BIOS. To install Ubuntu, it is important to know exactly the layout, since you must select the UEFI or BIOS mode.
To check this, enter the query "System Information" in the Windows search bar and find the line "BIOS Mode". If it says "Legacy" (outdated), Ubuntu should be installed in BIOS mode. In this case, both Secure Boot and the Fast Boot option must be disabled in the BIOS, and the mode cannot be changed to "UEFI".
If the system information says "UEFI", Ubuntu should be installed in "UEFI" mode and use the 64-bit version. To run Ubuntu parallel to Windows in UEFI mode, Windows 8 and 10 users must disable fast startup. This is done in the power settings through the "Action of the power button" item.
In the Shutdown Options section, make sure that the Turn on Fast Startup option is unchecked. Windows 7 users must disable hibernation from the Start menu with the "powercfg /h off" command. And finally, disable the Fast Boot option from the UEFI firmware.
Space preparation for Ubuntu
To install Ubuntu side by side with Windows, you need enough space. The Ubuntu installer is capable of shrinking the space of an existing Windows. You can do this in advance, manually and directly from Windows. To do this, go to "Disk Management", which is called through the Start menu with the command "diskmgmt.msc".
 Typically, Windows takes up the entire disk, but can free up space for Ubuntu
 Even if you're a Windows-only user, there are often various partitions on your hard drive, including Recovery, UEFI Boot, and, of course, Windows System. The more complex the initial conditions, the more likely it is that the Ubuntu Boot Manager will crack its teeth on your system later on.
To shorten an existing section C Windows systems, right-click on it on the main screen of the utility and select Shrink Volume. Now you need to specify the size of the compressible space of the required space in MB. If you enter "20000", Windows will free up 20 GB for Ubuntu. This is enough to get started with Linux. To reserve a seat, click on the "Squeeze" button.
Installing Ubuntu
Start your computer again from the DVD or USB stick as described on page 85. In Live CD mode, click on the desktop icon "Install Ubuntu 16.04 LTS". Follow the wizard's instructions, choosing the language first. Connect via LAN or Wi-Fi to the Internet to get updates immediately.

The key point during installation will be the "Installation Type". In this case, you should select "Install Ubuntu next to Windows Boot Manager". Next, set the default settings, such as location and account.

At the end of the installation, you are presented with two options: stay in Live CD mode or restart your computer. Select "Continue exploring" and open the command line with the key combination "Ctrl + Alt + T".

The "sudo apt-get install efibootmgr" command launches a small tool for setting the boot order. The "efibootmgr" command will display information about boot entries. In addition to the line "Windows Boot Manager", the entry "Ubuntu" should appear. Use "sudo efibootmgr -o x,y" to change the boot order, where "x" is for the numbers before the Ubuntu entry and "y" is for the numbers before the Windows Boot Manager.
First steps in Linux
This operating system offers only a base for working with programs and web services. In order for everything to go smoothly, you should get acquainted with the system.
1. Introduction to the Desktop
 Ubuntu uses the so-called Unity desktop. It looks simple, on the left side is displayed the software panel - the launcher. In addition, a menu bar is located on top, similar to the implementation in Mac OS X from Apple. When you open a program, Ubuntu minimizes the menu to this bar at the top of the screen instead of a window. To feel like in Windows, move the launcher to the bottom of the screen. At the moment, this requires typing a command in the terminal. "gsettings set com.canonical.Unity.Launcher launcher-position Bottom" brings the panel to the bottom. An analogue of the well-known Control Panel from Windows in Ubuntu is the system settings.
2. Check for updates
 Like Windows, there are regular security updates for Linux. They need to be installed
 Once Ubuntu is installed, the system is considered up to date if the Wizard is allowed to complete the upgrade. For those who like to speed up the process, there is a command "sudo apt-get update && sudo apt-get upgrade". The first part of the command requests the latest package from the Linux servers, the second one starts the updates. To go to new version Ubuntu, for example from Beta 2 from premium DVD to final, type "sudo apt-get dist-upgrade" as well. If command line scares you, find the appropriate graphical interface in the update manager.
3. Installing programs
 There are many programs for Linux that you know from Windows. With the command "sudo apt-get install vlc" you can, for example, install the VLC media player. Gnome offers a graphical utility similar to the App Store for Ubuntu. In it, find "vlc" and click on the "Install" button.
Troubleshooting Ubuntu
Installing Ubuntu 16.04 side-by-side with Windows doesn't create any problems per se, as our tests confirmed when installing in BIOS mode. However, the devil is in the details, as our experiments with various PCs and laptops with UEFI found out. At the same time, everything seems to go like clockwork, but then Windows boots up again, and there is no word about Ubuntu.
If you're also facing the same issue, search Google for the exact model of PC or laptop paired with Ubuntu. The quickest way is to find tips on a specific BIOS / UEFI setting or a special bootloader adaptation. So, we failed with a Sony Vaio Pro laptop and an NCQ-enabled SSD drive. Only after disabling this feature did Ubuntu start up. In general, it is recommended to use latest version UEFI.
Instead of relying on Ubuntu to automatically set up your hard drive or SSD, you can resort to manual partitioning when an error occurs. The corresponding menu item in "Installation Type" is simply called "Other Option". Here you need to create three partitions: “/boot” for 250 MB (ext2 file system), a swap partition for 4092 MB, and you can give the remaining space to the root partition “/”. Let the bootloader write to the /boot partition.
Linux security under control
Even Linux is not invulnerable. In February 2016, hackers broke into the Linux Mint project server and changed the ISO files hosted on it. In the installation files, they hid a backdoor to steal passwords. But you can protect yourself.

Checksum verification. Manipulations with Linux distributions pop up immediately if the checksums do not match. Windows utilities such as md5sums display values for ISO files. They must match the data from the developers.
Photo: manufacturing companies
It's quite popular among new Linux users to use two operating systems on a computer - Windows as a secondary system just in case, and Linux as a primary system to learn. One of the most popular systems for beginners is Ubuntu, and most users still use Windows 7 and consider it the best operating system. Despite all the problems, she remains popular.
In this article, we'll take a look at how Ubuntu is installed alongside Windows 7. If you think about it, this is the easiest option that could be.
Installing Ubuntu alongside Windows 7
This is Windows 7, it uses a regular bootloader and does not yet know what UEFI is, so there will be no problems during installation. I am assuming that you already have Windows 7 installed on your computer and that you are going to install Ubuntu as a second system.
Preparing a hard drive in Windows
I have already written in more detail about what partitions and why are needed in the article partitioning a disk for Linux. But that's not the point. Now you have Windows and it takes up the entire HDD. We need to separate a little space from it, and at the same time make it so that nothing breaks and everything works. We could use the Gparted program directly from the Linux or Acronis boot image, but the safest way is to use the standard Windows tools. Click on the icon "My computer" right click and open "Control":
Then select from the left column "Disk Management":

Here you need to find a way to allocate some memory under Linux. Usually Windows has two disks, let's switch to Linux terminology and call them partitions. The first is C: this is the main partition on which the operating system is installed. The second is the D: drive, where files, games and other data are located. It is advisable not to touch the system partition at all, but to separate the space from drive D. But if you have already decided to reduce the system partition, for example, because you only have drive C, then in no case do not touch the beginning of the partition, you can only cut off from the end. And so, first we need to reduce the section. Therefore, mark the desired volume, right-click on it, click "Shrink Volume":


In the window that opens, you need to enter the amount of free space to which you want to shrink this volume:

We will need about 100 GB for Linux, at least 30 GB for the root partition, 10 GB for other partitions, and about 60 GB for the home partition. This is quite enough for you, so that later you don’t have to think about what to do in order to have more memory. When you select the volume, click "Compress".
When the compression is complete, an empty space will appear in front of you. This completes the work with Windows. Further partitioning is best done from Linux. Almost everything is ready to install windows 7 and ubuntu.
Burning bootable media
Next, we need to burn Ubuntu to our media, for example, a USB flash drive. Since we are working on Windows, we will use the Rufus utility. Download and run the program. In it, select the flash drive you are going to record on, then go down below and find "Create Boot Image", select "ISO image":

Then select the disc image you want to burn and click "Start":

When the recording is completed, you can restart your computer.
Preparing a disk in Ubuntu
Next, you need to restart your computer and boot from the media you just burned. I won't tell you how it's done. If you are going to install Linux, then you probably already know how to work with the BIOS. When the Ubuntu image starts, you will need to immediately press any key to select the language:

Select "Russian" and press "Run Ubuntu without installing". We need to run the system without installation because this way you will have more freedom in case of any problems.

When the system starts, immediately open the installer. While I will be looking at Ubuntu 16.04 stable, this will definitely work for Ubuntu 17.04, 17.10 and newer. Nothing has changed there, except for the desktop wallpaper.
In the first step of the installer, select the language:

Then do not forget to check the boxes that you need to install updates and additional software:

On the next screen, we can already move on to working with the disk. The installer itself identified Windows 7 and beginners, those who are afraid to go into disk setup themselves can select this item and install Ubuntu next to Windows 7 in automatic mode. But we will go the other way and look at manual disk partitioning, so choose "Another variant":

Here we see the free space that we allocated for Linux, I have 22 gigabytes, this will be more than enough to install the test system, but I recommend you take about 100 GB and definitely not less than 50. We have to create three partitions - a swap partition , root partition and home partition. First we make a swap partition. To do this, select free space and click the button "+" :

The size of the partition must be equal to the amount of RAM, and select the file system "Swap Partition":

The next partition is the root one, the size of the partition is from 30 GB, the minimum size is 8 GB, but it's better to take more so that you don't have to think about where to get the memory later. For example, in my working system, which has been installed for a year now, 17 gigabytes have been used on the root partition, despite the fact that I did not install any games or heavy applications. We select the Ext4 file system, and the mount point, the place where this partition will be connected in the file system, is naturally "/".


The last one is the home partition. It takes up all the remaining space, the file system is also ext4, and the mount point is /home.

System installation
Now everything is ready to proceed with the installation. We leave the bootloader as it is, let it be installed on this disk. It will transfer the Windows bootloader to the system partition, and write itself to the MBR. The installed Widnows will be detected and you can access it from the menu during boot. When finished press the button "Install Now":

Next, you still have to create a new user, select a time zone, keyboard layout and wait. There is nothing specific here, so see Installing Ubuntu 17.04 for information on that.


Let's say you read a few articles on the Internet and became interested in the free Linux operating system. Perhaps you even installed it on a virtual machine or booted into Live mode and tried how everything looks and works. You liked it, and now you want to install it on your computer and start using it. But at the same time, you don’t want to lose your already installed Windows, so that in case of an unforeseen situation you can return to a fully working system, and your favorite games and necessary programs will always be at hand. It is possible to install Linux and Windows 10 on the same computer. At one time, for me, as for many other users, this was the ideal option.
In this guide, we will look at how to install Linux alongside Windows 10. I say Windows 10 because it is the newest operating system from Microsoft, but these instructions will also work for earlier versions such as Windwos 7, 8, and 8.1.
I assume that you already have Windows installed, you have found and decided on which disk to separate some space for Linux from, but you do not know how to do it correctly. Here you will get a detailed answer to this question. Let's touch on another important topic - UEFI. This technology is used on all new Windows laptops, and many users are wondering how to install Linux on UEFI and what problems it may encounter.
To install the Linux operating system alongside Windows 10, you will need to create some additional disk partitions. The minimum number is three sections. It is not customary to install Linux on one partition like Windows, although this option is possible. Linux is so flexible that it allows you to place the system, user files, and settings on different partitions. This is very beneficial during reinstallation. You reinstall the system in the system partition, and all your files on the desktop and settings of the working environment will remain in place.
These are the three sections:
- System;
- Home;
- swap partition.
The minimum volume requirements for a system partition in various distributions vary from seven to twenty gigabytes. But this is enough to install the system itself and several additional programs. If you are going to use a lot of programs and games, especially if they take up a lot of space, you need to take another couple of tens of gigabytes in reserve. I recommend using under system Linux partition the same as for disk C Windows, 30-40 gigabytes.
The swap partition is used when the system runs out of RAM. At a certain percentage of filling, Linux gradually starts dumping unused data into this file. Therefore, for this section, the volume is half as small as the size of your RAM. But if you plan to use sleep or hibernation, then you need to allocate an amount of disk space equal to the size of RAM for the swap partition, because in these modes, the entire contents of the computer's RAM is transferred to disk. The home section is the section with your files, movies, music, downloads. Estimate how much you need.
Preparing a disk in Windows
To install Linux next to Windows 10 already in use, you will need to "cut off" space from the system drive. Therefore, before taking decisive action, it is important to back up the system or at least important files. If everything goes well, nothing bad will happen to the files or the system, but due to some kind of failure, such as a power outage, the file system may be damaged. You yourself, inadvertently, can do something wrong and delete the wrong thing.
Therefore, if you work with the system disk, copy important files to external media, and, if possible, create a backup copy of the operating system using the appropriate item in the control panel:

When working with a non-system partition, for example, D, E, F and so on, just copy the files from there.
Now we proceed directly to preparing the disk for Windows installation 10 and Linux. The easiest way to do this is with the standard disk management utility in Windows. Right click on the icon " This computer" on the desktop and open the item " Control":


Here, at the bottom of the window, we see two drives: C (system) and D (normal). I will give an example of how to resize drive D. For drive C, all steps are the same.
Right-click on the desired disk and select the option Shrink Volume:

This window will open, in which you need to enter the size of the volume to be created in the field compressible space size:

Note that you cannot specify a size greater than the amount of free disk space. So first free up some space if you haven't already. We click on the button squeeze. After that, unallocated space will appear, from which you can create the necessary partitions:

That's all. Now you have a place to install Linux next to Windows 10. I see no point in performing further disk partitioning in the Windows utility, since we have already done all the dangerous operations that could damage the system, and Linux partitions are best configured using Linux.
Disk preparation in Linux
This is not the next step to install Linux along with Windows 10. It is Alternative option disk partitioning without Windows usage. If for some reason you do not want to use the standard Windows utility to allocate the required space, this can also be done using any Linux distribution LiveCD with the Gparted disk management program preinstalled. For example, the same Ubuntu.

Boot from the Ubuntu disk, search for Dash and type Gparted:

The following window of the disk management program in Linux will open:

It is important to note here that disk partitions in Linux are named differently than in Windows. Here drives are just file addresses in the dev virtual file system. Later you will understand what this is, but for now it is only important that the name of each partition starts with /dev/sd. Next comes the letter representing the physical disk (sda, sdb, sdc, sdd, and so on). Behind it is a number that indicates the partition number on the disk, for example: sda1, sda2.
In the utility window, in addition to the name of the disk partition, we can see the file system, size and free space on the disk. Now, by size and file system, we can understand on which disk our system is located.
In my example, /dev/sdb1 is drive C on Windows and /dev/sdb2 is drive D. We will do the same as in the previous example. Let's reduce the size of the /dev/sdb2 (D) partition to 10 GB in order to install Linux on Windows 10 on the freed space. To do this, right-click on the partition and select Resize/Move:

In the window that opens, you can enter the desired size manually in the field new size or use the slider:

Then press the button Resize/Move.

As you can see, free space has appeared, but there are no real changes on the disk yet. In order to burn everything to disk, press the green checkmark, or in the menu Edit select item Apply All Operations:

The process of resizing the file system may take a little time:

Now you can see that the /dev/sdb2 partition has shrunk and there is free space:
For the system partition, the operations are the same, only there is one note: do not touch the beginning of the partition. You can safely reduce the size of a partition by adding free space after it, but don't try to do it before it, like this:

You don’t need to do this, otherwise the Windows bootloader will be damaged, it is very easy to restore it, but I don’t think you need to solve these problems at the very beginning of your acquaintance with Linux.
We will not create partitions for Linux here either, it is better to do all this during installation with a utility specially designed for this.
Installing Linux alongside Windows 10
I will not go into detail here on how to install Linux, all this has already been discussed in detail in my articles separately for different distributions. Let's look at just a few aspects of disk partitioning. Let's take Ubuntu as the most popular OS for beginners, but other distributions are pretty much the same.
At the stage of choosing a markup method, I advise you to take the manual option. Since this way you will better understand how to install the system:
Here you create the sections that we talked about at the very beginning of the article from the previously freed space. For the root partition, the mount point must be /, for the home partition, /home, and for the swap partition, no mount point is specified.
Installing Linux alongside Windows 10 UEFI
All modern laptops released with Windows 8, 8.1, 10 use UEFI technology. This is a new progressive technology that has replaced the outdated BIOS. The first important and most noticeable change is the use of the GPT partition table instead of the obsolete MBR, as well as the creation of a separate disk partition for operating system loaders. Many users fear that UEFI will make it harder to install Linux with Windows 10 on their laptop. And in vain - in most cases there is nothing complicated. If you already have Windows installed, then most likely the efi partition has already been created, and during disk partitioning, you just need to select it to install the bootloader. The efi partition is usually created with the fat32 file system and takes up about 30 MB of memory:

If you have a clean hard drive, you need to create a GPT partition table. This can be done using the same Gparted by opening the menu devices ->Create Partition Table:


Then we specify this partition during the installation of Linux along with windows 10, for it you need to specify the /boot/EFI mount point. That's all the difficulties with installing in UEFI. In general, installation in UEFI is supported by all distributions running in Grub2.
Completing the installation
Many new users are interested in: "How do I boot my Windows then?" Don't worry, the Grub bootloader will automatically find the Windows bootloader and, before starting the computer, it will offer you a menu where you can select the operating system:

This way Windows 10 and Linux dual boot will be configured automatically.
If something doesn't go according to plan, although it is unlikely to happen, everything is very easy to set up. So, if done right, you will definitely get access to your Windows after installing Linux.
conclusions
Today we looked at how to install Linux on Windows 10. We figured out how to perform partitioning, how to select partitions and what to do if your laptop uses UEFI. It is pointless to talk about installing any particular Linux distribution along with Windows 10, since, firstly, all the steps are similar, and, secondly, you can find detailed instructions in the relevant articles. I would also like to note: for a comfortable Windows work 10 with Linux on the same computer, you need to disable Windows FastBoot, otherwise you will not be able to . If you have any questions, ask in the comments!


