Create a new local account windows 10. How to add a user on the command line
Today we will touch on the topic of how to add a Windows 10 account. different ways. There are two types of accounts in Windows 10. The former are tied to a Microsoft account and require a password from the corresponding Email. The latter are local, similar to those in earlier versions. operating systems. In this case, in the future, an account of any type can be converted to the opposite or. Let's get started.
The latest OS from Microsoft has new settings. It is with their help that we will now create a user. Throughout the article, the material is presented in the form step by step instructions, each stage of which is accompanied by screenshots.
- First, let's open the Windows settings. To do this, go to the "Start" menu and click on the gear icon, which can be found in the lower left side of the window.

- In the window that opens, click on the tile, which we marked in the picture with a red frame.

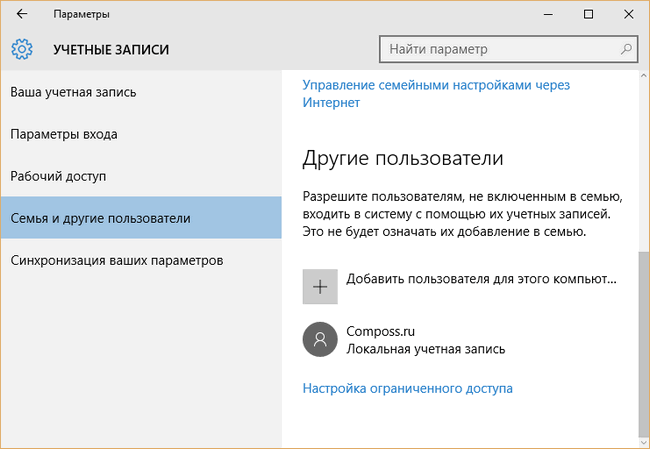
- Another window will open. There are sections on its left side - select "Family and other people." In the right half you will see the inscription "adding a family member" - we marked it with the number "2". This mode is used, for example, when you need to use one PC by several family members and in order not to get confused, each of them creates his own account. Click on the marked button.

- Once the button is pressed, you will be taken to the next screen. Here you can choose who owns the created account: a child or an adult. You also need to enter your password recovery email address. We do this and click "Next".

- We will be asked to confirm the intention to create an account - we do this by clicking on the appropriate button.

After that, an invitation will be sent to the specified e-mail and the user will be able to become a member of your virtual family.
Below you can create a new user who will not be a family member and controlled by Windows 10. Let's see how this is done.
- On the left side of the window that we opened a step earlier, click on the inscription "Family and other people", and on the right side, click on the item indicated in the screenshot by the number "2".

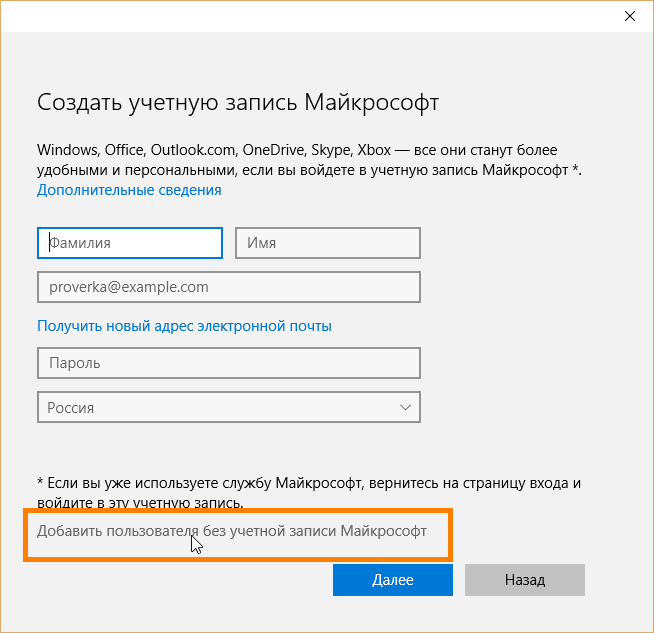
- Next, we will be prompted to enter the email of a new user, but if you want to create an account without being tied to Microsoft, click on the item indicated in the screenshot by the number "3".

- We will create exactly the local user, so in the newly opened window we click on the inscription circled in red rectangle.

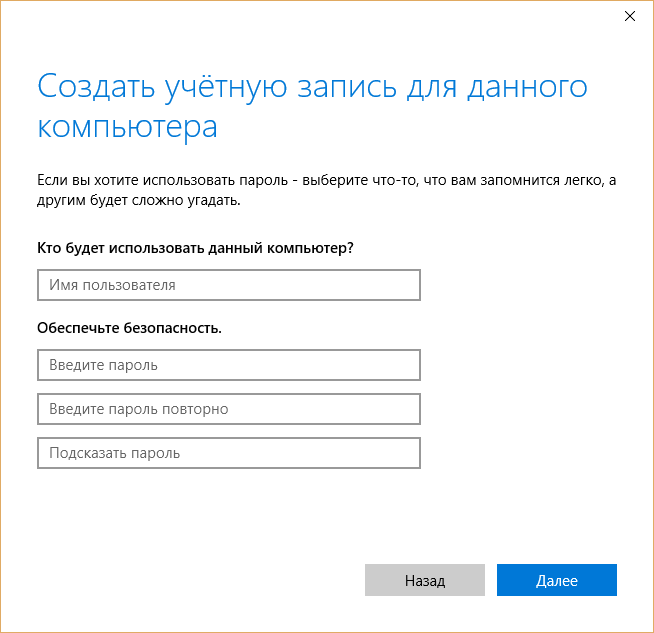
- Now you need to specify the name of the new user, the password for his account and a hint that will be needed in case of loss of the password to restore it. After completing the data entry, click "Next".

After that, a new account will appear in the system.

The user we created does not have administrator rights. Consider how to endow it with them. Please note that in order to do this, you yourself must have such powers.
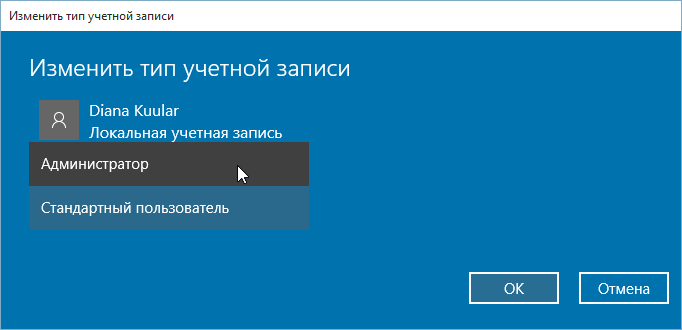
- We follow the same path that we used to create a new user. We find there the account that we will edit, and click on it with the left mouse button. The button "Change account type" will appear - we need it.

- In the next window, select the desired item from the drop-down list and apply the changes.

As you can see, the user has become an administrator. That's all. Now you can work with the new account by ending the current session and selecting the user on the start screen.

How to add a user on the command line
In order to create another user using the OS command line, you must run it with administrator rights. This is done as follows:
- Click on the magnifying glass icon on the taskbar and enter the command in the line that opens cmd, and then press Enter. When the result we need appears, right-click on it and select the utility launch item with administrator rights.

- When the command prompt opens, enter the following statement into it: net user username password /add (replace with the desired nickname of the future account and enter a password for it), then press Enter.

- After a couple of seconds of waiting, the system will notify us of the successful completion of the operation, and the user will be added to the system. If you want to make him an administrator, write one more operator (if the command does not work, try specifying English administrators instead of the Russian word Administrators):

Now the user we created will appear in the system. And it will not just appear, but will receive administrator privileges.

Create a new account through " Local Users and Groups »
There is another option to create a new user in Windows 10, let's look at it in more detail.
Important: the method is applicable only on Windows 10 Pro and higher - there is no group policy editor in the home version.
- Initially, we launch the utility itself - we will do this through the Run program. In order to launch it, use the hot key combination Win + R. When the window opens, enter the command in it msc and press Enter.

- When local users and groups open, select the "Users" folder on the left side, then right-click on an empty space and select "New User".

- Specify the name of the new user, his password and repeat the password, and then click on "Create".

As a result, the user will be created - you can see it right here.

- If we want to grant administrator privileges to the account, we right-click on its name and select the "Properties" item.

- Go to the "Group Membership" tab, select the user we want to make an administrator, and click the "Add" button (it is indicated in the screenshot by the number "3").

- In the window that opens, in the empty field marked with the number "1", enter the word Administrators and click "OK".

Ready. The user has now gained administrator privileges.
Use control userpasswords2
To complete the picture, consider another method of creating a local windows 10 account. We take the following steps:
- As in the previous case, we launch the Run utility using the key combination Win + R, enter the words in the window that opens: control userpasswords2 and press Enter.

- In the next window, click on the button labeled "Add" - its name speaks for itself.

- Here you can select the type of account you want to create. We, similarly to the previous options, will make a local account, but you can optionally link it to Microsoft. When the choice is made, click on "Next".

- Next Windows screen 10 praises accounts from Microsoft and scolds local accounts You still have a chance to change your mind. In our case, the answer will be no: we choose a local account.

- Enter the account name, its password and a hint for it, and then click on "Next".

- The user is created, we just have to click on "Finish".

- By tradition, we will tell you how to grant administrator rights to a new account. To do this, select it and click on the "Properties" button.

- Go to the "Group Membership" tab and switch the trigger to the position marked in the screenshot with the "2" button. At the end we press on "OK".

As you can see, the new user is now the administrator of the computer or laptop.

In the article, we considered the question of how to add a user in Windows 10 in different ways. If you have any questions on the topic, ask them in the comments and we will as soon as possible we will give a definitive answer.
Video about how to add an account toWindows 10
You create a new account during the installation process. But what if you want to add additional local accounts? Read the article further and we will show you how to do it.
Why do you need to do this?
Millions of Windows users never create additional accounts on their computers, but use their primary accounts with administrative privileges. As practice shows, this is not safe, and users should get rid of this habit, or be too lazy to create a new account, as you like.
Creating a secondary, non-administrator account for yourself and additional accounts for your children (so that dubious downloads from malicious sites don't infect your computer) is a great idea and one of the important things that greatly increases the security of your machine.
You might prefer the online and synced features of a Microsoft online account, but we found a lot of the good stuff with a local account that's free of all the online bells and whistles and potential privacy issues. A standard local account is great for people who don't want to have their personal data associated with Microsoft, and it's also perfect for kids who don't need add-ons (and maybe don't even have an email address to link to an account).
Let's take a look at the process of creating a secondary account in Windows 10.
How to create a new local user account in Windows 10
The first step is to access the Accounts menu. To do this, click on the search icon to the right of the Start menu and type "Accounts".
Select "Add, change, or remove other users" from the search results. Clicking on it will open the Accounts menu, as shown in the screenshot below. Alternatively, you can go to the Start menu -> Settings -> Accounts, then select "Family and other users" to get to the same menu.

Select Add a user to this computer. Microsoft has made it so that in the process of creating an account you will be strongly carried away towards an online account instead of a local one. So, let's be careful.

Ignore the prompt for an email or phone number. Instead, click the link at the bottom of the window: "The user I want to add doesn't have an email address."
Since we don't have an email address, Windows will prompt us to create an online account. Logically. But as we said, Microsoft is pretty stubborn that we create an online account instead of a local one, and suggests creating a new email address via @outlook.com. But ignore this information and click on the link at the bottom "Add a user without a Microsoft account".
If anyone remembers, in Windows ten years ago, the account creation screen looked very simple: just a username and password and nothing more. But now, as we see, everything is different .. And you enter your username and password and click the "Next" button.
After clicking the Next button, you will be taken back to the account settings screen, and now you can see a new account. By default, the local account is set to limited rights (no ability to install applications or make administrative changes to the machine).
If you have a good reason to change the account type to one with administrative privileges, click on the account, select "Change Account Type" and set to "Administrator".
You can also select "Delete" to remove an account that is no longer needed. If you need to make more changes (for example, child accounts or parental control) be sure to check it out for a more detailed look.
Perhaps the most important point V Windows setup immediately after the first launch - account registration, that is, an account to which our copy of Windows and other programs from Microsoft will be linked. This approach is not new to us: we have long been accustomed to the fact that we connect all Android devices to a Google account, and “apple” gadgets to an Apple account. At Microsoft, accounts have also existed for a long time, but most of the home users simply ignored them. Corporate networks are another matter, but why bother at home?
But if at the time of Windows 7, a Microsoft account was considered some kind of optional option, then in Windows 10 we need to pick up our own key to the “window”. By the way, contrary to popular legend, users of the "pirated" version can do this.
Create an account
- Go to the Start menu (Start button), and then select Settings > Accounts > Your account.
- Select "Sign in" with a Microsoft account.
- Follow the instructions to switch to a Microsoft account. You may need to verify your identity by entering a verification code.

However, the main “account” for Windows today is considered not a local account, but a network one, thanks to which your system communicates with the central Microsoft server. And already in this big “passport” you can enter local accounts for all your home ones, creating for each of them their own set of settings, parameters and programs.
Features of Windows 10
A Microsoft account is not only a “key” to Windows, but also a new mailbox, a personal cloud storage for your files on the OneDrive server, a personal photo album and, of course, the ability to use the Windows Store app store. In addition, the Skype dialer, which became part of Windows several years ago, will be linked to the same account.
In addition, a piggy bank of programs for a new, “tiled” interface, a photo album and a folder of documents will be synchronized with your account, so when you log in from any computer or mobile gadget with Windows 10 under your account, you will immediately find yourself in your usual working environment .
After setting up an account, Windows will ask you to confirm it using a code sent to your mobile phone number (we also specify it during installation) or to your email inbox. When creating a new account, you can skip this step, but in the future the system will repeatedly pester you and beg for a mobile phone number.
From time to time (for example, when updating the hardware of your computer or reinstalling the system), Windows will ask you to confirm your “authenticity”: for this you will need to indicate your email address to which you linked the system, and then enter the verification code in a special field that will come to this box. Do not be afraid - this procedure has nothing to do with checking the legality of your copy of Windows and is successfully carried out even on "pirates".
After linking Windows to your account, every time you boot your computer, the system will require you to enter a password. This is not very convenient (after all, Android does not require such sacrifices from us). But if there is only one account on your copy of Windows, you can activate the automatic download mode without a password.
Alas, but if at the moment Windows installation The Internet will not be available (for example, during installation with a disabled network adapter), then the system will still be installed, but with a local account that is not connected to the Network. The difference between these types of accounts is one thing: a local account does not allow you to synchronize your contacts, photos, calendar, etc. with a Microsoft server. Which, you see, nullifies the majority Windows benefits 10.
This video walks you through creating a local account in Windows 10.
In cases where more than one person uses the same computer, it may be necessary to create separate user accounts. Accounts created on one computer will allow you to share work with personal files and folders of users without affecting the documents of another. By creating a Microsoft account, you can access all the Microsoft Store apps, and sync settings and access files across your Windows 10 devices. This step-by-step photo tutorial shows you how to create a local, guest, and Microsoft record in operating room Windows system 10.
Step 1
How to create a local account using the User Accounts window
Start by opening the Run window. To do this, simultaneously hold down the "Win" and "R" keys on the keyboard.

Step 3
At this point, click the "Add" button.

Step 4
To create a local account, click the "Sign in without a Microsoft account" line.

Step 5
Now click on the "Local Account" button.

Step 6
Fill in the account username fields, enter the password twice, specify the password hint. Then click the "Next" button.

Step 7
Click the "Finish" button.

Step 8
The account has been created.

Step 9
How to create a local account using the Computer Management window
Right-click on the "Start" button and in the context menu that opens, click on the "Computer Management" line.

Step 10
Under Local Users and Groups, open the Users folder.

Step 11
At this stage, right-click on the free space of the window and in the menu that opens, click on the "New User" line.

Step 12
Enter your username, you can also fill in the "Password" and "Confirmation" fields and click the "Create" button. The specified password will be used to log into the account.

Step 13
The account has been created.

Step 14
How to create a Microsoft account on a computer
Let's look at the first way to create a Microsoft account. Start by pressing the "Win" and "R" keys on your keyboard at the same time.

Step 15
In the "Open" line, enter "control userpasswords2" and click "OK".

Step 16
Now click the "Add" button.

Step 17
If you have an email address that you use to sign in to Microsoft services, enter it in the appropriate box. If you do not have a registered email address, click "Register a new email address".

Step 18
Enter the last name, first name, email address, and password that will be used to sign in to your Microsoft account. Then click "Next".

Step 19
Re-enter the password, select the country or region and click "Next".

Step 20
At this point, enter your date of birth, gender, country/region code, phone number, and alternate email address. This information will help you regain access to your Microsoft account if you lose your password. Click "Next".

Step 21
At this stage, enter the characters that are shown in the picture. Then check the box next to the items that interest you and click the "Next" button.

Step 22
Click the "Finish" button.

Step 23
A Microsoft account has been created and added to your computer.

Step 24
How to create a Microsoft account using the official website
In the second method, you will learn how to create a Microsoft account on the official website. To do this, in the browser, go to the Microsoft website by clicking the account.microsoft.com link and click the "Create an account" button.

Step 25
Enter your email address and password. Then click the "Next" button.


Step 27
The account has been created.

Step 28
Let's move on to connecting a Microsoft account on a computer. To do this, select a username with administrator rights. Please note that the item "Require username and password" must be checked. Then click the "Add" button.

Step 29
Enter your Microsoft account email address and click Next.

Step 30
Now click the "Finish" button.

An avid user of operating systems of the Windows family is familiar with the concept of an account. This administrative attribute in new versions takes on a new and relevant meaning. And if earlier, for example, back on XP, its essence was to delimit local access zones to services, services and OS programs, now everything is much more complicated.
Windows Profile Benefit
With the development of an extensive structure of Internet services and web applications, it becomes inconvenient for users to manage online access to their accounts. The developers took into account the growing problem over time and offered a universal solution - a single profile Windows user. Now with, Skype, you can work from any device (PC, laptop, tablet,), having only one user entry. It remains only to read the instructions on how to create an account Microsoft entry on Windows 10.
Create a profile in Windows 10
You can create a Microsoft profile:
- By means of standard dialog forms in windows through the control panel + parameters (accounts).
- Using the command line - "Run", located in the main menu, start the system.
In the first case, you need:
- Select "Family and other users" and, accordingly, "Add a user for this computer."
- Enter your email address in the next step.

- If it is not there, then select the button to create it (you need an Internet connection). This is done in the bottom field with the inscription "I do not have login data for this person."

- After entering the First Name and Last Name, click "Get a new email address" and write down its name, fill in the Password field and select the country of residence.
- Enter a phone number or alternate email address and click Next.

- Optionally, select the display of materials that best suit your desire and click "Next".

- Your account has been created!

Advice! Similarly, you can enter the record creation system through the command line using the command: control userpasswords2
You will be asked to go through a similar procedure.
Registration on the Microsoft website
Users of several Microsoft devices and services at once are invited to create a single universal profile. Go to the latest operating system
Creation is done in two ways:
- during the initial setup of the smartphone;
- at the time of operation.
The sequence of transition commands is as follows: "Settings" → "Mail + Accounts" → "Add Service" → "Microsoft Account" → "Create".
Creating a single profile for all Windows devices without exception is useful for every advanced user. If you have a question about Windows 10, . Together we will try to find the answer.


