What to sew an organizer from. How to make a cosmetics organizer with your own hands from cardboard, wood, fabric? How to sew a travel organizer with your own hands? Convenient jewelry storage
In every apartment, many small items accumulate, which often get lost and do not have a permanent place. This situation occurs in a woman’s purse, in a needlewoman’s corner, in the hallway and in other rooms. To eliminate clutter, it's smart to make your own small items organizer. With its help you will quickly find what you are looking for. Thanks to the available compartments, you will always find keys, cosmetics, umbrellas, combs, gloves, toys and many other small things on time.
Bag organizer
A woman's handbag contains many small items that are often difficult to find. Moreover, transferring such items from one bag to another is tedious. An organizer for small items will help get rid of this problem. We will discuss in detail how to make such a product with your own hands in this article.
First, you need to draw a pattern that matches the size of the items that will be placed in the future product. We cut out a rectangle with dimensions of 24 by 65 cm and an allowance of 1 cm on each side, calculating that 2 compartments will be 14 cm wide, 3 compartments will be 10 cm wide, and one will be 7 cm wide.
Secondly, we select 2 cuts of fabric that interests you with harmoniously combined colors for the front and back sides. Using your pattern, draw a rectangle on each piece of fabric, then cut them out.
Thirdly, with an allowance of 1 cm, sew two parts on three sides, folding them right sides to each other. Turn the rectangle inside out through the unstitched area, straighten its corners using a ruler, sushi stick or needle, picking up small bends. Then sew the open side closed with a blind stitch.
Fourthly, iron the part and fold it widthwise so that the front of the pockets is 10 cm, and rear end- 14 cm. Sew the product on the sides, lay the lines, creating pockets.
The resulting organizer can be rolled up and fastened with Velcro or a button. If the fabric is plain, then you can decorate the product with embroidery or appliqué. You learned how to make an organizer for small items. The master class reveals in detail the sequence of actions.
Organizer for the hallway
Things like keys, umbrellas, gloves, combs, creams and shoe brushes tend to get lost in the hallway at the most crucial moment. To avoid this and not be late for work or a meeting, you can sew an organizer for small items with your own hands. It is placed on the wall or the end of the cabinet and has several pockets of different shapes. Small compartments can contain small items, large compartments can contain larger items. In addition, the original panel will serve as a decorative element of the interior.

How to sew pockets for small items with your own hands: master class
The basis of future pockets is made of dense, possibly furniture fabric. If necessary, the base can be duplicated with non-woven fabric. Pockets can be sewn from any fabric of a suitable color, which must be reinforced with a border. Pockets can be voluminous or flat. Volume is obtained by creating a fold along the bottom edge of the pocket.
The side sections of the compartments are processed with edging on the top. On the lower raw side, two opposing folds are laid. Next, you need to attach the pocket to the base at its future location, lower the top edge down, holding the cut with the folds. You will end up with an inverted pocket with the outside facing out. The part is attached to the base with the bottom cut, after which the pocket should be raised up. On the front side, the side cuts are stitched along the line of the bias tape.
Shallow pockets can be fastened with buttons or snaps. It’s not difficult to make such a convenient organizer for small items with your own hands, and it would be appropriate not only in the hallway, but also in the bathroom.

Pockets for children's
To teach your child to keep the children's room clean, you need to have a lot of cabinets, chests of drawers, shelves, and drawers. A convenient option for placing small accessories, pacifiers, bottles, napkins, powders, and diapers can be an organizer in the form of hanging pockets.
Every young mother is interested in learning how to sew pockets for small items with her own hands. A master class on creating a convenient device is described below.
We will need two types of fabric - the main one and for finishing, an elastic band that supports the pockets, and cardboard that strengthens the shape. The organizer can be either vertical or horizontal. Depending on the direction, the product can be hung on the wall, on the end of furniture, or on a child’s bed.
Cutting out products and sewing pockets
We cut out one part for the base for pockets 80 cm long and 35 cm wide. Next, we will need 3 parts for future compartments with dimensions of 20 x 30 cm. To make the pockets convex, we will make a wide sidewall for them, 60 cm long and 8 cm wide. Also necessary prepare bias tape 4.5 cm wide to trim the pockets and the perimeter of the product.
Then you need to round the edges of the compartments using a saucer. Finish the edges with an overlocker or use a zigzag stitch on a machine. Attach the side piece to the front side of the pocket and stitch from the wrong side. Turn inside out, iron, and edge the top of the pocket, including the side, with bias tape.
If desired, you can insert an elastic band into the binding and secure the ends at the edges. In this way we prepare 2 more pockets. Then we sew the pockets to the base, keeping the distance between them. You can strengthen the made organizer for small items with your own hands by cutting out one more piece of fabric and cardboard. Sew two parts on three sides, fold them over, process the top edge, leaving it open to insert cardboard. Edge the outer edges of the product with trim.

Ribbon Keeper
Any needlewoman accumulates a large number of small things, including meters of bias tape, braid and a wad of all kinds of ribbons. In order for all these items to always be quickly found, it makes sense to build How to store ribbons separately from needles, buttons, pins and other small items, we will consider in this part of the article.
To create a box for ribbons, you need a small box, fabric or self-adhesive paper, glue, eyelets, tools for installing them, whatman paper, colored cardboard. A suitable box with a non-removable lid can be purchased at the post office. You need to cut off the excess cardboard from the lid, leaving only the top. If the box is dark, it should be covered with either adhesive paper or white Whatman paper, and a cloth on top. The inside of the organizer is also covered with pieces of fabric. All allowances located on the inside of the lid and box are decorated with colored cardboard. Next, you need to install the eyelets on the lid and sides of the drawer using special tools. Now you can put the spools of tape in the box, and bring the ends out through the holes.

Convenient jewelry storage
Designers offer a glamorous solution for organizing space for decorations. Most often this is a panel placed on the wall near the dressing table. When making an organizer, you should take into account the interior of the room and the design of the dressing table. The panel must be correctly combined with the surrounding environment. Most often, to create an organizer, a baguette is used, on which, instead of a picture, burlap or canvas for embroidery is placed. Sometimes the fabric is replaced with wire, fishing line or colored ribbons, on which earrings and hairpins are placed. To hang beads, you can screw screws decorated with buttons or small decorations into the frame.

To summarize, we can say that organizers for small things can be made from anything. The main thing is to fantasize and not be afraid to experiment.
Organizer- an indispensable thing in the house for storing not only every little thing, but also some valuable things. Such a convenient and necessary thing can be purchased at any supermarket. Or you can use your imagination and do it yourself. And we will help you create an organizer for any occasion.
The main thing in the article
How to make an organizer with your own hands?
- Making a box for storing all sorts of things is not difficult even for a beginner. You will need material, stationery and some time.
- Organizer materials are usually created from , from things that are thrown away or, in rare cases, the necessary components are purchased.
Small organizer for hairpins and elastic bands with your own hands for beginners
Surely, more than one girl has experienced the mess in her hair accessories. There seem to be a lot of them, but they are not always in place. So, in order to put the elastic bands and hairpins in decent order, you need to put them in one place. The place should be beautiful and comfortable.
You will need:
- Frame;
- ribbons;
- hooks;
- glue;
- scissors;
- ruler;
Progress:
- Measure the photo frame and cut the ribbons according to size. Glue with reverse side with an interval of 3 cm.
- Then measure a sheet of cardboard and cut it to fit the photo frame, glue it over the ribbons on the back of the frame.
- Glue the hooks to the outside of the frame, placing them as you wish.
- Now you can hang the photo frame on the wall or place it on the table.
DIY stationery organizer
To find a pen, some people need to search the entire house and turn everything upside down. But if you have a stationery organizer, you won't have to go far to find pencils and pens.
You will need:
- pencil;
- tourniquet;
- 6 cans;
- paper;
- scissors;
- glue;
- spray paint;
- ruler.

Progress:
- Coat the jars with glue and cover them with paper.
- Make a handle as in the photo and wrap it with a tourniquet.
- Then paint the jars and set them to dry.
- Arrange the jars in pairs, insert a handle in the middle, and wrap everything with a tourniquet.
DIY underwear organizer: step-by-step instructions with photo examples

The creators of furniture for things did not think about how they would be stored there. And in most cases, underwear suffers. Few people always fold their laundry neatly. Therefore, you can use a little trick and add a linen divider to your closet.
You need:
- shoe box;
- glue;
- scissors;
- ruler;
- stationery knife;
- pencil;
- paper for design.
Progress:

DIY cosmetics organizer
Don't have time to buy a decent cosmetic bag for your beauty arsenal? Or do you have so much of it that your travel bag is bursting? Then a magnetic board for cosmetics will help you.
You need:
- large photo frame;
- magnetic sheet according to the size of the photo frame;
- small magnets for each beauty item;
- paper for registration;
- glue;
- scissors;
- ruler.

Progress:
- Measure the inside perimeter of the frame and cut the magnetic sheet along it.
- Do the same with the design sheet.
- Place a decorative sheet in the frame, then a magnet, and cover everything with the frame lid.
- Place magnets on all makeup items.
- Hang on comfortable spot.
- The organizer is ready, now you won’t lose anything and everything will always be in one place.
How to make a convenient jewelry organizer?
There is never too much jewelry, you just need to find a spacious storage for them. Various boxes take up a lot of space, and besides, the jewelry in them sometimes gets confused. Therefore we offer you Alternative option for storing jewelry.
You will need:
- frame;
- metal grid;
- pliers;
- spray paint;
- furniture stapler and staples for it;
- hooks

Master Class:
- Place the mesh on the back of the frame and secure with a stapler. Trim off any excess tails with pliers.
- Turn the frame over and paint it, wait until it dries.
- Hang hooks and you can hang decorations on them. By the way, some decorations may not require hooks.
Large shoe storage organizer
Storing shoes in boxes is not always convenient, and often it takes up a lot of space. So why not make one big shoe organizer?
You will need:
- plywood;
- electric jigsaw;
- roulette;
- pencil;
- wood glue;
- the beams are thin;
- self-tapping screws;
- sandpaper;
- iron rod;
- iron mechanisms for scrolling;
- dye;
- drill.


Progress:
- Cut circles from sheets of plywood; select the number of circles according to the number of pairs of shoes.
- Sand the edges with sandpaper.
- Cut out partitions from the beams for each section of the cabinet. Calculate that you need 6 pieces for one.
- Make a hole in the center so that the cabinet rotates.
- Assemble the cabinet: circle of plywood + crossbars + circle of plywood + iron mechanism and so on, repeating the steps.
- Thread a rod through all sections.
- Build a stand for the organizer and place the box on it.
- Paint the organizer, wait for it to dry, and place your shoes inside.
Headphone organizer
Often, headphones lie around and get tangled. This is very unpleasant and takes quite a long time to unravel. Therefore, we have prepared an interesting life hack for you so that your headphones are always in order.
Prepare:
- funny pictures 2 pcs;
- paper;
- glue;
- scissors;
- double sided tape.
Procedure:
- Cut out the pictures.
- Prepare a piece of paper measuring 5x10.
- Fold the piece of paper in half and glue a picture on each side.
- Secure on the inside at the top with double-sided tape.
- Now you can wrap your headphones around without worrying about them getting tangled.
- You can replace the paper with felt, and use buttons as a fastener.

DIY organizer for small items: ideas with photos
To organize small things in one place, it is enough to create an interesting place to store them. Then she will always be at hand. And creative boxing will fit perfectly into your .


DIY desktop organizer folder for papers and documents
Papers, like other work supplies, must be visible and in order. And so that they are always at hand and look good, build a storage folder yourself.
Required tools:
- colored paper;
- beer cardboard 2 pcs;
- glue;
- scissors;
- ruler;
- decorative paper.

Master Class:
- Cover the beer cardboard with paper for decoration.
- Cut the sheets of paper 1cm smaller on each side than the beer cardboard.
- Using 2 long pieces of paper, make an accordion out of them. Bend 1 cm at a time, and glue sheets after each span.
- Cut the paper for the crust and connect the cardboards as in the picture in step 4.
- Glue the accordion with sheets. Your folder is ready, fold the papers.
DIY organizer for handicrafts
Craftswomen have a lot of little things that need to be stored somewhere. We suggest you make a box for small items.
You need:
- thick cardboard;
- glue;
- scissors;
- pencil.
Progress:
- On a sheet of paper, draw the future box in folding form. Draw a handle on top for convenience. On the second sheet, make a drawing of exactly the same box.
- Cut out the drawing, bend along the fold lines and glue.
- Place them back to back and glue them.
- Design the box the way you like and use it.
Try the option for storing ribbons and ribbons for this box you will need:
- shoe box;
- eyelets;
- paper for registration;
- scissors;
- glue;
- pencil;
- ruler.

Progress:
- Cover the lid and box with paper for decoration.
- Using a ruler and pencil, mark the points for future holes.
- Attach the grommets.
- Place the ribbons inside and thread them through the holes.
DIY crib organizer
For young mothers, we have prepared a convenient organizer that can be hung on the crib. You can put the most necessary things for your baby in it.
You need:
- textile;
- scissors;
- ruler;
- threads;
- sewing machine;
- binding;
- buttons or snaps.

Master Class:
- Decide on the dimensions and cut the fabric according to them.
- To seal the organizer, cut out exactly the same piece of fabric for the base, stuff your future organizer with a thin layer of padding polyester and sew it together.
- Make pockets of different sizes.
- Make handles for fastening.
- Sew trim around the edge, attach pockets and handles.
- Make a fastening from buttons or snaps.
- Your organizer is ready, use it to your health.
DIY kitchen organizer
The kitchen for every housewife is hers personal account, a place where masterpieces are created. Therefore, so that all the tools for creating unique things are focused in one place, we have prepared two versions of the organizer.
For the first option you need:
- adhesive wallpaper in 2 colors;
- cans of chips (Pringles);
- scissors;
- tape measure.

Progress:
- Measure the diameter and length of the can and transfer the data to the wallpaper.
- Cut out the required size and cover the jar.
- Draw a sign of the utensils that will be stored in the box on the wallpaper in a different color.
- Cut out the sign and glue it to the jar.
- Place the organizer in a convenient place. Such storages can be made for each group of items.
The second version of the organizer is designed for interesting storage of cups. For him you need:
- small boards;
- thick tourniquet;
- hooks;
- screws;
- screwdriver;
- staples;
- ruler;

Master Class:
- Connect all the boards with staples using a screwdriver.
- Make a fastening on the reverse side and tie a tourniquet.
- Screw on the hooks.
- Use chalk to write funny messages to decorate the board.
- Hang the organizer on the wall and hang cups.
DIY car seat back organizer
Some families need organizers for their car, especially those with small children. We have prepared a master class on making a hanging box just for such families.
You will need:
- textile;
- scissors;
- sewing machine;
- threads;
- Velcro;
- binding;
- straps;
- decorative elements.

Progress:
- Measure the seat of the front seat and transfer it to the fabric on the inside.
- Draw the pockets. Then cut out all the components.
- Sew the binding along the edge of the main fabric and onto the pockets on top.
- Sew pockets and straps for fastening.
- Add decorative elements.
- Now your child will not be bored, and things will always be in one place.
DIY car trunk organizer
Sometimes everything in the trunk is upside down. And it takes a lot of time to put things in order. But there is an alternative - make a wardrobe for things in the trunk of your car yourself.
You will need:
- soft fabric;
- plywood sheets;
- self-tapping screw;
- screws;
- screwdriver;
- pencil;
- roulette;
- glue/splitter with staples.

Progress:
- Measure the dimensions of the trunk and transfer them to a sheet of plywood to make the bottom. Then make the same lid.
- Saw the partitions according to the required height.
- Insert one at a time and secure with a screwdriver.
- Cover the lid with fabric, preferably similar to the one in the car interior.
- Secure it with a stapler or glue.
- Place an organizer in the trunk and put things away.
How to make a hanging bath organizer with your own hands?
An interesting organizer for the bathroom can be made from jars for storing cereals. To create such a thing you will need:

- board;
- jars for storing cereals;
- screws;
- screwdriver;
- round iron fastenings;
- ruler;
- pencil.
Work process:

DIY organizer made of cardboard with photo examples
Cardboard is a fairly dense material, so it is great for creating storage boxes. Moreover, the budget version of the organizer is suitable even for a beginner.


DIY organizer from boxes: step-by-step master class
There are boxes in every person's home. Only some people get rid of them as unnecessary trash, while others carefully keep them for a creative impulse. If you have accumulated a sufficient number of boxes of approximately the same size, then you can build a mini chest of drawers for storing small items. You will need:
- boxes 5 pcs, one high and 4 low;
- ribbons;
- paper for registration;
- glue;
- scissors;
- pencil;
- ruler.
Work process:
- Make three inner boxes of the same size so that they fit into one larger one.
- Place the fourth box up and glue it.
- Cover the boxes with paper and make handles for the drawers.
- Insert the drawers and your dresser organizer is ready.
Sew an organizer with your own hands from fabric: patterns and photo ideas
The organizer can be made not only from scrap materials, but also sewn from any fabric. This could be an old towel, jeans, tablecloth, or new fabric purchased.


DIY jeans organizer
Are your old jeans worn out? But this is not a reason to get rid of them forever. Give them a second life and they will pleasantly surprise you. You will need:
- jeans, several pairs;
- sewing machine;
- threads;
- measuring tape;
- scissors;
- pen.

Master Class:
- Open the pockets on all jeans;
- Cut the pant leg on one side and then mark a rectangle;
- Cut out a rectangular piece and sew pockets on it.
- Make a hanging handle from the remaining material.
Video: DIY organizers - little tricks
Making a box to store your favorite things is very simple, just use your imagination. And our magazine will help you with photo ideas and job descriptions. Store your stuff in cool designer pieces that you made with love.
Organizers are great devices that make our lives easier and organize things. They can be very different in their purpose, material, type, color, etc. You can buy a suitable model in a store, or you can sew an organizer yourself. They are convenient to use at home, in the kitchen, in the children's room, in the car and in the country. How to sew a wall organizer with your own hands - a master class on this topic will allow you to do everything simply and easily.
Organizer - a convenient means of maintaining order
This item provides a rational and practical arrangement of things, their storage and functional use.
Organizers will be an indispensable assistant in the following cases:
- In the kitchen - they will allow you to conveniently place various small items, as well as sort spices.
- In the children's room - they will help the child store and put away toys, books, stationery and creative materials. In addition, this will be a convenient device for a mother to care for her small baby.
- In the bedroom, the organizer will provide a woman with the opportunity to place cosmetics, creams and other personal care items in the most comfortable way.
- DIY closet organizer - ideal for storing small wardrobe items. For example, underwear, socks, tights.
- In the hallway, organizers are used to store keys, mail, and even shoes.
- In the pantry, garage or at the dacha - with the help of such devices it is convenient to place sets of tools.
- In the car - they allow you to conveniently store various accessories in the trunk, or find their application in the car interior.
And these are not all the options for using organizers in everyday life. There are several ways to arrange such an optimizer of space and placement of things:
- Hang on the wall.
- Hang on the closet or door.
- Place directly in the closet, on the shelf.
- In a car on the back of the seats.
Important! The installation of the organizer depends on its construction, design, size and material.
Bathroom organizer
A convenient optimizer is simply necessary for the bathroom. It is in this room that there are a large number of various objects and small things, among which you need to put things in order:
- Personal hygiene products and items - toothbrushes, pastes, shampoos, gels.
- Cosmetics.
- Men's shaving accessories.
- Cleaners.
For such a number of accessories, you need a convenient organizer to make their use comfortable and simple. We suggest sewing a bathroom organizer with your own hands.
Materials and tools
- Terry fabric. In our case, this material is used, but you can replace it with any other material you like, or use oilcloth, which will even be more justified in a bathroom.
- Fabric for the back of the organizer.
- Braid for decoration and reliability.
- Non-woven fabric for added rigidity.
- Wooden slats - 2 pcs.
- Measuring tape.
- Sharp scissors.

Sewing instructions
We start by cutting out all the details of the organizer:
- Draw a rectangle on the fabric following sizes: width - 42 cm, length - 58 cm. This is the basis of the device.
- Fold the fabric in half, measure 5 cm to the side at the top of the fold. Make a note.
- Then move 4 cm down from the top along the fold. Mark this place.
- Connect the marks with a smooth line along which to cut the part. The resulting semicircle will serve as a hole for the handles.
- In the same way, make a pattern for the non-woven fabric and the reverse side of the organizer.
Important! When cutting parts, do not forget to allow an allowance of 1 cm.
- We cut out pockets. Here you are guided by your imagination and needs.
Important! Pockets can be identical and symmetrical, or they can have a variety of sizes and shapes: narrow or wide, long or short, roomy or small.
It’s easy to sew a bathroom organizer with your own hands:
- First, attach interlining to the pattern pieces to provide rigidity to the structure.
- Edge all the pockets with braid, and then stitch them to the front of the organizer.
- Sew the front part of the product to the lining. You need to sew the parts from the wrong side, then turn the base inside out.
- At the top of the product, make 3 cm folds under the wooden slats.
- Baste and sew on a machine.
- Thread the slats through the holes.
Important! Select the color of the material to match the style of the interior so that the product ultimately harmonizes with the decor of the bathroom.
The best place to place the organizer in the bathroom is the door or wall of the room.
Organizing space in the closet
If your closet often gets cluttered with underwear, socks, and other small items, then a DIY clothing organizer will help you in this case.
Materials and tools
To make it you will need:
- Thick fabric.
- Braid for decorating pockets.
- Sewing machine, matching threads, needles.
- Measuring tape.
- Sharp scissors.
Sewing instructions:
- We are making a pattern. In this case, it will be a rectangle measuring 40 by 80 cm. Two such parts are needed.
- We connect these two elements on the sewing machine from the wrong side.
- We turn the base inside out and make a stitch on the front side of the product. Along the perimeter of the rectangle at a distance of 1 cm from the edge.
- Next, cut out the strips. We will need 4 such parts, from which we need to form 4 lines of pockets. In this organizer model, each strip will be divided into three pockets.
Important! You can make the number of pockets in one row based on your desires and needs.
- We tuck the top edge of each strip and trim it with braid.
- We form two folds for each pocket, which are not fixed at the top. This way we create depth in the departments.
- Using a sewing machine, we attach each strip to the base on three sides. In addition, we make seams between the pockets.
- We trim the lowest line of pockets in the lower part with braid.
Your organizer is ready! And you can place it inside the closet or on its door. To do this, attach the cord to the top of the product on both sides, and hang it from a door handle or hook.
Important! This option is also suitable for the hallway to place gloves, children's mittens, hats, scarves and scarves.
Conveniently store clothes
Another master class on a DIY clothing organizer. It can be made from a cardboard box. Lovely ladies will find it convenient to store their underwear in such a drawer.
Materials and tools
For these purposes you need to prepare:
- Shoe box.
- Thick cardboard.
- Pasting paper. This can be wallpaper, self-adhesive paper, packaging.
- Scissors.
- PVA glue.
- Double sided tape.

Manufacturing process
- We cover the cardboard box with paper on all sides.
- We measure the dimensions of the box - length, height, width.
- Then, according to the obtained values, we cut out the required number of strips of cardboard that will serve as partitions.
- We make slits at the required distance so that later, using strips, we can form compartments for the organizer.
- We try on the received parts for the box.
- If everything matches, we fix the partitions to the bottom of the box using double-sided tape.
The result is a convenient organizer that can be placed on a shelf in a closet or in a drawer.
Stationery organizer in a children's room
Many items are always present in the children's room, especially during creative activities or school lessons. How to sew a wall organizer with your own hands? A master class on how to make it is described below.
Materials and tools
To make it you will need:
- Material for the base of the organizer.
- Material for making pockets.
- Cardboard.
- Decor elements.
- Sewing machine, matching threads, needles.
- Measuring tape.
- Sharp scissors.
How to sew organizer pockets on the wall:
- Determine the dimensions of the future organizer, and then cut out a rectangle of the given size from the fabric. Of course, the dimensions depend on the number of things to be stored.
Important! Choose fabric for the children's organizer that is bright and beautiful.
- Bend the edges of the part around the perimeter by 0.5 cm, stitch on a typewriter.
- In the upper part in the center, attach a loop through which the product will be suspended from the wall.
- We cut out pockets from cardboard. Since the organizer is necessary to accommodate office supplies, the sizes of the compartments should be very diverse.
Important! It will be convenient to store pencils, pens and felt-tip pens in wide pockets, a rubber eraser in very miniature ones, and rulers and scissors in narrow pockets. In addition, the shape of the branches can also be original. You can decorate the organizer with round, triangular, square or heart-shaped pockets.
- Based on the templates obtained, we cut out pockets from the appropriate material.
Important! Make allowances of 0.5 centimeters on the seams.
- After this, you need to lay out all the details on the base and think over the composition.
- Sew the pockets to the fabric.

Decoration
It looks like it’s ready, but there’s just one final touch left—decorating the organizer, because it’s an accessory for a child’s room.
You can decorate the product in the most incredible way:
- Place stickers with your favorite cartoon characters.
- Sew beautiful and funny appliqués onto your pockets.
- Sew pictures corresponding to the filling of the pockets, that is, an image with them on the compartment under the scissors, etc. By the way, such a system will teach the child organization and independence.
- Use bright buttons, beautiful ribbons and bows, flowers, beads and sparkles.
Important! You can entrust this process to your child, and he will color the pockets with paints or pencils to his taste.
Now you know how to sew pocket organizers for the wall in a child’s room. This product can be used to store books. In this case, the organizer model will have larger compartments, and it will be convenient to place such an optimizer near the child’s bed, so that you can always read your favorite book before bed.
And a practical device is simply necessary for a young mother who is caring for a baby. Convenient pockets are perfect to place on the side of the crib. And in the compartments you can store the necessary little things - napkins, a pacifier, a comb, or your baby’s favorite rattle.
Original ideas for organizing order
A DIY organizer can have an original idea and no less original execution. We will talk about such examples further.
Old jeans get a second life
If you have several pairs of old pants or shorts in your closet, you can sew a fabric organizer for the wall from their pockets. It's very easy to do this:
- Buy fabric for the base of the product. Cut out a rectangle of the desired size from it.
- Take pockets from old clothes.
- Place it on the base as you like, machine stitch it to the fabric.
- At the top, consider mounting it to the wall. For example, a loop in the center or two on the sides, a rope, a hole.
How to store documents?
And this method is incredibly simple. To ensure that documents always lie in a certain place and do not wrinkle, thick files are suitable. These stationery supplies are sold in stores. Attach such a folder to a cabinet door or wall and place papers in them. The organizer is ready!
Important! This option is also suitable for the kitchen to store your favorite recipes.
And don’t forget about the decor - plastic files can be decorated with bright stickers.

Tin cans are great storage containers.
Unnecessary tin containers can be effectively used as towel holders in the bathroom.
You need the following materials:
- Several tin cans.
- Light-colored acrylic paints.
- Satin ribbon.
- Material for decoupage: napkins or fabric.
- Glue gun and glue.
- A sheet of plywood that will serve as the basis for fastening.
- Several screws.
Master class on how to sew an organizer:
- We paint the plywood sheet and cans with light-colored paint. For example, cream or beige. Containers must be painted on all sides.
- We produce decoupage of jars. To do this, we apply an ornament to the front side of the containers, which can be cut out from napkins, patterned fabric or special cards for decoupage. Glue the decor to the jars.
- Glue satin ribbon to the top edge of the cans.
- We attach the bottom of the cans to the plywood base with screws.
- Also decorate the perimeter of the base with a satin stripe.
Important! Rolled towels can be placed in these containers. And such an organizer looks very unusual and stylish.
Convenient cosmetic bag
The female half always has a lot of personal care products and tools in their arsenal. These are a variety of brushes and tweezers, scissors, mascara, lipsticks of many shades, pencils. In order not to look for these items every time in your purse or dressing table drawer, you can sew an organizer for them.
With the help of organizers, you can put things in order anywhere: in the bathroom, in your closet, at your desk or in the inside of your car. Thanks to these devices, each thing will take a certain place, and order will reign in the room. Irritability will disappear when it is impossible to find the right thing for a long time. We have given basic information on how to sew pocket organizers on the wall, and following your imagination, you can complement these products with colorful details, original decor and exclusive performance.
Our review contains many ideas plus three detailed master classes.
Textile organizer with pockets
Based step-by-step master class to make the simplest basic model of a wall organizer, you can make any organizer - with more or fewer compartments, a wider or longer organizer, a bathroom organizer made of waterproof material.
You will need:
- A large piece of fabric for the double-sided base of the organizer;
- Smaller cuts are for pockets;
- Thin, durable plastic material to reinforce the base and pockets (if desired, you can use dublerin and glue it to the fabric with an iron);
- Ribbon or finished bias tape of sufficient length to cover pockets and the base of the organizer;
- Eyelets
Step 1
First, decide on the size of the organizer and pockets. For example, in this case we start from the dimensions of a standard A4 sheet - you can use it as a template. Cut out rectangles of appropriate sizes from plastic, and from fabric - parts twice the size, not forgetting a few centimeters for the volume of each pocket and good seam allowances.Step 2
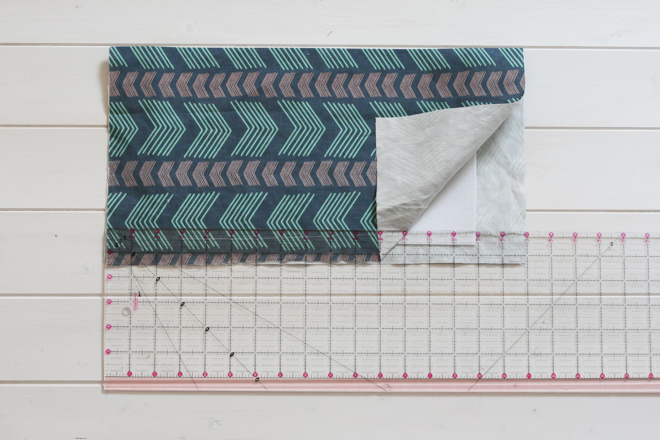

photo: blog.spoonflower.com
Fold each pocket piece in half with the wrong side inward, place the plastic piece inside and topstitch.
Step 3


photo: blog.spoonflower.com
Iron the fabric on the sides inward like an accordion so that there are allowances on the sides.
Step 4

photo: blog.spoonflower.com
Topstitch the folded edges of the pocket. Do this for each of the pockets.
Step 5

photo: blog.spoonflower.com
Now let's get to work on the base of the organizer. Place the plastic part between layers of double fabric part.
Step 6

photo blog.spoonflower.com
Place the pocket pieces on the base and pin them in place.
Step 7

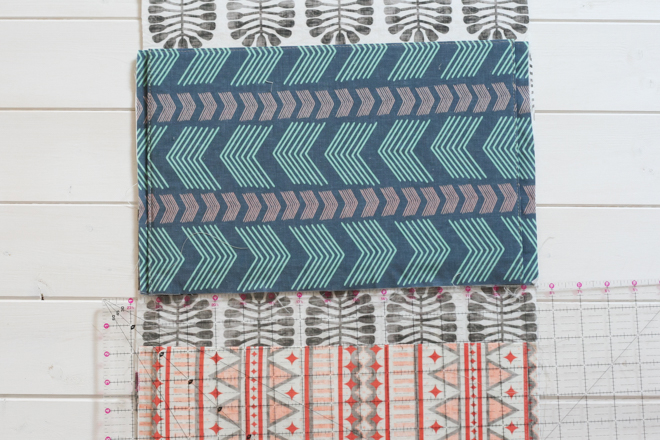
photo: blog.spoonflower.com
Sew the pockets to the base.
Step 8

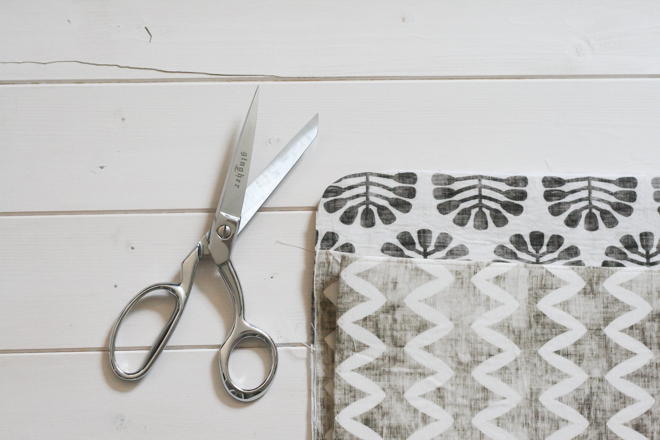
photo: blog.spoonflower.com
Using a round object as a template, round the corners of the base.
Step 9


photo: blog.spoonflower.com
Finish the organizer in a circle with bias tape or ribbon.
Step 10


photo: blog.spoonflower.com
Mark the location of the eyelets and install them. Ready.
Options for textile organizers with pockets

photo: apartmenttherapy.com

photo: handmadepride.tumblr.com
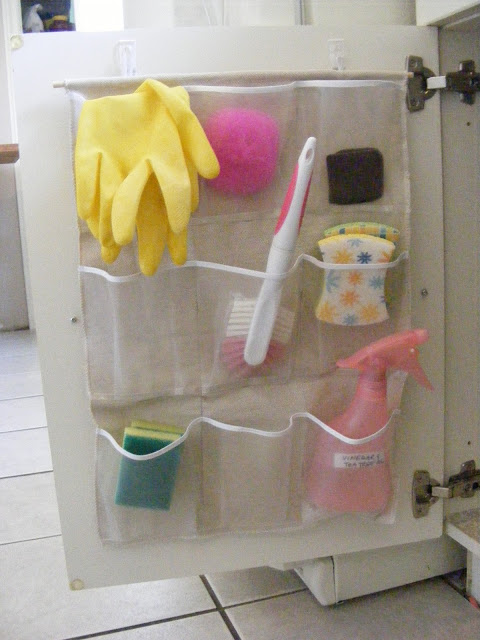
photo: imperfecthomemaking.com

photo: livesimplybyannie.com
A similar organizer can also be adapted for a bed.
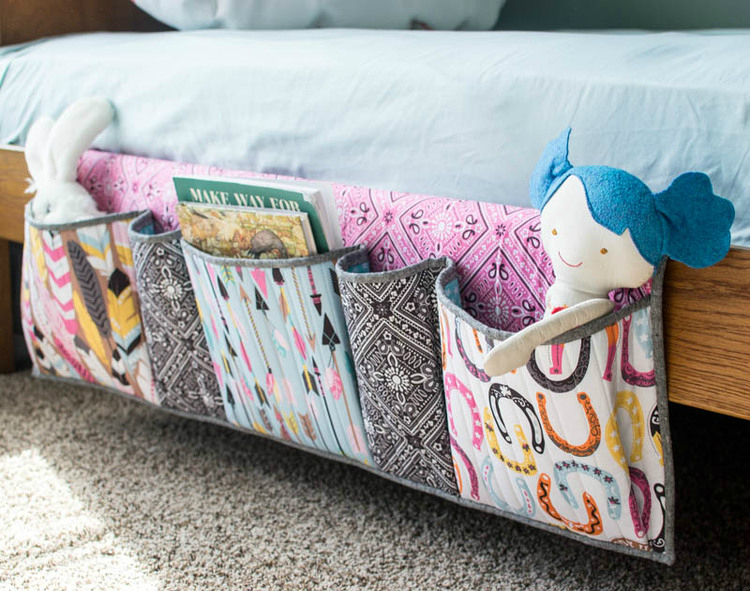
photo: static1.squarespace.com
with your own hands
Organizer “plates” for the closet

photo: blog.spoonflower.com
If your closet does not have enough compartments with shelves, you can add them by sewing a similar organizer. It is useful in the bathroom, for example, for towels, and in the nursery - for toys, and in the hallway - for hats and scarves.
You will need:
- The same amount of fabric for the outer and inner sides (take dense, strong fabric);
- A piece of Velcro tape (Velcro) 10+ cm long;
- Thick cardboard or plastic to strengthen the organizer;
- Hanger
Step 1


photo: blog.spoonflower.com
Cut out the fabric and cardboard according to the diagram in the picture (the number is the number of parts).
12 pieces 23x23 cm (lining fabric);
2 pieces 23x32 cm (main fabric);
2 parts 20x23 cm (main fabric);
2 pieces 32x69 cm (main fabric).
Don't forget to add 0.5 cm allowances.
Step 2


photo: blog.spoonflower.com
Sew 20x23 cm pieces as shown in the picture. Turn them inside out, iron them, and sew on Velcro.
Step 3

photo: blog.spoonflower.com
Mark the middle of this part and sew two lines to the middle of one of the parts of the main fabric 23x32 cm.
Step 4


photo: blog.spoonflower.com
Connect this piece to one of the lining pieces. Sew the parts together as shown in the photo. Insert cardboard between the shelf parts.
Step 5


photo: blog.spoonflower.com
Lay out the finished back part of the organizer on the table and baste, and then stitch the outer fabric parts 32x69 cm. On one side, leave an unstitched section for turning.
Step 6

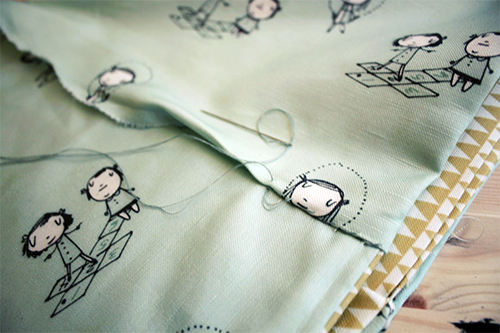
photo: blog.spoonflower.com
Turn it inside out and sew up the open section.
Step 7

photo: blog.spoonflower.com
All that remains is to attach the hanger with Velcro.
with your own hands
Wardrobe organizer options

photo: ebootcamp.org

photo: ebootcamp.org

photo: diyjoy.com
Options for organizing closet storage using homemade organizers
Storing shoes and bags:

photo: s-media-cache-ak0.pinimg.com
Shoe storage plus a “shelf” organizer option, supplemented with boxes:
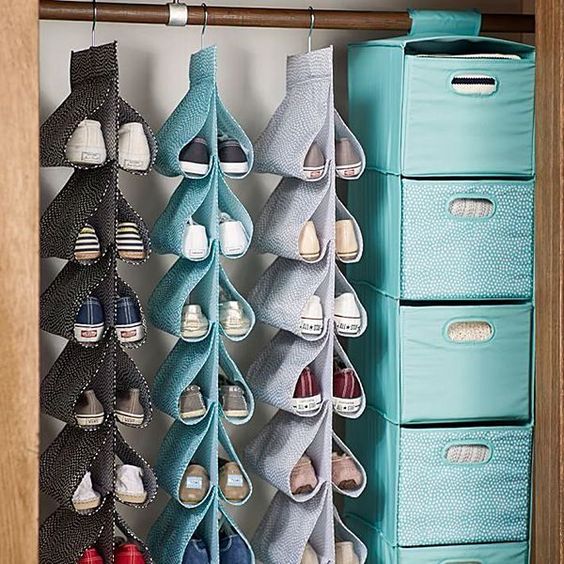
photo: simplesdecoracao.com
Bag storage:

photo: cheapbuynsave.com
Shoe storage:

photo: casatemperada.blogspot.com
Homemade covers for clothes:

photo: amazinginterior-design.com
Bag organizer
Such an organizer will help, on the one hand, make a large bag that has no pockets more convenient, and on the other hand, it will make it easier to transfer everything you need from one bag to another. Very convenient for those who choose a new handbag for every outfit.This organizer is sewn from thin felt. We recommend this particular material: it holds its shape well and does not require processing of the edges.
You will need felt, a sewing machine, thread, scissors.
To sew an organizer, follow the instructions in the video:
Organizer options for small items:

photo: 1.bp.blogspot.com

photo: coupons.com

photo: craftbnb.com

photo: pdc2011.org
Option 1.
Case for sewing machine
Sewing machine cover, made to order. Nothing unusual - the same shape, the same side pocket
The letter “N” is the first letter of the customer’s name. The idea with the embroidered letter is entirely mine. It was necessary to somehow decorate the case - so I offered the customer this option. At the same time, I finally used the book “La fabrique poétique de Vanessa” by Vanessa Ouache.

The cover is made of floral cotton and striped fabric from grandma's supplies, and the inside is lined with checkered fabric. Compacted with dublerin. Decorations include natural lace and wooden decor.

During cutting, I managed to make a mistake in the calculations, so I had to add striped fabric to the back of the cover. So, in my opinion, it turned out even more interesting


The dimensions of the case are 41*28*19 cm. As in the previous case, I made a pocket in one of the sides. It was sealed with double rubber, so the case holds its shape well - in all the photos it stands on its own without support.

Option 2.
Sewing machine cover

Quite recently I became the owner of a new sewing machine, but not because the previous one fell into disrepair, but simply because I wanted a more modern machine with advanced capabilities. Well, my mother agreed to take my previous car.

Once again, assembling the sewing machine after working on it and stuffing the wires with the pedal under the factory soft plastic case, I suddenly remembered how not so long ago Inna (Milady Azazel) showed a bag for the pedal and wires that she sewed for her sewing machine.

I had a lot of fabrics suitable for the autumn theme (and for some reason I wanted to make the set specifically autumn), but they all stubbornly refused to be combined with each other. After painful deliberation, I settled on checkered linen, and chose fabric with roses for the lining.

I chose the design from the book “Jahreszeiten. Herbst und Winter” from Christiane Dahlbeck (these cute animals have haunted me since last year), and the bag was decorated with an applique in the form of acorns.

The dimensions of the cover for the machine are 38*30*18 cm, the bag dimensions are 18*23 cm. There is a pocket on the left side of the cover. I made it with the hope that a bag with a pedal and wires would fit there, but the pocket turned out to be too small, so I’ll have to find another purpose for it.

Option 3.
Handicraft kit for handicraft supplies

I created just such a set for the current process or for storing handicraft supplies (it’s whatever the housewife wishes).
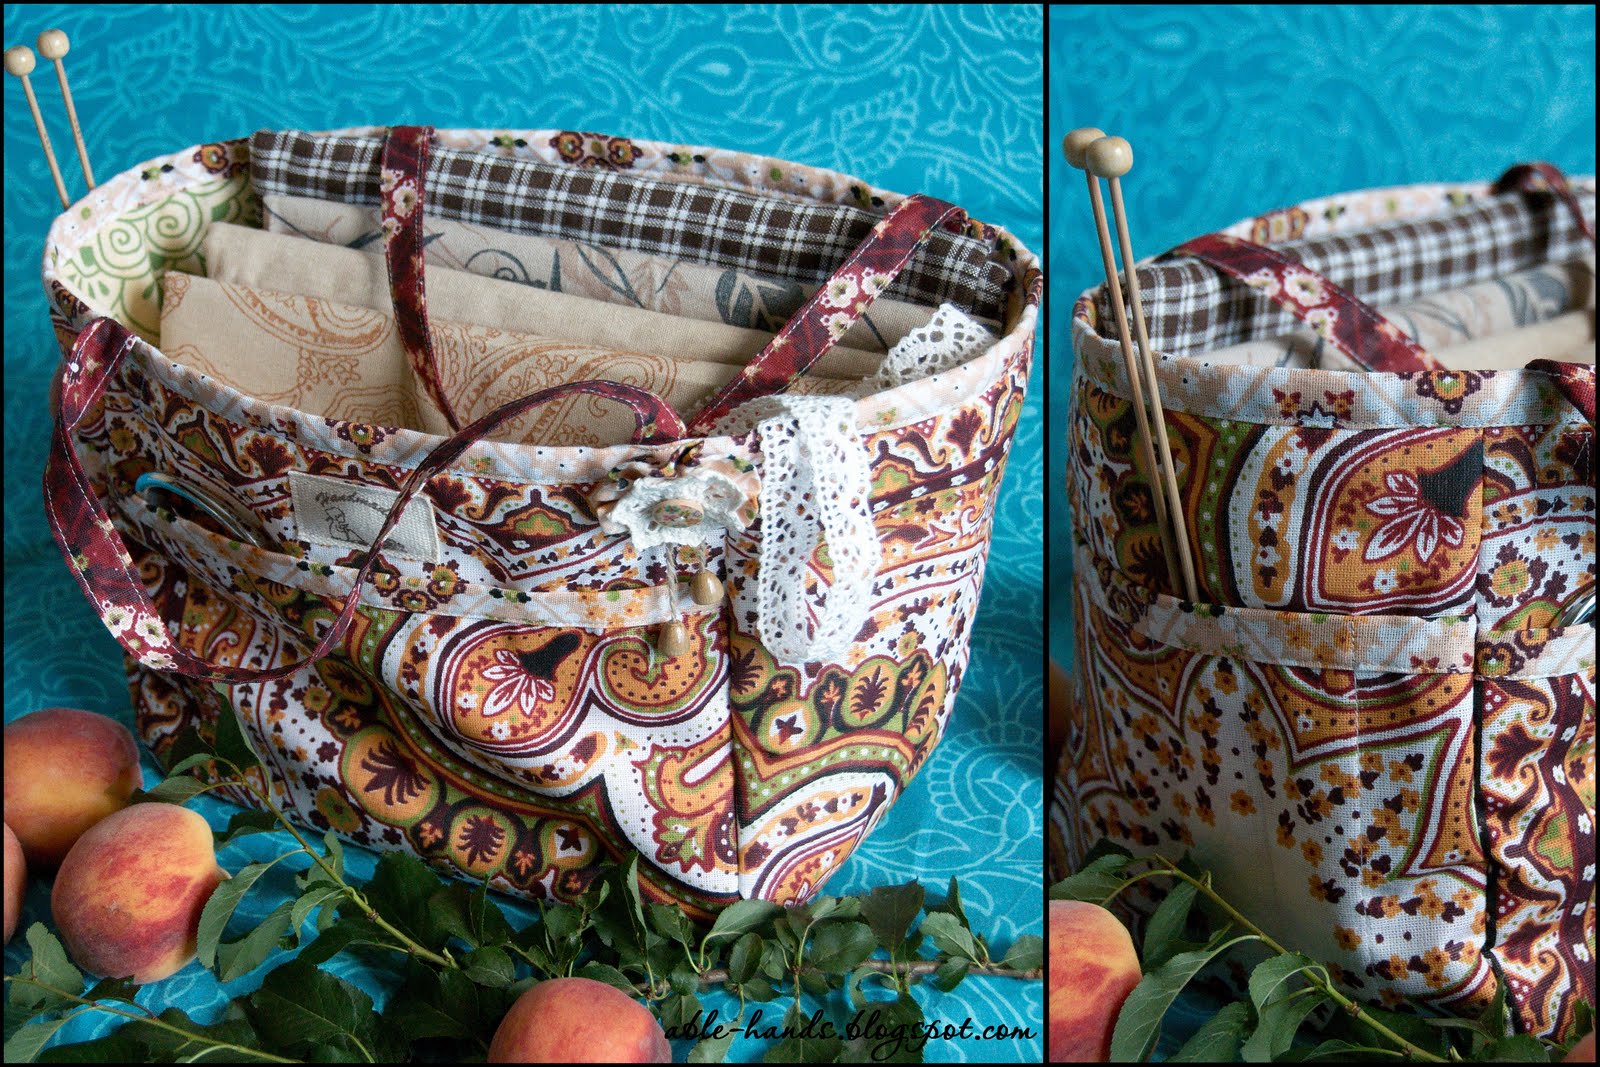
The organizer bag has three pockets on the outside: two regular and one with small compartments (for example, for knitting needles/hooks or pens/pencils). Decorated with a tag and a flower brooch on a pin, which can be moved to another place or simply removed if desired. Materials: calico, padding polyester. The dimensions of the handbag are 19*23*18 cm. The handbag is sewn according to this MK, everything is quite clear and uncomplicated.

I decided to add a bag to the bag for various small items so that nothing gets lost. Well, of course, I wanted to embroider something! Embroidery design “Un air de printemps” from Tralala, embroidered on Britney Lugana 28ct in Antique white color, DMC threads (I selected the colors myself to match the main fabric). Materials: calico, natural lace, satin ribbon for ties, wooden beads, button for decoration. The dimensions of the bag are 10.5*18*4 cm. I sewed using this pattern, and before turning the bag inside out, I stitched the corners for volume.
Option 4.
In pink or Dolce vita
What will happen if you combine your love for handicrafts, sweets and peas?.. For example, I got an organizer for handicraft supplies.


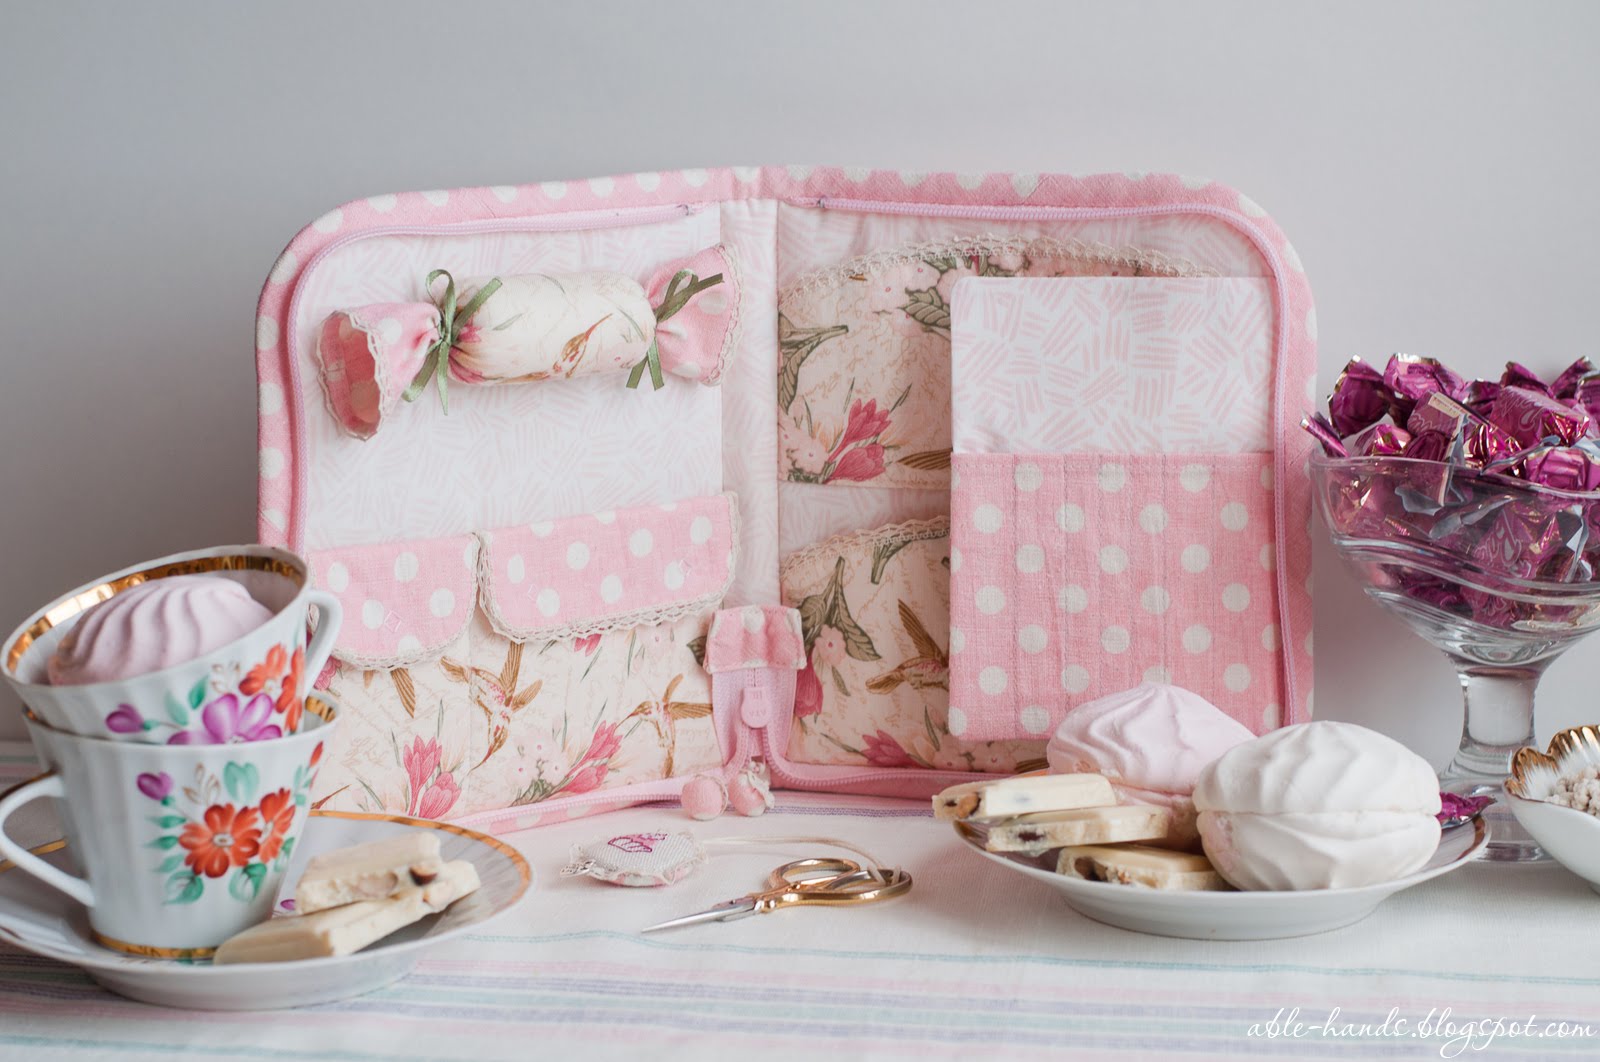


Option 5.
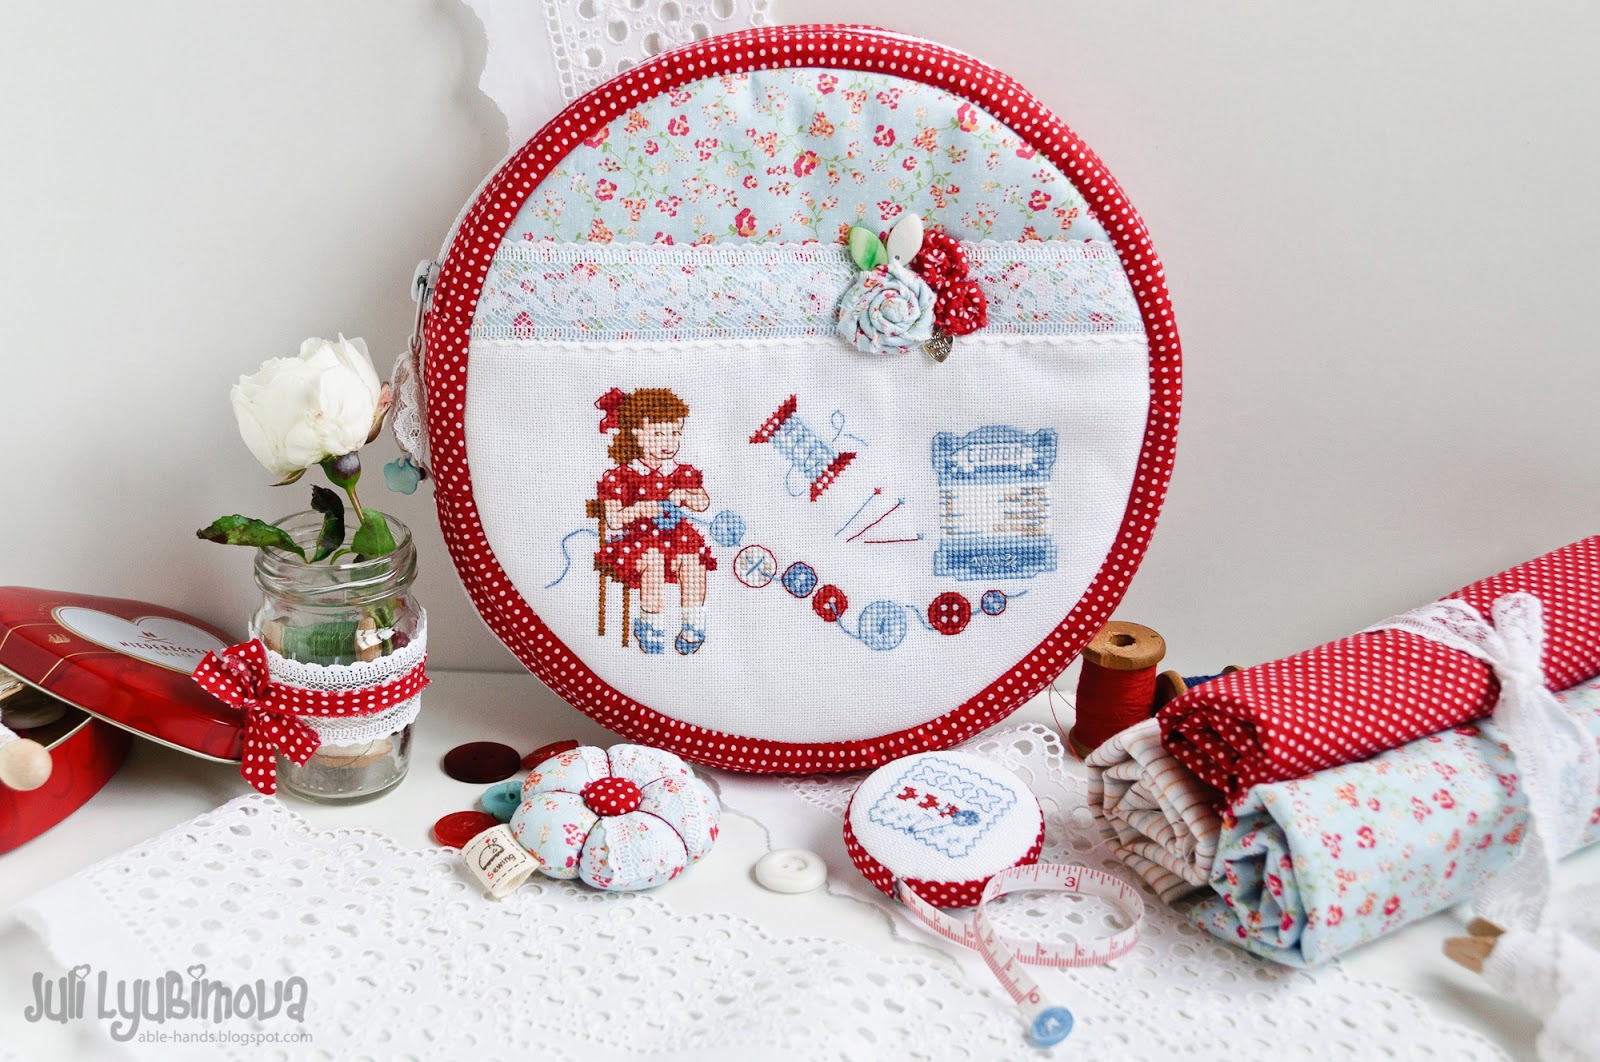
Organizer. Retro.
This is not the first time I have noticed that if I was not able to immediately show my new job, then it becomes more and more difficult to do this every day. That's how it was with this craft organizer. And now I look at the photos of this organizer and don’t even know what to write about... But just recently I liked it so much!! Although it turned out a little differently than originally planned... It was supposed to be gentle and romantic, mostly blue and just a little bit red, but in the end it turned out so much red that it dazzled the eyes. And it was precisely because of the abundance of white polka dots on a red background that the organizer received the name “Retro”.
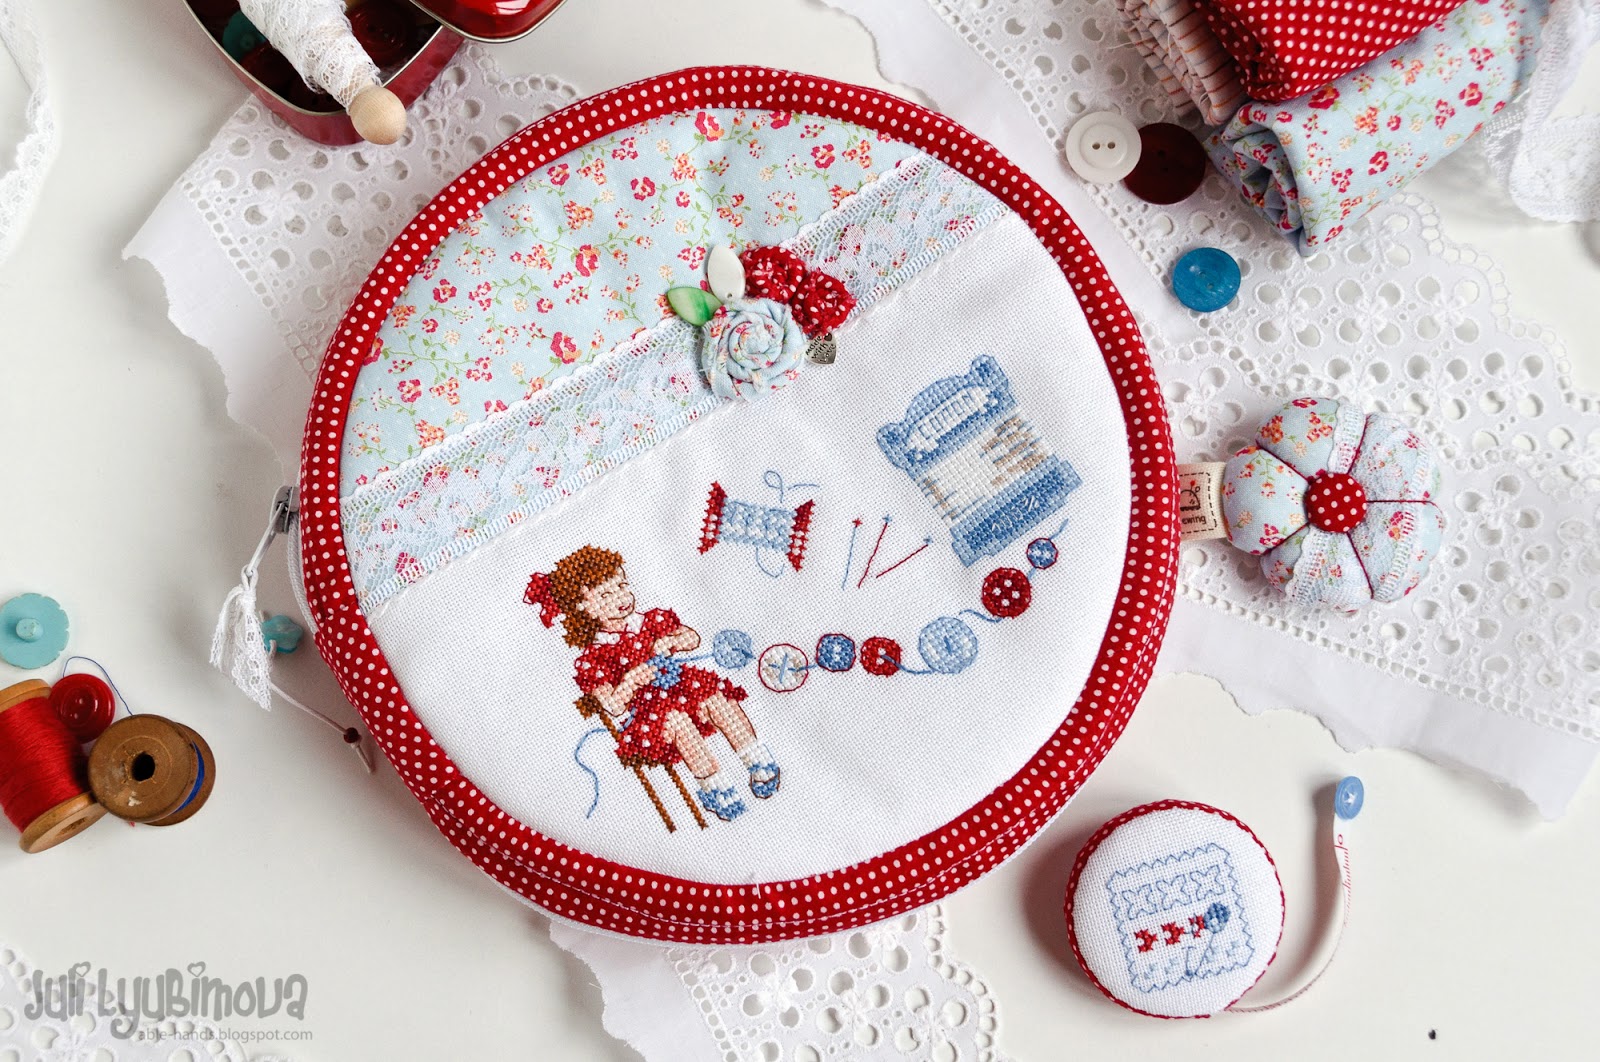

When I was choosing a motif for embroidery, my attention was drawn to a girl in a red dress with white polka dots. After all, I had exactly the same dress with the same white collar as a child. My dress also had a white frill around the edge, but that’s not that important, right? Design by Veronique Enginger, embroidery pattern from the magazine “Creation Point de Croix” No. 18 (March-April 2012). I did not embroider the entire proposed motif, but only half of it, and, based on the shade of the blue fabric, I replaced the blue thread colors with blue ones.

The size of the organizer is 22 cm in diameter, thickness 3 cm. It is sealed with two layers of adhesive bulk interlining and closes with a zipper. Inside there are five pockets of different sizes, two of which close with a flap with a button. On the back of the organizer there is another zippered pocket.

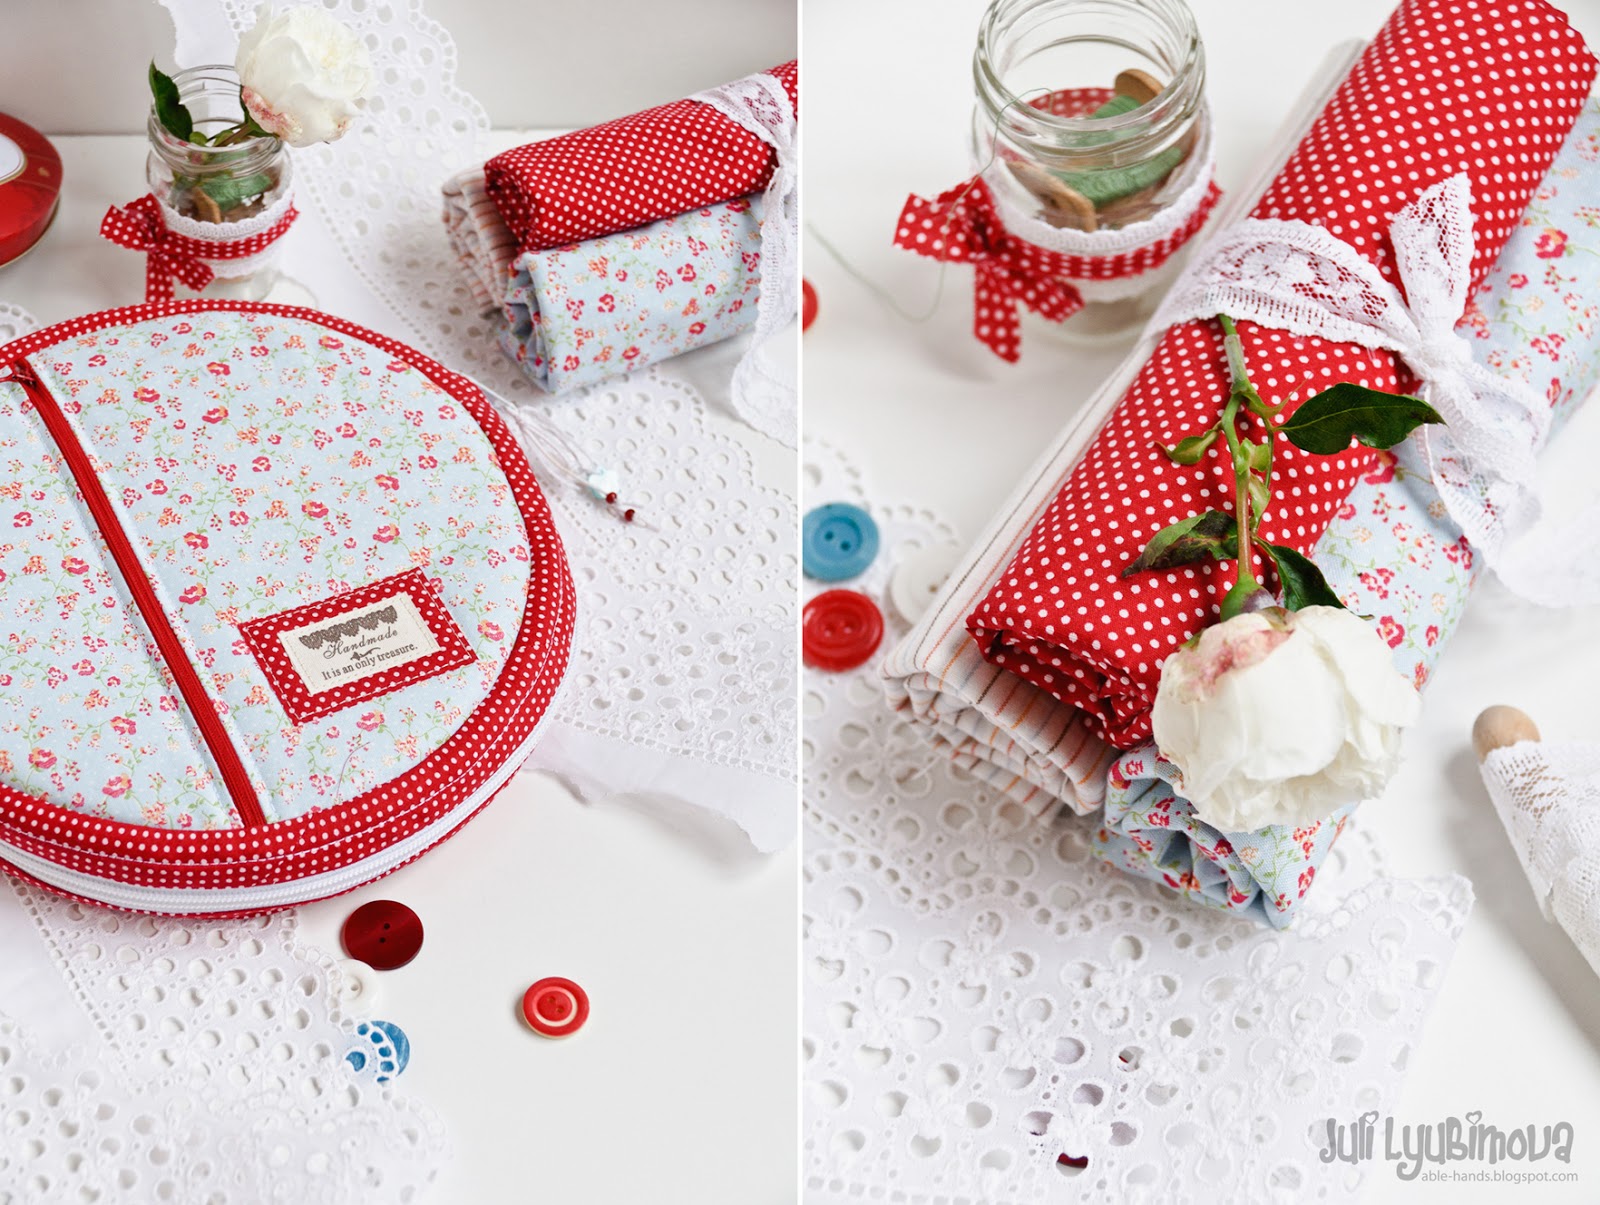

To go with the organizer, I sewed a small pumpkin pincushion and covered a tape measure with fabric. They are always at hand, as they are in their place thanks to the buttons located on the inside of the organizer and on the back of the needle bar and tape measure. Embroidery pattern for decorating a roulette from the book “Agenda 2011 Latelier de la brodeuse au point de croix”.


I made this organizer to order. And despite to my overkill with the color red no matter what, the customer accepted him as he was.
Option 6.
Knitting Needle Case


Case for knitting needles and crochet hooks “Brown” / Knitting Needle Case


Still, they turn out different for me every time! There have never been 100% repetitions even with the same set of fabrics.


Option 7.
Case for knitting needles and hooks “Green” / Knitting Needle Case


I seal the covers with Vlieseline H 640, duplicate each detail with adhesive, plus stitching, which makes them sooo nicely dense! Sheer tactile pleasure! :)) You can simply meditate by opening them...oh-oh-ohmm


Option 8.
Case for hooks "August" / Knitting Needle Case"


Option 9.
Sewing machine cover
You have purchased a sewing machine. Perhaps it is equipped with a plastic case, perhaps not. But in any case, I would advise you to sew a fabric cover for your car:
- The plastic case becomes electrified and collects a lot of dust.
- Gets dirty quickly
- It is good only as a protective device against inquisitive young “vandals”
- A fabric cover will not only protect the car from dust, but can also be a beautiful and individual product.
Uncover

- First you need to measure the car.
- You need to make an increase to the obtained measurements so that the cover fits easily on the car (2cm each) and on the seam reserves (1cm)
- Make patterns (side part - 2 parts and central part - 1 part)
- Cut out.
Assembly
1. The case is a three-layer product:
- Top
- Pad
- Lining
The top can be made in different ways: you can decorate it with applique, you can make the top using a patchwork technique (this is done before quilting), you can simply quilt it, etc.
As a gasket, you can use synthetic winterizer or non-woven cushioning material used in furniture production. The padding after stitching will give the cover rigidity.
It is better to use cotton fabric as a lining.

2. Stitching will not only add rigidity to the product, but will also enrich the texture of the fabric and decorate the product. Before quilting the details of the cover, it is necessary to fasten all layers of the “sandwich” with fastening stitches. Locking stitches will prevent the layers of materials from shifting relative to each other during stitching.

The fixing lines are laid with a “forward needle” seam with long stitches - 2-3 cm from the center to the edges with an interval of approximately 10 cm. Since our product directly relates to a sewing machine, I suggest quilting all the parts using the stitches available in your sewing machine’s arsenal. This is the simplest option and is within the capabilities of a novice craftswoman. Also start stitching from the center, moving towards the edges of the part, this will prevent the product from pulling together.

3. After stitching, check the dimensions of the parts using the pattern, trim the edges evenly, leaving a seam margin of 5-8mm + 1-1.5cm for “freedom” (the cover should be somewhat larger than the size of the sewing machine).
- Using tailor's pins, pin together the central part of the cover with the side parts (Thus, check the size - the length of the central part). If necessary, adjust the size of the part.
- Split the pieces and edge the short sides of the center piece and the undersides of the side pieces of the cover.
- Sweep the central part of the cover with the sides
- Edge the side seams. As an edging, you can use either a bias strip of fabric (don't forget to check the width of the bias binding!) or ready-made edging braid (not ready-made bias tape! - it's narrow).

Your case is ready! - a wonderful gift for your assistant.
PS. If your sewing machine is equipped with an “upper feed”, or you purchased an additional foot with the function of upper fabric feed, be sure to use them when stitching. Don’t forget about the foot with the guide ruler when edging the cover. These devices will help you do this job better.
Good luck to everyone who decides on this “labor feat”, Tamara Afanasyevna
Here are a couple more samples


Option 10.
Case with lining for sewing machine
For a long time I had been planning to sew a cover for a sewing machine, the one that came with it when it was sold was some kind of cellophane and was all frayed (with the help of the cat, of course). And then I was choosing fabric for my bag, and ended up buying fabric for the case. And what’s the matter, the car is always in sight and so terribly tattered, it’ll be offended =)
Here it is, my joy =)


I didn’t learn to sew anywhere and I admit that somewhere I could have done something incorrectly or in the wrong order, or maybe everything at all. But! It was sewn so quickly and simply that I didn’t expect it and even surprised myself.
So: A case with a lining, sealed with adhesive thick interlining (or thin synthetic padding... I can’t figure out what it is). The outer fabric is American cotton, the inner fabric is also cotton, but not American, but domestic.
We measure our car (length, height and width). Mine is 38cm. 31cm. and 18 cm respectively. On the sides I added 1 cm. so that the cover is not stuck to the machine and lies a little loose. We will need one part of the central part (in the figure numbered 1) and 2 parts of the side parts (in the figure numbered 2). Total 3 parts: 1 central and 2 identical sides. The pattern is ready!

Cut out 3 pieces from the main fabric, 3 pieces from the lining fabric and 3 pieces from the sealing fabric. We cut out the outer and lining fabric with allowances, I use 7mm, but here you are used to it.
Sealant, if it is adhesive , cut without allowance, since it only thickens the seams and complicates turning the part out.
We will put the seal aside for now, since we will glue the main fabric after we make the hole for the handle.

So, our parts are cut out, the seal is also cut out, but put aside. The fabric with clouds is my lining, with pictures the main one.
3. Let's start with the inner case. (I decided to immediately train on it, since it was scary to just take it and make it from the main fabric right away. And the pattern could be corrected without damage and even altered if anything, I still have 2 meters of fabric with clouds, and the main one is quite close was.)
Place the central part on the machine and use pins to mark the location of the handle


It turns out to be such a rectangle, you can lightly draw it on the fabric.
We cut out a piece of fabric that is slightly larger than our rectangle and cut it and the main fabric with the right sides facing each other.


We cut out the rectangle, make notches in the corners so that it looks neat after turning it inside out.

turn it inside out

and smooth it with an iron

It turned out to be such a neat hole for a pen.


We do the same for the central part of the main fabric; we should get exactly the same hole on the main fabric.
I still had to prepare the base fabric a little, since it was originally just a panel of elements.

it had to be cut, having previously measured it 77 times, and sewn a little differently so that it would correspond to the idea

here I left only the necessary details, turned one of the central pictures so that it would not be upside down in the product and stitched the side parts

So, we carry out the procedure with the valve for the main fabric.
We apply it to the machine (you don’t have to apply it, but put a lining on the main part, because there is already a ready-made hole and trace it), mark the cutout, apply a rectangle of fabric, sew, turn, iron


and try on:

Making a pocket on one of the side parts
In the photo there are 2 parts of one side, in my case the right one, where I planned a pocket.
The fabric with clouds is the inner parts of the pocket, I took it from the shortage of the main fabric =)
I think it's clear from the photos
Stitched and ironed


And voila, we have a pocket (I stuffed scissors in there for clarity) but it’s not secured in any way yet.

Inside the pocket there is fabric with clouds

but both side parts are made of the main fabric. Here's the pocket where the mouse and the bird are

Now you can glue the main fabric with a sealant. Apply and iron.
I laid out the main fabric, the sealant on top with the glue down, a thin diaper on top and ironed at maximum.
This is the seal I have


In place of the valve, I cut out the seal and tucked it under the fabric, this is important, because otherwise, a piece of fabric around the hole will be unsightly.

I got so carried away that I somehow didn’t capture this moment in the photo. But I think there are no questions here.
As a result, our outer and inner covers have this appearance.

We place both covers with the wrong sides inside each other and sew them together along the contour of the cut for the handle.

Now they can't get away from each other =)

Now only the bottom of the cover remained, I wrapped it inside and carefully sewed it with a hidden seam, I got such a neat bottom

Option 11.
Case made from old jeans for a sewing machine

To do this we will need old jeans, a synthetic padding lining, small pieces of colored fabric for lining the pocket and canvas with embroidery. 
First you need to build the details of the pattern as in Figure 1. It is better to start building from the sides (details 8,9,10,11). To do this, you need to measure the height of the sewing machine h, the width at the bottom x1 and the width at the level of the middle of the flywheel of the sewing machine x2. Don't forget about protruding parts. They also need to be taken into account. And add 0.5 cm to freedom on each side.
First, construct a simple rectangle with parameters h and x1. Find the middle of the segment x1 and draw a dotted line dividing the rectangle into two halves. Then, along this line from top to bottom, measure a segment equal to the height from the middle of the flywheel to the very top of the machine, taking into account the protruding parts h1. After this, use a compass to construct a circle with a radius equal to x2/2. Connect the bottom points of the rectangle to the circle and adjust the top half of the circle to the height of the rectangle by hand.

After the part is built, use a centimeter to measure the length of the sidewall contour excluding the bottom. This will be the length of part 1 (d).
Now let's start building part 1. Everything is simple here. Sidewall length d and sewing machine length y (don’t forget about 0.5 cm for freedom) The first part is cut out from a synthetic padding. After this, determine the middle of the rectangle and build a hole for the handle of the sewing machine, not forgetting the freedom allowances. 
Next we make a pattern for the instruction pocket. Here, too, the entire construction consists of rectangular ones, for the construction of which you only need to determine the depth of the pocket d1. Everything else is calculated using the formulas below. 
Now the details can be transferred to the fabric. It turned out that I cut the sides from one trouser leg, and the remaining parts from the other. First, I ripped the jeans along the side inner seam, and arranged the parts so that the outer seam looked harmonious. The knee-length pants were enough for me. Now let's start assembling. So, first we fold the parts of the sidewalls from padding polyester and from jeans inside out and sew them with a zigzag along the edge. After this, we begin assembling the outer part of the pocket. We attach parts 3,4,5 to each other, where the embroidery is in the middle. To the resulting part we attach part 6 from cotton fabric on top. After this, we iron the seam, fold it in half and make a decorative securing stitch. Attach part 7 from cotton fabric to part 2 from below. Don't forget to iron the seam. We apply part 1 of padding polyester to the resulting part and attach them to each other along the lines of the rectangular hole for the handle marked in the center. Iron, turn, iron again and make a decorative securing stitch. And you can also stitch the sides so that the parts don’t move. Now you need to attach the faucet to the resulting part, attaching it with the side of the cotton fabric and stitching along the side and bottom. I’m not lazy to make extra lines to make it stronger. And after that I zigzagged along the edge. If desired, you can sew a patch denim pocket at the back.  The most left difficult process connecting the side parts to the main one. It's almost like sewing on sleeves. Don’t be lazy to bait it first, turn it out and see how it turns out, and only then attach it. At the very end, I folded the edges inward at the bottom and stitched. That's it - your clothes for the machine are ready.
So, we’ve prepared everything we need – let’s get to work!
1. Take your lining fabric and cut out two rectangles that match the size of your machine. You should, of course, measure your sewing machine first.
2. Sew two rectangles. You should end up with a bag that looks like a pillowcase. Put it on your car.
3. The upper corners are in our way - pin them, remove the cover, stitch and cut off the excess.

4. Repeat the same with outside cover: cut out, stitch the bag, measure out unnecessary corners and get rid of them.
5. Now turn the inside inside out and place it inside the outside of the case.
6. It's time to sew them together, hiding the seams inside. You can sew lace, braid, or decorative thread along the edge for edging.

You can additionally make a groove at the bottom of the cover for an elastic band, with the help of which the cover will be pulled together, further protecting the sewing machine from dust and various types of contaminants. But to do this, you must initially cut the cover with a small margin at the bottom.
The stylish cover for your sewing machine is ready!