Easy DIY paper crafts. Crafts from colored paper (106 photos): instructions and cutting patterns for creating amazing toys and decorations
Colored paper and thin cardboard are the first materials from which children begin to make flat or three-dimensional figures. Children's paper crafts develop creativity, spatial thinking and fine motor skills fingers. This is the simplest way to keep children occupied in their free time. They will be passionate about the creative process at any time of the year, especially in inclement weather. The ideas, diagrams, instructions and templates proposed in the article can be used not only by teachers, but also by parents of preschoolers and children of primary school age.
Self-production simple crafts made from paper – it’s exciting and accessible. Every year, experts offer new ideas and work techniques that inspire exclusive interior decor.
Paper doesn’t mean something you can do, throw away and forget. If you prepare correctly and do everything very carefully, paper decor will not look cheap and trivial. You can make many beautiful and useful household items with your own hands from thin colored cardboard and thick office paper. They are suitable for updating the design in a children's room or decorating the whole house for the holiday:
- for the New Year;
- for Easter;
- by March 8;
- for Valentine's Day;
- on the birthday of each family member.

Designers use three-dimensional figures for interior decoration in various styles. For example, branches of delicate sakura with voluminous pink flowers made using the origami technique from modules is a great idea for a Japanese-style bedroom.
Panels with voluminous butterflies, applications in the form of birds or autumn leaves, a tree with owls - a simple and unique decor for a hallway or dining area in a country style.
New Year's paper decorations – better preparation for the long-awaited holiday.
Enthusiastically use all your limitless imagination:
- openwork snowflakes on the window glass, planted on soap;
- Christmas angels;
- moon and planets;
- garlands with colored paper additions;
- Santa Claus, snowmen, hares and other winter characters;
- voluminous and flat Christmas tree decorations.
Children of different ages, girls and boys, are willingly involved in the work. Older schoolchildren, having had practice, become “instructors” for the kids on behalf of their mother. They can make a complex base in the form of an accordion, fan, flower stem or supporting parts.

Tip: Teach your child to be careful when working with glue so as not to make stains or sagging. And before cutting something out, let him measure with a ruler, mark it and make marks with dots. The pencil lines should go into the scraps, not into the main parts. Under this condition, all work will be performed masterfully, and not like beginners.
Knowing how to make spherical tulips, three-dimensional daffodils, roses and other flowers, older children are able to make a gift for their mother or grandmother with their own hands. One of the parents will give the child an idea and teach the simplest skills of working with scissors, glue and thin cardboard.
A beautiful paper bouquet in a makeshift vase will stand on the window for months, reminding you of the holiday. And for parents there will be another reason to praise their children for their patience and perseverance, and to remind them when something doesn’t work out.
It is better for beginners to master various techniques and tinker using the easiest patterns. Simplicity and accessibility are the secret to the popularity of crafts made from the cheapest materials.

You can start with children 3-4 years old or when the baby begins to show interest.
Our experts will share their secrets on how to make interesting paper crafts with your own hands using various techniques.
Invite your schoolchildren to watch a video master class on creating three-dimensional flowers from paper.
How to make easy paper crafts using various techniques?
- Making cardboard toys according to a template is the easiest way, especially if the elders do the difficult work for the baby.
Hares in the grass is a simple toy; it can be made “animated” if the characters are not fixed, but made into slots on sticks.
- One hare (head and shoulders) is cut out as a template and reproduced together with the child, who can trace the cardboard blank with a pencil several times. Don’t forget to teach your child to save paper by placing the templates tightly together.
- These bunnies will need “running eyes” made of plastic, which are sold in craft departments.
- All that remains is to glue the eyes onto the cut out faces and finish drawing the nose and mouth. If you depict them differently, you will get bunnies with different facial expressions.
- The length of the ears can be varied or even twisted onto a pencil to lower them.
- Next you need a strip of cardboard with cut out grass in 1 or several rows.
- Behind the grass, you need to cut holes across the width of the hare’s body so that they “sit” there tightly. It’s better to attach the bunnies themselves to sticks or paper tubes to control them.
The toy is ready, now it can be used - the bunnies will tell the child a bedtime story on the edge of the back of the crib. At the same time, the mother will move these bunnies one by one. To complete the plot, you can make a wolf or a fox so that the bunnies hide in the grass (we lower or remove the templates).

Using a similar technique, you can make any flat animated crafts from colored paper with your own hands. For example, in the window of a house cut out according to a template. You can place a doll or storyteller there. Stories or poems can be read to children at night by a grandfather and a woman with a samovar (other characters). Use an easy plot that children can understand, with famous fairy tale characters.
A dog and a whole family of puppies will look out of the booth, driven out by a cat or a rooster. If you manage to make a tower of a “stone” castle, let the princess and the dragon appear in the window with your dialogues - children love to watch this.
- Curled paper figures are an easy way to add dimension to paper crafts. Experts suggest mastering this at a basic level, and the baby will do a whole animal world in the children's room.
The easiest way to make it is from paper rings and cylinders:

- Bunny.
- Curly bird.
- Chicken.
- Kitten.
- Puppy.
- Little frog.
- Owl.
The paper cylinder is the body; depending on the design of the toy, it can be positioned horizontally or vertically. Attach a tail and paws cut out of paper to this base. The most important thing is to make the head or muzzle – flat or voluminous (your choice).
If you are making birds with a child, it is better to open the beak. Use a chicken feather or down - this will make the chicken or cockerel more attractive. Eyes can be drawn or glued, for this use:
- halves of peas or beans;
- "shifty eyes";
- black allspice;
- flat beads;
- black sparkles.
In addition to the toy itself, children will be interested in making a character’s “habitat” out of paper: grass, a lake, a house, a hollow, a tree, etc. If you are not too lazy, in a few days you will get a lot of crafts on the same theme - an entire zoo or the characters of the fairy tale “Teremok” . This plot can be memorized and shown in roles to guests at a child’s birthday.
- Dressing up a paper doll is a popular game for girls. You can buy them ready-made or make them yourself. For those who don’t know how to draw, it’s easier to cut out Barbie in a swimsuit from a “decoration book” and stick it on a cardboard base.

Outfits are made from:
- white paper and decorated with pencils or markers;
- thin colored cardboard;
- velvet paper;
- foil;
- magazines (illustrations with the texture of fabric or fur).
If the mother or girl has artistic skills, then you can draw a fashionista doll yourself or copy it from a sample you like. Such paper crafts are decorated with paper and fabric appliqué, feathers and a flower herbarium. A slightly more complex level - fluffy dresses made of voluminous elements and pleated skirts made of fan folds.
Tip: Don't forget that each outfit must have holders (elements on the edges of the outfit) to attach to the doll's shoulders and waist. An advanced level is to attach a flat magnet inside a cardboard template, and glue a light metal plate or a shoe nail without a head under each outfit. Usually they turn to their father or grandfather for such help.
Add a Girlfriend and a Prince for the doll, a house or a whole street for walks. If we limit ourselves to just one “fashionista,” she needs a box or box made of cardboard in any technique. It is no less interesting to weave a basket of twisted paper for a homemade doll and make a rug.
This is one of the most simple ways creating color patterns. Even a 3-4 year old child can master a braided rug step by step.
With this technique you can do:
- basket;
- bookmark;
- patterned mat for paper toys.
Several methods of color combination have been developed. For those who are interested in what crafts can be made from paper, it is enough to master three:

- plain weaving;
- two-color;
- multicolor patterns.
The lightest is braided, where stripes of two similar or contrasting shades alternate.
For the doll rug you will need:
- scissors,
- glue;
- ruler,
- pencil;
- 2 squares of colored paper.
We mark the back sides at 1-1.5 cm, but do not cut them all the way - a centimeter border is needed along the edge. You should end up with one shape with the edges not completely cut on both sides, the second one with one side cut to the edge. These strips will simply thread through the first template step by step. Then the ends need to be glued. Finish with a border, curly or openwork edges of a different color.

Toys made from curled paper or newspapers
Another new product for those who are not familiar with this technique.
Real hand-made masters use this technique to weave furniture from wicker and rattan, and from newspaper tubes to make interior baskets. Easy crafts made from twisted white paper start with blanks, then weave according to the pattern.
Newspapers rolled up into tubes will also become products: after painting with an aerosol, letters and photos will not be visible, but the recycled material will become a useful decoration for the apartment. According to the general scheme, for example, you can weave baskets for old flower pots and flower pots that require updating.
Another interesting idea is a basket for office supplies on the computer desk to put small items there for general organization.
Newspapers are cut with a sharp knife and wound on a thin long knitting needle, after which the edges need to be secured with glue. One sheet of newspaper will make 4 tubes if folded in half twice and cut into 4 equal parts.

It is suggested to weave:
- A vase for dry ikebana or paper flowers.
- A box.
- Lamp for the kitchen.
- Frames for family photos.
- Coasters for hot glasses.
- Interior inserts, etc.
In Russia, this type of needlework is not yet as popular as abroad, but the number of admirers of the technique of working with paper is growing rapidly. This is the twisting of long narrow strips to create three-dimensional images. They are combined into three-dimensional images or pasted onto postcards.
The examples show how to make paper crafts using this technique.
First, make the easiest samples with your child - a bird or a flower. This will be something new and surprising for him, then his imagination will develop. First, children need to be told the density of the twist and the need for creases in certain places. Soon they will begin to understand and make new models from “paper filigree” on their own.
This technique is used to make full-fledged souvenirs or decorate the base. The most popular:
- cards and invitations;
- photo frames;
- earrings;
- gift packaging;
- New Year's decorations for the Christmas tree;
- interior decor.
In craft stores you can find ready-made quilling kits, cut-up colored stripes for DIY paper crafts, diagrams and templates.

Trimming
Another original way to create three-dimensional figures, which requires identical templates made of soft paper. They are connected and unfolded, resulting in three-dimensional figures that can be used to decorate the interior or make holiday decor in the house.
Iris Folding
A new type of working with paper for Russia, which develops creativity. In principle, nothing new - paper spirals are twisted in a special way and used to lay out patterns. If you carefully consider the pattern and shades, you get masterpieces that belong in a frame on the wall.
Invite your daughter to make a young lady in a fluffy dress, but help her complete the most difficult stages of the work.
Papier mache
This is the oldest technique that periodically comes into fashion and is forgotten again. To some it will seem new, but to others it is known from the surprise balloons that are hung up during the holidays. They are filled with candies and various sweets, and the birthday person must knock them down with a bat, releasing the goodies.
Many interesting paper crafts are made by craftsmen from glue and torn newspapers. Translated from French, papier mâché means “torn” or “chewed” paper. By applying layer after layer of glue-based scraps, it is easy to obtain any shape.
The same “surprise balloon” can be easily made by wrapping a large balloon in thin paper or newspapers and applying layers of papier-mâché. When the layer is ready, the ball is deflated, but the shape remains. It is filled with candies, and the hole is covered with the same “chewed paper” on glue. The top is decorated with colored blocks and foil stars. This is a popular activity at Mexican themed parties.
If durable figures and sculptures are created, gypsum or starch is added to the base. Using this technique it is easy to make anything - from prop hats for a party to decorative items in the interior.
A piggy bank can be made using this simple technique with original painting and varnished. It can be filled for years, and then broken, and with this money the family can go to the seaside.
Layer-by-layer pasting of an object - “machining”. To remove the finished papier-mâché, you need to carefully cut it and close the seams using the same technique. Sometimes they make a liquid mass based on shredded paper, which is squeezed out and made into a shape.

Accordion-based toys
This is a more challenging level for kids, but a great base for the body of crafts. Two strips of paper are placed in a square on top of each other alternately at right angles until an elastic accordion comes out. All that remains is to glue the paws, tail and face of the funny animals to this base.
Try making easy three-dimensional paper crafts with your child: a caterpillar, baby frogs, or an arched, yawning cat hiding in the grass.
Paper origami is the most popular technique for children's creativity.
Many models do not involve working with glue and scissors - the figures are folded according to a certain pattern.
Advanced level – modular origami from triangular elements. Children with spatial imagination use this method to lay out entire zoos and cities. Start with the simplest thing by watching a video master class on how to make paper crafts using the modular origami technique:
To consolidate the knowledge gained, we suggest doing:
Paper bud (TULIP) step by step
- Fold a square of red paper (preferably double-sided) diagonally.
- Fold the second diagonal (see photo).
- Roll into a triangle.
- Fold the corners towards the center and top, as well as from the reverse side.
Summary: DIY paper crafts for children. How to make paper crafts with your child. Children's craft made from colored paper.
Paper is the most accessible material for creative activities with children, which is why paper crafts are so popular. In this article we will tell you about the most interesting crafts from paper for children. When making paper crafts with your own hands, the child learns to work with scissors, develops fine motor skills, accuracy, and patience. Working with glue also requires certain skills from the child. Not everything always turns out as beautifully and neatly as we would like the first time. We tried to select for you only those paper crafts that children can do on their own or with a little help from adults.
1. Paper crafts. DIY paper crafts
We will start with the simplest paper crafts that even small children can make. By the age of 4, most children can already cut simple shapes out of paper with scissors. To make a paper “bunny” craft with your own hands, the child must cut out several strips of paper of the same width. The bunny's head is made of a strip of paper glued together in a ring. The ears are glued on top separately. To make the paws, you need to make small cuts on both sides of the strip that is intended for the body. The finished paper craft must be glued onto a strip of green paper - “grass”.
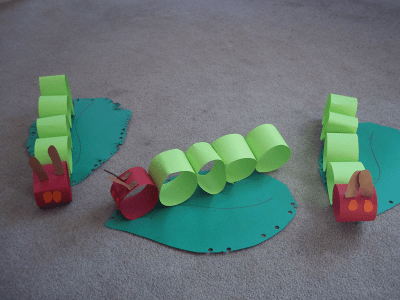
Curly birds. Also a very simple paper craft for children. The body and head of the bird are made of strips of colored paper of the same width, but of different lengths. Each strip of paper is glued together into a ring, after which the rings are inserted into each other and glued together in one place. Even a small child can make such a paper craft for children.
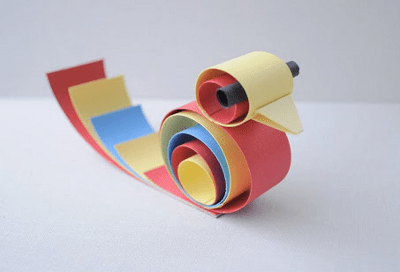
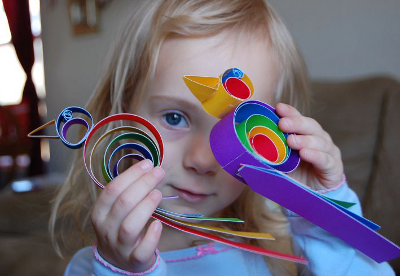
Here is another version of a similar craft made from colored paper. These birds had their tails curled by wrapping them around a pencil. Detailed instructions how to make this paper craft, see the link.

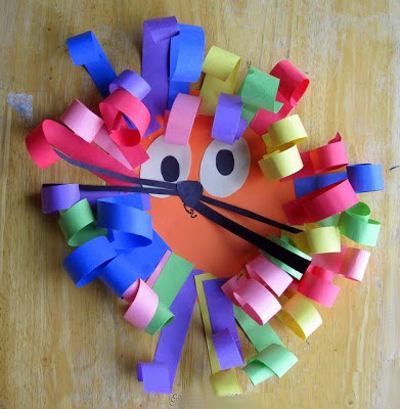
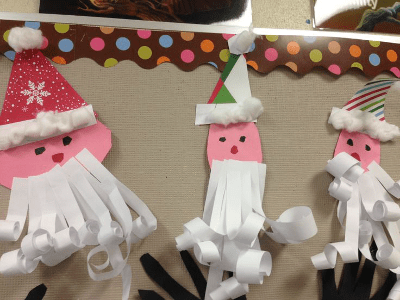
Craft from colored paper "Lion". This cute, colorful lion is also made from strips of colored paper, curled using a pencil.
In a similar way, you can make a paper beard for Santa Claus.
3. How to make a paper craft. Children's paper crafts
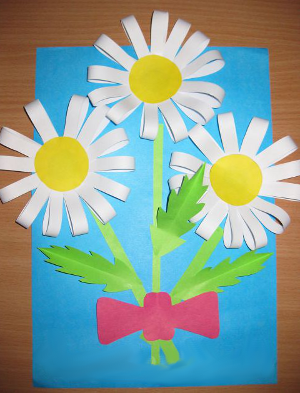
Separately, I would like to talk about flowers made from strips of paper. As in previous crafts, instruct your child to cut strips of paper. A 3-4 year old child can easily cope with this task. After that, help him cut out the centers of the flowers and stems with leaves. First, separately glue each strip of paper in the form of a “loop” (these will be the petals of the future flower). After which in correct sequence Glue all the applique details onto the cardboard base.
4. Paper crafts. Paper weaving
Weaving is one of the most ancient forms of art. With its help, you can make many useful things: bookmarks, rugs, baskets, etc. In addition, paper weaving fosters perseverance, accuracy, patience, develops attention, eye, and coordination of movements. There are several types of paper weaving. In this article we will tell you about the simplest, and therefore the most popular, type of weaving - straight paper weaving.

To make a paper craft "Rug" you will need:
Two sheets of colored paper in contrasting colors
- ruler, pencil, scissors, glue
On back side The sheet must be marked, which is applied with a pencil using a ruler. To do this, you need to step back 1 cm from the edge on all sides - this will be the border. Draw horizontal lines every 1-1.5 cm. Fold the base along the width (length) front side inward and make cuts along the marking lines to the border, unfold the workpiece.
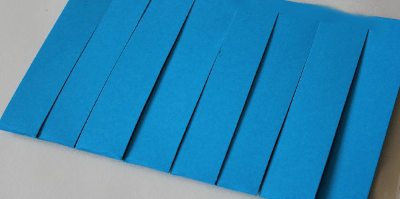
Cut strips of a different color (the width of the strips is equal to the distance between the cuts).

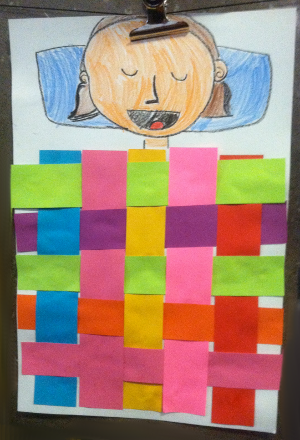
Start weaving from the wrong side into the 1st strip: the strip, like a duck, emerges, hides, etc. Glue the tip of the strip from the wrong side.

Using this technique you can make many unusual paper crafts. Here are examples of just some of them.

Material prepared by: Anna Ponomarenko
You like origami. You are delighted with beautiful paper figures, but you think that it is extremely difficult. Believe me, there is no need to engage in self-deception. In ancient times, monks figured out how to make special figures out of paper, which were intended to decorate temples and conduct religious ceremonies. This is not as difficult as it seems at first glance, and today we will try to prove it to you.
Materials for work
First, we will need to purchase a set of tools for our future work. The first thing you need to pay attention to is the choice of paper. An office one is best because it is quite rigid. It is quite enough for any folding schemes. To connect small parts you will need paper glue, for example PVA or a special glue stick. If you need to connect several blanks of different colors, aerosol glue will come to the rescue; when you use it, you can create unique multi-colored figures.
You can also use other specialized glue masses, especially those that do not leave any marks on the paper or are quite easily removed. At the same time, it is convenient to attach with such glue both outside the product and inside. If the figurine is made of white or gray paper, then you can use spray paint to give the craft the required color. Several types of scissors may be required. Sometimes a cutter comes in handy. This tool aligns the cuts. Be very careful, the blade can be very sharp, otherwise you won’t get a smooth and beautiful cut.
Buy several different lines. They will be useful for making a craft diagram, tracking the desired angle during assembly, applying the main part and correct placement panel-based products. Regular pencils or a special pencil will be useful. Experienced origami makers use rhinestones, various ribbons, pieces of fabric, unnecessary beads, beads from other decorations, and much more in their work. All this is suitable for creating unique and original figures.
The right approach to choosing paper
To get results, you should approach the choice of paper with full responsibility. After all, the creation of figures mainly involves bending and folding paper sheets. A lot, if not everything, depends on its quality. The list below will allow you to understand which material is best suited for origami, and which is not suitable at all:
- Office paper is quite thick, stiff and quite cheap. The first steps when creating figures should be taken with the help of it. When joining, a piece of paper holds very well, and if the workpiece is damaged, there is absolutely no shame in throwing it away.
- Multi-colored office paper - has the same advantages as plain office paper and does not have stains or white stripes on the folds, great for modular origami.
- Stickers - great for colorful figures, most often used in modular origami and kusudami.
- Colored paper for school is 100% not suitable for this hobby. Thin, not dense, tears easily enough, light stripes remain at the folds.
- Foil paper is very thick, almost impossible to tear, and is more often used for making complex circuits and models. If you straighten the fold, hard, dense stripes will remain.
- The pages of glossy magazines retain their shape and fold perfectly, and are quite dense.
- Banknotes have good strength and perform well on folds. Perfect for creating small exclusive gifts.
- Paper intended for origami has several types (double-sided, monotone, etc.), and is found in the form of sets.
- Tracing paper - suitable for those who are taking their first steps and decided to test their strength.
- Different variations of expensive paper have both advantages and disadvantages and are used only for certain products.

What types of origami are there?
There are several types of origami that help you have a great time, learn how to create jewelry with your own hands, improving your skills and abilities over time. In addition to the well-known origami techniques of the so-called classical direction, there are several alternative ones:
- Regular (simple) origami - suitable for those who decided to try themselves in a new business. Assembling the figures does not require special skills; the folds need to be made towards you with the so-called valley or away from you with the mountain. A good example is the figurine of a crane.
- Modular origami (blanks made from modules). The connection is made from several identical parts, called modules, which are folded according to the laws of ordinary origami from a single sheet. They are connected by simple folding. Do not crumble due to friction between individual modules.
- Aerogami is a name that speaks for itself. The art of creating airplane figures.
- Kusudami is origami using volume; modules are assembled using glue or thread. Most often, crafts are made in the shape of a ball.
- Kirigami - making various figures using scissors. Suitable for making holiday cards.
- Raw or wet origami. The base is paper moistened with water to give the products a more expressive shape, hardness and clear lines. It is more often found in the manufacture of figurines of animals and unusual plants. The paper must contain water-soluble glue, otherwise the product will inevitably fall apart.

Crane - origami
One of the most simple models It is believed that if you collect 1000 cranes, your most cherished wish will come true.
Step-by-step instructions for making an origami crane look like this:
- Bend the paper sheet diagonally.
- We take scissors and cut off all the excess, in the end there should be a triangle left.
- Let's make one more fold.
- From the resulting triangle (one, since there will be 2 of them), we make a square using the straightening method. On the other hand, we repeat the procedure.
- Take the edges from above and gently bend them towards the center.
- Bend the triangle located on top.
- We unbend it, we form a contour.
- Bend the lowest corner horizontally.
- Fold the edges towards the center to form a diamond shape. We repeat all steps on the other side.
- Take it by the bottom and bend it along the inner counter. The result is a neck.
- We also make a tail.
- At the neck, carefully bend the beginning to obtain a beak.
- We bend the wings using a slight angle.
The crane is ready, you can color it if you wish.


Paper rose
One of the most popular models is the origami rose. It's quite simple to do:
- Fold a sheet of paper in half, preferably red. Let's make one more fold.
- We open the top layer and flatten the top a little.
- Turn it to the other side and flip it over.
- We repeat the second step.
- Take both corners and bend them towards the top corner.
- We bend the resulting triangle in half until we get fold lines.
- Pull the corners down, flattening them a little, and open the triangles.
- We take the pockets by the upper part and very carefully bend them down.
- On the other side, repeat steps 5-8.
- Bend the top corner.
- Open the bottom part like a notebook.
- Stretch and flatten until you get two triangles.
- Place the workpiece on the other side.
- Raise the triangle to the top.
- The lower square located to the right bends strictly diagonally from top to bottom.
- Rotate the workpiece 180 degrees and repeat the previous step.
- We transfer the product to left hand, carefully take the walls of the product with the fingers of the other hand and twist it clockwise until we get a rose. We bend the petals with a handle.


Volumetric origami - flower ball
Making a beautiful origami in the form of a flower ball is very simple, the main thing is to be patient and follow the instructions:
- Fold the note paper in half in the shape of a triangle.
- We bend the edges and press them very firmly.
- Bend the right corner back.
- Bend the left side of the triangle, folding it in half.
- We do the same with the right one.
- Then we fold the entire workpiece in half.
- We bend the triangle below in half again.
- In this case, the larger figure should be on top of the smaller one.
- We fold part of the protruding triangle and bend it inward.
- One module is ready, we do the same with 4 more sheets. They should all be completely identical.
- We glue the modules together or put them on tape.
- The first flower is ready, we do the rest in exactly the same way.
- You will need approximately 11 of these flowers, connect them together with glue until you get a ball.


Origami in the shape of an Easter egg
To create an egg you need to make about 1000 modules. They will be attached using grooves. Colors and patterns are limited by your imagination. Assembly starts from the top, take 8 modules of the same color and make a circle out of them, add another module between the rows. It turns out two rows of 8 modules. In the next row, two blanks are added between the rows. To increase the volume, it is necessary to add modules in each subsequent row. There should be 32 modules in the middle. The bottom is assembled in exactly the same way, but the number of modules will be reduced.
Once the egg is ready, you can begin making the stand. We take 18 modules and form a circle from them. Modules are inserted into unoccupied spaces in the row. We come up with a pattern by selecting blanks by color. The parts for the central axis of the stand consist of two rows of 12 pieces. To start row number 3, you need to move the modules towards the center, turning them slightly inside out. We lay the finished parts up. We have formed a column. In the middle of the stand there will be 7 rows of modules. The top is assembled in the same way as the bottom.


Modular origami in the form of a white swan
Step-by-step instructions for creating modular origami in the form of a beautiful three-dimensional swan:
- We make 458 blanks from plain paper in the form of a triangle. For the beak we make one red one.
- We insert two modules with their corners into the pocket of the third.
- Add 2 more. We fasten the corners into pockets.
- We prepare 3 rows in the same way, for each you will need 30 blanks, close the circle.
- We also put on modules for 4 and 5 circles.
- Hold the product with your fingers and press on the center, gradually turning it inside out.
- We bend the edges of our future swan up.
- We make the 6th row, observing the checkerboard order of the pieces.
- We are preparing blanks for the wings in the seventh row, for which we put on twelve modules, skipping 2 corners and attaching 12 more. The narrow place left will be the neck, and the widened one will be the tail.
- In the eighth row, we reduce the number of modules in the krill by one.
- Next, we do the same with each row until one triangle remains.
- The tail is made by reducing it by a module in each row.
- The head and neck are assembled from 10 regular and one colored blank, red or yellow color. The corners of the colored blank must be glued together so that the beak does not split in two. We assemble the neck by inserting the corners into the pockets of the blanks, then gradually bending them.
- We put the neck in place.
The swan is ready.


Anyone can learn origami in full, you just need to have a little free time and desire and you will succeed.
99 new photo ideas for paper origami


