Files are not written to disk. How to burn files to disk without installing additional programs
Inexperienced personal computer users often have problems with operations such as writing documents to disk. However, we can say with complete confidence that recording various documents on disks does not take much time and effort.
You will need
- - computer;
- - document;
- - DVD or CD;
- - Writeable disk drive.
Instructions
In Windows operating systems, starting from version 7, it became possible to burn files to CDs without the help of third-party programs such as Nero. Now this can be done using built-in Windows tools. We’ll talk about exactly how in this article.
Preparing files for recording
First you need to insert the disc into the DVD drive. Windows should detect this disk as blank, or rewritable.
Start recording a disc
In the window that appears, you need to click “Burn files to disk”, after which you will be asked to select the option of using the disk after burning. You can also specify the disk name. Select the required option and click “Next”.

Selecting the disc type to be written to
Then a window will open into which you need to drag and drop the files that you want to burn to this disk. You can also simply copy them here.

Moving files to be written to disk
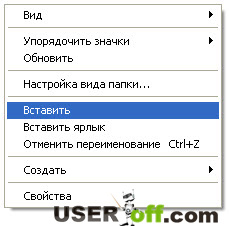
After adding files to be written, a corresponding message will appear with the text “There are files waiting to be written to disk.”

Write or delete prepared files
Now all that remains is to write these files. To do this, click the “Burn to CD” button at the top left.

The second way to write prepared files
The same operation is available if you right-click in the “My Computer” local drives window on the icon DVD drive and in the window that opens, select “Burn to disk.”

Specifying Recording Options
A final window will appear before recording, where you can change the disk name and also specify the recording speed.
How to delete files waiting to be written to disk?
If you suddenly change your mind about writing prepared files to disk and you are periodically bothered by a message about these files, then in order to remove it, the files to be written must be deleted.
To do this, go to the disk through the drive icon in the “My Computer” local drives window and delete files marked “Files prepared for writing to disk” with the “Delete” button.
Share this article on in social networks! Help our site!
Join us on VK!
This is enough old problem, which appeared along with the compact, and then DVD disc ami. Previously, in Windows, to write files to disk, you had to install third party programs. For example, Nero or similar ones, which made it possible to burn discs much more conveniently than the built-in Windows tools.
Installation additional programs always poses a problem for most users, so the question " how to burn files to disk without installing additional programs"still remains relevant. However, in new Windows versions There is a very convenient way to burn discs without any additional programs. Now I will show how this is done using Windows 8 as an example.
You can write files to the disk just like to a flash drive
That's exactly what it is. Moreover, you can not only delete them, but also delete them, as you do on a hard drive or Flash card. To take advantage of this benefit, you must first format the disc you are recording.
Formatting is disk partitioning, that is, a special procedure required before you write files to the disk. There is nothing complicated here, it takes little time and is done only once for each disk. To format a disk prepared for writing files, you need to open Explorer (My Computer or WIN+E) or any other file manager and find this disk there. There is no need to go to the disk.
Above is Explorer and a list of drives in the My Computer folder. Call up menu right click for a disk drive that already inserted a disk for recording files, then click “Format”.

Attention: don't go wrong with the disc!
If you accidentally format the wrong drive, you will lose all the data on it!

Just in case, double-check that you have selected the right disk. The drive letter is indicated in the window title. You can leave the window parameters as they are and click the “Start” button, and the system will once again ask for confirmation of the operation. If the drive is selected correctly, click OK.

Here comes another warning. If you click "Yes", the disk formatting process will begin.

This type of operation cannot be interrupted, including by forcefully ejecting the disk using a button on the drive. This may render the disc unusable! Be sure to wait until the formatting process is complete.
There was an important part of the article, but without JavaScript it is not visible!
Video tutorial on burning discs using Windows
For a long time now, you can no longer install special programs on your computer for burning CDs and DVDs. All these operations can be performed using tools built into the operating system. All you need is an appropriate writeable drive.

Let's sum it up
Before you can use a CD or DVD like a flash drive, you must format it appropriately. Next, copying files to the disk is done in the same way as for any other disk.
Hello dear friends, I have long wanted to add this topic to my site and tell you how It is better and more correct to burn the disc.
How to burn files from a computer to disk
So, disc recording can be done in the standard way in Windows or using a special program. And now we will look at everything.
Method 1: How to burn a disc in Windows
1. Launch autorun.
When you insert the disk, a window should pop up that will prompt you to do the following:

- If there is no such window, then go to my computer and double-click on this disk with the left mouse button.

2. You must select a recording method this moment is very important :
You should now see a menu like this:

Now attention!
| Recording format | Recommended drives |
| A). Like a USB flash drive This format is intended for rewritable discs (CD-DVD-RW), do not use this format for regular discs, since your disc after recording may not be readable on other devices, especially if you want to record for audio or video players. And if you choose this format there's no way to go back!The only advantage is that you can use the disk as a flash drive, that is, you can delete at least one file at a time and you can also write at least one file to the disk. But please note, this is only for RW discs (rewritable discs). | CD-DVD-RW(R) |
| B). With CD-DVD player this format is intended for all drives and if you are not going to use the disk as a flash drive and you want your disk to be readable everywhere, select this item. | CD-DVD-R |
If you nevertheless chose the first option, a window will appear in which you will be asked for confirmation to format the disk for this recording type. You will not be able to revert the changes!
If you still agree, confirm and click yes.

3. Now choose what to record.
First way:
You can simply copy the file you want to burn and paste it onto the disk.


Second way:
Right-click on the selected file or folder and select send and select the drive.

4. And finally the recording!
We go to our disk and click burn to CD (burn disc).

A window will appear in which you need to select:
1. Disc title
2. Speed (the lower, the better)
3. By checking the box, the recording wizard will automatically close.

The entire disc is recorded!
Method 2: How to burn a disc using Nero micro
As you probably know, standard methods are not always good; Windows Disc Burning Wizard, although it does its job well, still has few advantages. Now let's expand your burning capabilities with the free Nero micro disc burning software.
You can download nero micro for free, and the most important thing is that this is a micro version of nero, with free distribution.


1. Record any data.
2. Record music in various formats
3. Record video in various formats.
4. A useful feature is writing images to disk.
Here I will show an example of how to burn a regular disc to a CD. For this:
Select CD with data. A window will open.

And here we add files.
You can add using the add button or drag and drop the required file into the window.

Here we choose:
1. Disk name
2. Recording speed (the lower the better).
3. Allow adding files (you can add to the disk if there is free space left), but the disk may not be readable on some devices.
Click record.
After burning, a window will appear indicating that the disc was successfully burned.
And in the end I will say that everyone has their own opinion on how to record a disc, but these methods have never failed me and discs were successfully written all the time, that’s why I recommend them to you!
In everyday practice with a computer, sooner or later you will have to face the question: how to write files to disk. For example, I'll show you how to burn a disc on Windows 7 and Windows XP. This process is quite simple, but in some cases it requires specialized knowledge. I’ll try to tell you simply and clearly about the process of recording to disk and its intricacies.
Today I will teach you how to burn various files and folders from your computer onto regular blank CDs and DVDs. We will also talk to you about what types of disks there are and how they differ from each other.
Let me note right away that there is a way to write information to discs that does not involve the use of any writing program. This method is good for its versatility. With its help, you can write information to a blank disk without additional special programs and settings, on virtually any computer.
You can also write data to disk using the CDBurnerXP program; you can read a lesson on how to use it in my lesson “”.
Unfortunately, this method has one very serious drawback - on computers with an operating system Windows system, this method can only record information onto a CD. To burn DVDs, you still need to install special program(Nero or similar). In this case, it will not be possible to record information on a DVD disc; taking this fact into account, we will talk about this method in my further lessons.
What kind of discs are there?
Discs (optical storage media) are divided into CDs and DVDs, these are plastic discs with a hole in the center. Using a laser, information is recorded and read on them. Many people mistakenly believe that only cartoons and feature films can be recorded on DVD discs, and everything else can be recorded on CD discs: text documents, photographs, music. Of course, in reality this is not the case at all. The main differences between CDs and DVDs are maximum size recorded information.Usually, a DVD disc fits five, and sometimes eight times large quantity information than on a conventional CD. Thus, if a CD can fit one movie not recorded in the same high quality, then on an ordinary DVD disc you can record three, four (and even more) films, depending on their size and quality. Nowadays it is very popular to sell licensed films on DVD discs. It is also possible to burn documents, music, photographs and other files to both a DVD and a CD.
The discs are also marked: RW and R. The difference between these discs is that on a disc with R it is possible to record information only once. Information can be written to a disk with RW not just once, but many times. On such disks, information can be recorded, used, and then erased (if necessary) and recorded with something else. Discs that can be recorded many times are called multisession discs.

Now we will look in detail at two ways to burn to a blank CD: for Windows 7 and for Windows XP.
How to Burn Discs in Windows XP
Before I start telling you how to burn a disc on Windows 7, I'll first show you how to do it in Windows XP. First, you need to insert a blank CD into your computer's drive. Now you need to select the files and folders that you want to burn to a blank CD. To do this, copy them by right-clicking on the files that need to be written.

After this, you need to open the drive, “My Computer” (Start -> Computer). In it, open the CD/DVD drive. You need to right-click on an empty space and click on “Paste”.
The folders and files that were copied will appear on the disk. This does not mean that files and folders have already been written to this empty disk. To burn these folders and files to a blank disk, you need to right-click on an empty space in the open window, and then from the list that appears, select “Burn files and folders to a CD.”

The CD Burning Wizard window opens. Here you can type the chosen name for your disc in the CD Name field, although this is completely optional.

When your disc is burned (the green bar fills and then disappears), a new window will automatically open in which you need to click the “Done” button. After this, the recorded disc will pop out of the drive. With this, the computer tells us that the recording to your disk has been successfully completed, and you can already use this disk.
How to erase a disk in XP
From the above, you understand how to burn a disc on Windows XP. But if you recorded it on RW discs, you can use it several times. Let me remind you that it is possible to erase information from a disk if it is reusable (multi-session). Reusable discs are labeled RW. If your disk is written R (this means that it is disposable), then we will not be able to erase information from it for re-writing.
To do this, you must first insert your disc into the drive. Open the disk on your computer via “My Computer”. Open the CD/DVD drive in it. Then right-click on an empty space in the window. Select "Erase this CD-RW" from the list. In the new window that opens, click the “Next” button. Wait a moment until all previously recorded information on the disc is erased. The moment this happens, the “Done” button appears. Click on it. That's all. Your disk is now clean. You can record anything on it again.
Burning a disc in Windows 7
This instruction is intended for computer owners who want to understand how to write files to disk in operating system(OS) Windows 7.
I draw your attention to the fact that computers with the Windows Vista and Windows 7 operating systems can record selected information both on a DVD and on a CD.
Select the folders and files that you want to burn to a blank disk. You need to copy them by right-clicking on any selected file or folder and selecting “Copy” from the list.  Then insert a blank disc into the drive. You need to open “Computer” (Start –> Computer). Open the CD/DVD drive. You need to double-click on its image with the left mouse button. A small window will open. Now you need to select the disk type. There are 2 types of disk available - “With a CD/DVD player” and “As a USB flash drive” (LFS file system).
  The first option – “With a CD/DVD player” – is considered classic (as in Windows XP). It is quite suitable if you want to record music on your disc that you can listen to both on your computer and on your player. This option is not very convenient, but it is reliable - a disc recorded in this mode can be opened on any computer.
The second option is more convenient: you will have a disk similar to a flash drive. You will be able to record folders and files using regular copying. You can erase the disk by simply deleting it.
Select the disk type that suits you. Then click the "Next" button. If you selected the “Like a flash drive” type, you will see a warning about the need to wait until the disk is prepared for recording.  Now you need to click the “Yes” button. After the disk is prepared, the window will disappear and a new window will appear in which the computer will prompt you to open the folder to view the files.
 If such a window does not appear, you need to open “Computer” again, then “CD/DVD drive”. An empty disk will open. Right-click on an empty space, then click on “Paste”.
  After some time, all the folders and files you need will be added to the disk. The disc is recorded!
If the disc type is "With CD/DVD Player", a blank disc will open.
 Right-click on the free space, then click on “Paste”. Now the files and folders you copied will be pasted onto the disk. This does not mean that the information has already been written to the disk. To write these folders and files to an empty disk, right-click on the free space and select “Burn to disk” from the list.
  In the “Burn to disk” window that appears, you can type any name for your disk in the corresponding “Disk name” field, although this is not necessary. The “Write speed” field is needed to select at what speed the disc will be written, I usually write 16 x.
  Now click the "Next" button. You will have to wait a bit for the disc to burn. After the disc is written (the green bar is full and disappears), a new window will open, here you need to click the “Finish” button. Before closing a CD/DVD disc, you must end the session that was recorded in order to use it as a regular removable media (LFS file system).
To close a disc session, you need to open your computer, right-click on the CD/DVD drive and select “End Session.” After this, the session will close and the burned disc can be used on other computers.

Once you understand how to write files to disk on this system, you can now use the standard procedure for erasing disks.
How to erase a disk in Windows 7
You can erase information from a disk if the disk is multi-session. Let me remind you that multisession discs are labeled RW. If the disc says R, it means it is disposable.
Insert your disk into the drive, then open it on your computer by clicking Start - Computer. Right-click on an empty space in an open window. A list will appear in front of you, from which you should select “Erase this disk”.  A new window will open. Click "Next".
  Wait a bit until the information on the disk is erased. When the process is complete, the “Done” button will appear, click on it. Your disk is clean and you can write information to it again.
How to format (erase) a CD/DVD disk
Open your computer, right-click on the drive, and select “Format” from the context menu.
 The standard cluster size when formatting is 2048 bytes, click the “Start” button. After this, formatting will begin.
I hope you figured out how to burn data to a disc that you can later use on another computer, laptop, or in your car player.
Burning an ISO image:
Recording with Windows Media in Windows 7: