Reproduction of orchids by leaves at home. How to properly root an orchid root and not harm the flower
Phalaenopsis Orchid - herbaceous plant orchid family. IN wild nature This plant lives in humid warm forests. Phalaenopsis is represented by 3-6 wide leaves arranged alternately, between which a peduncle grows, represented by a flexible long branch.
The number of flowers depends on the care and variety of the plant, flowers can have any color, spots and stripes.
Phalaenopsis can be propagated even by an inexperienced grower.
breeding conditions
For getting positive results in the propagation of orchids, a number of rules must be observed. Choose the right landing time, observe temperature regime, humidity and choose the right plant from which we will take planting material.
Time
 The best time to propagate Phalaenopsis orchids is when the plant is nearing the end of the flowering phase- then the resources of the flower will be directed to reproduction.
Humidity
The ideal humidity for Phalaenopsis orchids is 50-80%. Humidity of 25-85% is possible, but optimal humidity is important for healthy reproduction.
Temperature
Great for breeding phalaenopsis temperature from 28 to 30 degrees, temperatures above normal are acceptable, but below are not recommended.
General condition of the orchid
Only suitable for breeding individuals without diseases. A diseased plant may have black, slimy or yellowish, unnaturally colored leaves, if you see any of the signs, postpone reproduction until the plant recovers.
Phalaenopsis Orchid Propagation Methods
In order to propagate the Phalaenopsis orchid, there are several ways, below we will consider each of them in detail.
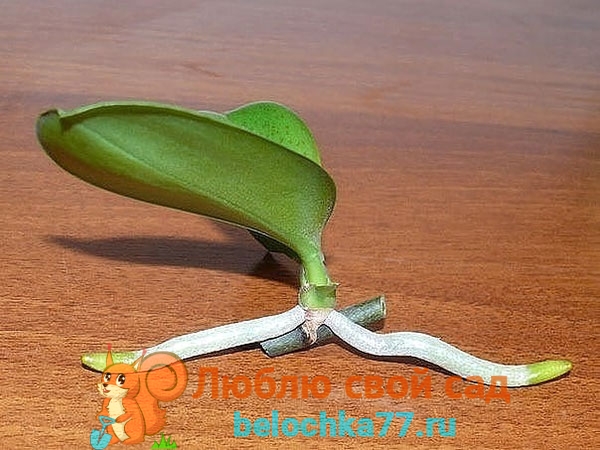
Stem division (peduncle cuttings)
One of the common ways of propagating the Phalaenopsis orchid is vegetative propagation, or cuttings - dividing the stem of the peduncle into parts. The best season for this is the end of spring - the beginning of summer.
We get cuttings from the trunk
You can learn more about cuttings of an orchid peduncle from the video below:
How to grow in water?
Reproduction of the Phalaenopsis orchid can be done by cutting off the peduncle. This method is suitable when the mother plant is very sick and cannot be saved.
How to propagate phalaenopsis in water?
Important conditions for caring for a cut peduncle
- The temperature should not exceed 25 and not exceed 28 degrees, under other conditions, not a baby, but a peduncle will grow from a kidney.
- In a bottle with clean water in addition to activated carbon, mineral fertilizer can be added at a concentration of 1: 4 from the usual one.
- Separate the baby when the young plant has 3-4 leaves and roots of at least 3-6 cm. Just cut it off along with part of the peduncle, plant it in a transparent pot filled with bark and avoid direct sunlight.
How to drop kids
 It is important that the plant has already left the flowering phase, is absolutely healthy and has a peduncle no older than 1.5-2 years.
The baby itself looks like a bud located on a peduncle.
Important conditions:
- It is desirable to start stimulation of kidney growth in February. The flower must be placed on the western or eastern side, shading the leaves and allowing the sun's rays to fall only on the peduncle.
- The temperature during the day should reach 27 degrees, and at night be in the region of 16-17 degrees.
- It is desirable to reduce watering of phalaenopsis to a minimum.
- Top dressing can not be made until the kidney wakes up. After about a month of such care, the sleeping kidney wakes up.
After the kidney wakes up, you need:
- Move the plant to a warm but shady place. Do not expose your baby to direct sunlight.
- Adjust your plant's watering schedule.
- Make foliar top dressing, that is, on the leaves. When the plant is sufficiently developed, you can start to make root.
After about six months, the baby will have 2-3 leaves and roots longer than 2-3 cm, you will need to carefully separate it from the mother plant and transplant it into a pot.
You can learn more about the reproduction of Phalaenopsis orchids by children from the video below:
How to propagate with cytokinin paste?
The method of propagation of the Phalaenopsis orchid with cytokinin paste is one of the simplest and most grateful. It is better to use this method at the end of winter or in spring, when the plant has the most vitality and energy.
Attention! Cytokinin paste can only be stored in the refrigerator!
So, to start growing a bud on a peduncle stem, with the help of a paste, you need to follow the instructions below.
- With a sterile knife or needle, scratch the surface of the peduncle.
- Apply approximately 1.5-2.3 millimeters of paste to the scratch area. After about 10 days, the kidney will begin to emerge. The best option is to apply the paste with a toothpick. Apply it a little more, with an insufficient amount of cytokinin paste, a new peduncle will appear, and not a kidney.
- To awaken the emerging kidney, cut off the scale that protects it and apply a similar amount of paste to the kidney.
- After 10-20 days, the kidney will wake up, let it grow two or three leaves and 3-5 cm roots, and plant the baby in a pot. Do not expose to the sun.

Propagation by seeds with a photo at home
Propagation by seeds is one of the most difficult ways, previously it was considered impossible.
The main reasons why this method is not used too often and takes so much time and effort:
- Orchid seeds are very small and almost impossible to see with the naked eye.
- They have no endosperm. Endosperm is a tissue that surrounds the embryo, nourishes it and does not allow the harmful effects of the environment to damage the embryo.
- Any interaction with environment, diseases and deviation from the norms of care leads to the death of the plant.
How to grow a phalaenopsis orchid from seeds, step by step instructions?
To get orchid seeds yourself, you need to carefully pollinate the flower with a toothpick, as in the photo below. Or you can buy ready-made seeds.

After successful pollination, orchid bolls begin to grow.

After 6 months, Phalaenopsis orchid seed boxes ripen.


To take the next step, you need to prepare a nutrient medium for the plant. There are several recipes for preparing a nutrient mixture.
Recipe 1
You will need 10-20 grams of agar-agar powder, 10 grams of fructose, the same amount of glucose, a little phosphoric acid, calcium carbonate, and about 200 ml of purified water. let the agar-agar swell in water, pour the jelly you received into boiling water and add fructose with glucose, calcium carbonate and acid. Stir until you get a homogeneous substance without crystals.
Recipe 2
Another nutrient medium recipe. We need:
- 400 ml of distilled water;
- 100 ml of tomato juice;
- 20 grams of sugar;
- 40 gr banana;
- 0.5 ml fertilizer for orchids;
- 2 activated charcoal tablets;
- 0.5 g of honey.
You need to grow an orchid in glass test tubes with airtight stoppers. If you don't have these tubes, use small jars with very tight screw caps. Thoroughly sterilize the jars, pour in 30-50 ml of the nutrient mixture.
Attention! It is very important to make the environment sterile, otherwise the plants in the mixture will grow mold and the plants will not germinate.
Re-sterilize the jars by pouring the resulting solution into them in a water bath and leave for 3-6 days to make sure that the disinfection was successful. If mold appears, do not use this solution!
 Cover the seeds with 1% chlorine lime solution and leave for 15-20 minutes. Shake the container vigorously 3-5 times during this time.
 Take a small saucepan with boiling water, cover it with a grid with cells in which you can fix flasks or jars with a nutrient medium. Lids should also lie side by side for disinfection.
Gently remove the seeds from the bleach solution and place them in the growth medium using a sterile syringe. Carefully close the containers and place them in the greenhouse.
 After six months, carefully open the containers. In case of successful seed germination, you will see sprouts in the jar as in the photo below.
Pour in 40-60 ml of warm water, shake until dissolved. Pour the resulting substance into a wide bowl and add 2-5 drops of 1% Furnadzol solution. Now leave your sprouted seeds for 15-20 minutes.
 Now, using the smallest, thinnest, softest brush possible, plant the germinated seeds one at a time into pots filled with bark and moss nutrient soil. Add crushed fern roots and a few crushed activated charcoal tablets to the soil.
 After about six months, it will be possible to transplant seedlings into soil intended for adult plants. Unfortunately, flowering of orchids grown in this way should not be expected earlier than in 4-7 years.
How do Phalaenopsis reproduce by roots?
Reproduction of orchids by roots is possible even for a beginner.
- Lift the plant above the pot and carefully free it from the soil.
- Cut the rhizome with a sterile knife or pruner, leaving 2-3 pseudobulbs per sprout.
- Dust the slices with charcoal powder.
- Plant each separated part in a separate pot with fresh soil, spray twice a day until true leaves and good roots appear. After a while, you will get a healthy plant!
 Possible errors during reproduction
Important errors in the propagation of Phalaenopsis orchids are:
- Use of a diseased plant for propagation. It is important to remember that a plant with an unhealthy color of leaves, black roots covered with mucus - important sign, indicating that such a plant should not be used for reproduction.
- The only propagation method that can be used with a diseased plant is propagation in water.
- Important remember to sterilize sections, regular watering.
- Do not expose plants to direct sunlight, it is harmful and dangerous for a plant that is in the process of reproduction.
- It is necessary to give the plant optimal temperature, lighting and humidity, a deviation from the norm may end unsuccessfully.
Baby Care
 In order not only to get a baby, but also to grow her into a healthy and beautiful plant It is important not to forget about proper care.
- Small plants should be planted in pots in which adult plants are planted: transparent, with big amount holes. You can also add to fresh soil taken from the pot of the mother plant in a ratio of 1: 1.
- It is important that young phalaenopsis get optimal conditions: temperature and humidity are ideal, and do not allow direct sunlight to affect the sprouts.
- Top dressing should be applied depending on the method of reproduction.
Useful video
You can learn more about Phalaenopsis breeding from the video below:
Instead of a conclusion
In fact, even a completely inexperienced beginner can start one or two more orchids in his house, propagating at home, the main thing is to follow the instructions and not lose faith in yourself!
Orchid reproduction can take place different ways. Sometimes this is an absolute necessity. When the bush has grown too large, for example, or a baby has appeared on the mother plant. It happens that you want to get another one of the same plant to give it to relatives or friends. Let's consider in what ways you can get new specimens of various orchids.
An orchid for reproduction must be mature, mature and healthy enough. This procedure is not resorted to in difficult times for orchids - in autumn and winter. It is best to do this in spring months or immediately after flowering. The survival of young plants depends on these conditions.
Sometimes the orchid itself decides that it is time for it to breed and forms a baby on the peduncle. You just have to wait until the small orchid has its own roots and plant it in a separate container.
How to propagate orchids at home
The way you choose to propagate an orchid is determined by its species. Existing options suggest: cuttings, dividing the bush, reproduction by children and seeds.
This method is suitable for propagating the Phalaenopsis orchid and is not particularly difficult.
- After flowering, the remaining green peduncle is cut into pieces 3-4 cm in size, each having one dormant bud. The kidney should be located approximately in the middle of the handle.
- All sections are processed with crushed charcoal.
- After that, the cuttings are placed in wet sphagnum moss, covered with glass or film on top and placed in a warm place with a temperature of 25-28.
- At the same time, it is recommended to moisten the moss periodically.
- After some time, roots form, after the appearance of leaves, young plants are seated in small pots.
You can do it differently. The faded peduncle is placed in water with the addition of fertilizers. A container with a peduncle is placed in a very warm, bright place and periodically treated with Doctor Foley fertilizer. This contributes to the awakening of dormant buds and the appearance of children on the peduncle. When they are sufficiently formed, they are cut and transplanted into pots.
Growing an orchid from a peduncle: video

Orchid babies can appear spontaneously at the same time as flowering on a peduncle or from a dormant root bud. For their appearance, it is necessary heat(over 28°C) and high humidity. In this case, there is a high probability that a baby will begin to form from a sleeping kidney. Some phalaenopsis hybrids are more prone to this, others less.
Attention! The appearance of children can be stimulated using a special cytokinin paste. This is a hormonal drug that helps awaken dormant buds and the emergence of new plants. Before applying a stimulating drug, it is necessary to remove the scale covering the kidney.
It takes up to six months for a baby to grow its own roots. Only after that it is cut off and planted separately. By this time, the plant should have 3-4 leaves and up to 5 own roots 4-5 cm long. The cut is made with a sharp knife, leaving a small piece of the peduncle on the baby. Sections are treated with crushed coal (and on the mother plant too).
In dendrobium, calanthe, tunia, catasetum, side shoots are called children. To stimulate their appearance, use a complex mineral fertilizer based on potassium, phosphorus and nitrogen with the addition of minerals and amino acids. After the shoots grow a little, you just have to cut them off with a sharp knife and plant them in a separate container.
Separation of children from the orchid mother plant: video

Propagation by cuttings is used for multipoidal orchids such as Vanda, Dendrobium, Epidendrum. This manipulation is carried out in the spring, so that over the summer the plant can get stronger and take root well. To do this, do the following:
- Cut off with a knife the top of an old stem or a new young shoot with two or more aerial roots.
- Sections are treated with a fungicide and sprinkled with crushed charcoal to prevent infection. After that, they must be covered with garden pitch.
- The cut stalk is planted in moss in a greenhouse. Grow a new plant in warmth with an abundance of light. Moss is kept moist.
Direct sunlight is contraindicated for rooting cuttings. Give them some light shade.
How to propagate orchid cuttings: video

Sympoid species are propagated in this way: Dendrobium, Cymbidium, Miltonia, Cattleya, Odontoglossum, Oncidium. For this method of reproduction, only an adult bush is suitable; at least 4 pseudo-bulbs should remain on each of the divisions. With fewer of them, you risk destroying the plant. The division of the bush is recommended to be combined with a transplant, while dividing the plant into 2-3 parts.
Carry out the procedure as follows:
- The substrate is moistened to make it easier to remove the plant from the pot.
- Then you need to pull the base of the stem and carefully remove the orchid.
- Clear the roots from the soil so that you can better see where to divide.
- With a sharp knife, divide the main large onion into 2-3 parts so that at least 4 pseudobulbs remain on each of them.
- Powder the slices with cinnamon or crushed charcoal. Air dry a little.
- Plant each delenka in a separate pot filled with a mixture of moss and nutrient substrate.
Due to the pseudobulbs, the orchid receives nutrition that will help it recover after division. If the seedling looks weak, it can be rooted in a plastic bag filled with damp moss. In conditions of high humidity, it will be easier for the plant to grow roots. Such a package should be in a warm place - this is a necessary condition for the rooting of the cutting.
If you do not want to share an adult bulb, so as not to worsen appearance mother plant, you will have to wait until the young shoots form their own bulb and enter the dormant phase. This moment will be the most favorable for their separation. They are planted in separate pots and cared for like other orchids during the rest period. After leaving this phase, the plants will begin to grow, grow roots and continue to form safely into adult specimens.
By dividing the bush, you can also propagate an adult Phalaenopsis. As a rule, this is done with plants that have many aerial roots and leaves. The socket is cut into 2 halves so that the leaves and roots remain on each part of the plant. Then proceed as usual. Sections are powdered with charcoal and dried. The lower part can be left in the old pot. The upper part is planted in a new container, tucked into the ground aerial roots. The stump dries up after a while, forming a basal baby before that. Thus, you get two plants.
Reproduction of an orchid by dividing a bush: video

Propagation of orchids by seeds is considered difficult and is used only by enthusiasts, since everything takes a long time and with certain difficulties. Orchid seeds are like dust and have no stock nutrients. They can germinate only under conditions of absolute sterility and sufficient nutrition. Nutrient mixtures are made on the basis of agar-agar, they can be purchased at a specialized store. It will take a whole year for the sprout to appear, so few people use this method of reproduction at home.
On a note! On an industrial scale, special laboratories are engaged in growing orchids from seeds.
Sterilized seeds are placed in test tubes with a nutrient solution. Changes can be seen in a week. Small green balls are formed from the seeds, on which suction hairs first form and only then leaves. Plants are transplanted into the ground at the age of one.
Nutrient medium for sowing orchid seeds: video

The full formation of an adult orchid takes 3-4 years. Until this time, young plants are kept in a suitable size pot. It must fully correspond to the size of the root system. Pots should be a large number of drainage holes so that moisture in no case stagnates at the roots.
At the bottom, it is desirable to place drainage from expanded clay or brick chips. Some use pieces of styrofoam. This is especially true for those who have cold window sills, since polystyrene foam is an excellent heat-insulating material.
The substrate itself is prepared from small pieces of pine bark, sphagnum and charcoal. You can add a little high-moor peat, it will allow you to populate the substrate with favorable microflora and prevent it from drying out quickly. If a young orchid has some of the roots sticking up, do not try to force them into the pot. The roots of babies are very fragile and easily damaged. It is advisable to periodically spray the roots remaining in the air with warm water so that they do not dry out, or cover with moss.
Caring for young plants is almost the same as caring for an adult specimen. Unless watering needs to be done more often due to the small volume of the pot. At first, growth stimulants and special fertilizers for orchids can be added to the water for irrigation - then the plant will get stronger faster. Children need good lighting and optimum temperature. If all the rules are followed, the orchid will give you its first bloom at the right time.
Propagation of orchids at home is a fascinating activity. This is quite a creative process that will allow you to observe the changes taking place and get satisfaction from the end result. A young orchid can then be given to someone as a gift or even sold - it's up to you to decide.
They seemed to us an overseas curiosity that could never be seen beyond the tropics.
It's been a while and most varieties This plant filled the window sills of apartments and offices.
Growing orchids is not difficult, but some rules must be followed. With at home, things are a little more complicated, it is especially difficult to do this with, but it is possible.
This variety in our region can be propagated only by cuttings, from which children are formed. Sowing seeds will not bring the desired result and the process can take several years to complete.
Phalaenopsis orchid propagation
cuttings
Propagation of phalaenopsis by cuttings is considered by many flower growers for phalaenopsis to be the most optimal.
This is how you can get several adult bushes ready for flowering in a relatively short period of time from one variety you like.
Exists several ways how to propagate phalaenopsis with cuttings that will differ:
- Length of cut shoots;
- The number of dormant buds on it.
An important point in this process will be correct cut.

You can do this in two ways:
- The stalk is cut off after the peduncle has completely faded. The length should be about 4cm;
- You can cut it even longer, then you can get more kids from one. This method provides for an almost complete cut of the arrow-peduncle, cut into two or three parts. Each must be at least 10 cm long.
Important! Remember, the strongest buds to germinate will be those closest to the leaves.
So that the plant and cuttings do not get sick and do not begin to rot, must be processed.
For this use:
- Charcoal;
- Activated carbon;
- Cinnamon powder.
All of these tools are equally good for carrying out disinfection of fresh sections on phalaenopsis.

Disinfection of the cut with activated carbon.
Treat them like this:
- The cut part is dipped with all the cuts in the product and allowed to dry slightly;
- The same is done with a cut place in an adult plant.
Advice! Before processing, activated and charcoal must be crushed into flour.
Conditions
Propagating the Phalaenopsis orchid from cuttings is not easy. In order for the children to develop well and be able to put down roots as quickly as possible, it is necessary to create certain conditions:
- On each of them need to check for a dormant kidney from which a new plant will subsequently develop. Usually it is tightly closed with an integumentary scale, which protects it from external influences. After cutting and processing, it is necessary to carefully remove it too, so the baby will hatch much earlier;
- The second stage is room in mini-greenhouses, usually made from plastic bottles or transparent containers. The top is covered with a bag or just put glass;
Advice! good option to create a greenhouse effect, it will become a regular zip package.
- Optimal temperature conditions is +25°C during the day and not lower than 18°C at night. If you lower the temperature, the kidney may not wake up at all.
It will also be important humidity inside the greenhouse, 70% is the best suited for the rapid germination of buds from the handle.
Germination in a mini greenhouse
in the greenhouse wake up a sleeping kidney and the easiest way to activate it. The conditions created there remind the cut material of its natural conditions and stimulate the growth and development of children with which the plant can be propagated.

Germination in a mini-greenhouse.
In order to start this process:
- Place the treated cuttings in the prepared substrate;
- Ventilate the greenhouse regularly;
- Spray the substrate daily to maintain moisture;
- Provide 14-hour daily greenhouse lighting;
- Maintain temperature 25°-27°C.
After 2-3 weeks proper, the first sprouts will appear from the kidneys, from which phalaenopsis babies will develop.
Using sphagnum
For breeding instead of substrate you can use moistened sphagnum moss, which will be a great helper for germination. He is excellent replicate natural conditions the growth of this type of orchid will help the kidneys wake up faster and give strong shoots.
In water
 There is another way to make a phalaenopsis orchid stalk sprout:
- Processed piece of peduncle with one dormant bud placed in a flask with water
- Covered on top to create a greenhouse effect,
- As the water evaporates, water is added, and the flask is ventilated daily.
Advice! To speed up the process, special nutrients for orchids are added to the water.
With hormonal paste
You can help the sleeping kidney develop and wake up as soon as possible hormone paste. Processing with such a tool will significantly speed up the process of awakening and active development of phalaenopsis cuttings.

Help the kidney with hormonal paste.
Advice! It is not necessary to buy pasta in a specialized store, it can be prepared in. To do this, you need 10 g of kinetin mixed with 1 ml of water and 1 g of lanolin.
Useful video
Watch a video about propagating phalaenopsis with cuttings:
And here it is shown how to grow a baby on a cut peduncle:
And here is the result of reproduction of phalaenopsis with a cutting from a peduncle:
Watch the video on how to make a greenhouse for an orchid without a substrate:
Conclusion
Propagation by cuttings of the Phalaenopsis orchid is recognized among flower growers quite efficient. Also, phalaenopsis can be propagated if, after flowering, the baby itself appears on the peduncle.
Orchids are increasingly seen on the home windowsill. The plant has many varieties that are grown in an apartment. And even novice flower growers can do it. It is only important to follow the step-by-step recommendations for propagating and caring for the plant, comparing your progress with the photo.
The key to successful reproduction of orchids in any conditions is proper care. These are lighting, humidity, watering, temperature conditions, top dressing and pruning according to the norms for your variety. The right technology means that a young shoot or cutting will have the necessary strength for rooting and growth. Each of the methods of propagating orchids has its own nuances:
- vegetative;
- cuttings;
 indoor orchids
 - stem offspring;
- or seeds.
Advice. Experienced flower growers recommend keeping an orchid care diary. Especially if you rearrange the flower on different windowsills, try different fertilizers, etc. This will help you accumulate and save experience in order to choose the best of the options in subsequent seasons.
How to propagate an orchid vegetatively
The asexual method of reproduction is optimal for an extensive varietal group - sympodial plants. Flowers have horizontal shoots that are connected by one root. Use a large specimen without damage or disease. If you propagate an orchid at home, start preparing a year in advance. Cut the root of the mother plant to the middle in several places. This approach encourages indoor plant form additional adnexal buds.
Separation procedure:
- Take the bush out of the pot.
- Carefully clean the rhizome.
- Separate the root with a disinfected knife or pruner. Each new part of the plant should have a piece of the root system, as well as 2-3 horizontal shoots and a young sprout.
- Treat the sections on the plant with crushed activated or charcoal.
- Plant the separated elements of the plant in different containers that will be comparable to their size. The soil should be identical to that which was in the mother pot.
Attention! The smaller the separated part of the orchid, the longer a full-fledged adult flower will grow from it.
After dividing for a month, the orchid needs daily spraying. New plants need high humidity. But you do not need to water the sprouts! A weakened mother plant must be supported: cover the soil in the container with a layer of moss. This will help the orchid to release leaves and shoots again.
 Reproduction of orchids
 Orchid propagation by cuttings
Cuttings at home is a less common method. With its help, monopodial orchids are often propagated. But the method has a significant plus - for the season you can get a lot more new plants. Prepare a sterile and sharp instrument and proceed:
- the best time is the period of active growth of the orchid after flowering is completed;
- choose a healthy stem with well-developed aerial roots;
- separate from it about 20 cm;
- rub the cuts with activated charcoal;
- deepen the cutting into a new pot, cut down.
The soil in the new pot should be the same as that of the mother bush. After some time, new sprouts will form on its used stem. Everything except the top must be cut off so as not to deplete the orchid. Transplant the cut sprouts into individual pots - they will also turn into plants.
Cutting a flower of the genus Phalaenopsis is somewhat different from propagating other monopodial varieties in this way:
- select 3-4 large pseudobulbs from 2 years old;
- cut into pieces so that each has a knot with a kidney;
- sprinkle the cuts with activated charcoal and leave to dry;
- deepen the cuttings in peat moss poured with warm water.
Maintain soil moisture and temperature. For example, putting a transparent plastic bag on a container with a handle. Once a day for 10-15 minutes. remove cover for ventilation. A transplanted orchid needs such a regimen for two months.
 How is an orchid
 Reed orchid is also propagated by cuttings:
- Choose a strong, fleshy stem with no leaves.
- Cut into several parts at the rate of 1-2 leaf nodes for each segment.
- Treat the cut with sulfur.
- Deepen the cuttings into containers. You can have several pieces in one. A vertical arrangement is allowed, with a half recess, as well as a horizontal placement in a special cassette.
Advice. In order for the cuttings to take root well in a new place, make sure that the soil is always slightly moist. Do this until they have 2-3 leaf nodes. After growing long roots, plant the sprouts in separate pots.
How to propagate an orchid using stem offspring and the seed method
Stem offspring are a productive breeding material if you are dealing with Phalaenopsis or Dendrobium orchids. Offspring are baby plants that appear on the stem of an adult sample, but not always, but under the following conditions:
- high air temperature;
- fertilization with an abundance of nitrogen.
As soon as you find the shoot, start spraying it abundantly with an intensity of 1 time per day. This will give the offspring additional strength for development. It will become ready for separation from the mother bush after it has formed aerial roots. To do this, carefully cut off the process with a clean and disinfected knife, sprinkle the slices with charcoal.
But seed propagation in the case of any kind of orchids is an unsuitable way for the home. Usually it is used by breeders. Growing an orchid from seed is quite a long and laborious process. Work must be carried out in a sterile environment. First, prepare the soil: mix the crushed moss with a small amount of leafy soil. Moisten the resulting soil.
 Reproduction of an orchid using stem offspring
 Deepen the seeds slightly, placing them in rows. You don't need to cover them with soil. Make sure that the soil and air temperatures are within + 22 ... 25 ° С. The soil in the seed container should always remain warm and moist (by spraying). Spray water must be filtered or softened.
Seeds germinate in 3-9 months. After the appearance of the first true leaf, dive the sprout into a substrate of equal parts of peat and moss. The second leaf has grown - dive again. New soil is prepared according to the same recipe plus chopped fern roots. After the 4th leaf, the sprouts are transplanted into a permanent pot. Such an orchid will bloom only after 3-4 years, so at home it is more expedient to use other methods of reproduction.
Reproduction of orchids: video
Orchid breeding is associated with the complexity of reproduction. Its varieties, such as phalaenopsis or dendrobium, can be propagated by separating the children on the peduncle, cuttings, dividing the bush, germinating and planting seeds.
You can propagate an orchid by picking up only a healthy plant without fungal diseases. Growing at home is carried out in conditions with maximum lighting, so that the daylight hours are at least 14 hours. It is not recommended to use a newly acquired flower as a material. It is necessary that he adapt at home and go to growth.
- 1. The children are separated from the plant and dried. Sections are being processed.
- 2. Finely chopped mixture consisting of fern rhizome and pine bark is added to the cups. Drainage holes are made at the bottom of the container.
- 3. The substrate is moistened, and the plants are placed in a greenhouse or mini-greenhouse. Provides a temperature of 25 degrees and good lighting.
- 4. As the soil dries out, watering is carried out with "Kornevin" or "Zircon". The room is ventilated daily for 7 minutes.
- 5. The yellowed 2 bottom sheets are not cut off, they are needed to nourish the root system.
- 6. Plants with root shoots up to 5 cm are planted in open ground.
- 1. Cut the peduncle at the very base. The cut point is being processed.
- 2. With a scalpel, the stalk is cut into pieces of 7 cm. Each of them contains a dormant kidney. Its location should be as close to the base as possible.
- 3. The shoots are placed in containers that are filled with sphagnum moss. The substrate is sprayed with a biostimulator.
- 4. From above, the seedlings are covered with a film. Maintained temperature - 28 degrees, humidity level - 70%. As the substrate dries, it is sprayed with growth stimulants.
- 5. Transplantation is carried out after the roots reach a length of 5 cm and the appearance of 2 leaves. The dried part of the peduncle is not removed at first.
- 6. At the last stage, you need to plant the culture in the black soil for adult orchids.
- 1. Using a sharp knife, you need to divide the plant into 2 parts, separating the top from it. They should have aerial roots and leaves. Sections are being processed.
- 2. The separated top is planted in a soil consisting of moss and pine bark. The soil is not watered, but sprayed as it dries. After the appearance of 2 leaves, the flower is transplanted into the main soil.
- 3. In the lower part of the plant, new buds will appear at the cut site. A side shoot will grow from each. After 3 years, an adult plant is formed.
- 1. The basis of the nutrient substrate is a mixture of agar-agar, consisting of polysaccharides and ocean algae, which will require 10-15 grams.
- 2. Agar-agar is poured with 200 ml of distilled water until it swells. Jelly and 10 grams of glucose with fructose are added. Stir until completely dissolved. To ensure the necessary acidity, a solution of calcium carbonate and phosphoric acid is poured.
- 3. Flasks or tubes with stoppers are prepared. The glass container is sterilized.
- 4. 40 ml of solution is poured into each and they are placed in a water bath.
- 5. Waiting time 5 days. The jelly will harden and mold should not appear on it.
- 6. 1% bleach is added to the seeds for a quarter of an hour.
- 7. A mesh is placed in a pan with boiling water and a flask is inserted into each cell.
- 8. Using a syringe, the seeds are removed from the solution and placed in test tubes. All glass containers are then kept in a greenhouse or greenhouse.
- 9. After 6 months, the contents of the flask are poured into a bowl of warm water. A few drops of "Fundazol" are added. Aged for 15 minutes.
- 10. With a brush, the seeds are removed and placed in a substrate of moss and pine bark.
- 11. After 6 months, you can plant the seeds in the ground.
Show all
Dropping off the kids
Such reproduction by children is carried out in the spring. After flowering, after 1.5-2 months, their separation from the mother plant begins.
Bud formation occurs in the axils of orchid leaves at the age of 2 years.
The order of work is as follows:
Propagation of orchids by planting children
cuttings
The method of propagation by cuttings is applied to orchids that have faded 2-3 months ago.
The following actions are carried out step by step:
Cuttings can occur in ordinary water. In this case, the container should be covered with a bag to ensure the necessary temperature conditions.

Reproduction of orchids by cuttings
The division of the bush
Dividing a bush is considered a risky way, because rot is possible. The selected flower should be healthy and large. The age is at least 5 years, and the number of leaves is more than 8 pieces.
Operating procedure:

Propagation of an orchid by dividing a bush
Reproduction by seeds
The difficulty of propagation by seeds lies in the fact that they are small and visible only under a microscope. They are difficult to collect. In addition, the seeds lack endosperm. The lack of tissue surrounding the embryo makes the seeds very vulnerable in the soil. They do not contain nutrients such as starch, vegetable oils, amino acids.
Germination of seeds is possible only in a special substrate, subject to sterility. The formation of green balls will occur after 6 months, and the orchid will bloom after 5 years.
Stages of seed germination:


