Simple verandas to the house. Terrace attached to the house - practical, beautiful and comfortable
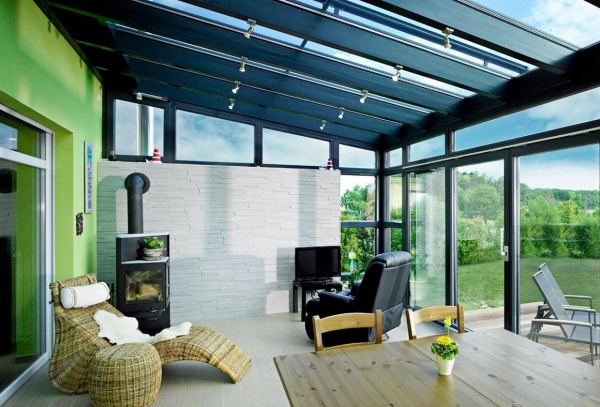
A closed veranda can serve not only as a beautiful extension to the house, but also as a unique place to relax or work. In it you can enjoy the view of the surrounding nature and feel comfortable in the hot summer and cold winter as well as in any bad weather.
Photo of a closed veranda built to the house:


Project development
Attention ! It is necessary to develop a project before construction, since the quality of the future premises depends on it.
First you need to determine for what purposes it is planned to build a veranda, whether you are going to use it in winter time(then full insulation is required) or it will only be as a closed summer veranda. Then its future location and dimensions are determined.
They usually have a veranda near one of the walls of the house, and often it is built from the side invisible to prying eyes, so that you can feel alone and completely free. Inside the room there must be a door leading to the main building.
Photo of a closed veranda attached to the house:


Also, do not forget about the future view from the building and its location relative to the sun. So, for example, on the southeast side there will be more sunlight than on the north. So, if you live in the northern region, it is better to place it on the south side of the house, and for the southern region, on the contrary, it is recommended to build on the north side so that there is more shade.
The optimal size of a closed veranda is 3 m wide, from 3 to 6 m long.
Attention ! The veranda should correspond to the size of the main building, that is, if the house is large, then it should not be too small and vice versa.
Now you need to choose the design of the closed veranda. It is recommended to build it from the same materials as the dacha was built, or use the most suitable for the style of the main building, the main thing is that both buildings harmonize with each other.
The foundation of the veranda should be the same height as the foundation of the house. If it is built after the construction of the house, then the foundation is most often made on pillars. It is better to make the floor immediately insulated.
Important ! The veranda should fit snugly against the house with walls and a roof so that precipitation does not get inside or there are no drafts.
The roof should be made single-pitched and more gentle than that of the main building.
In the veranda, by definition, there should be a lot of light, which means there should be a lot of windows, at least two. You can even make the walls entirely out of windows, including sliding ones. Sliding panels can be opened remotely or mechanically.
If the veranda will be used in winter, then heat-insulating double-glazed windows or polycarbonate should be installed.
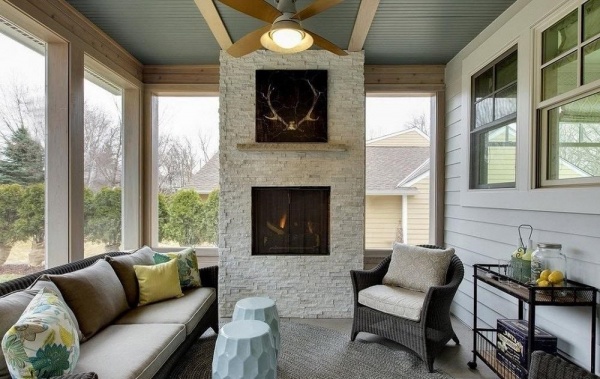
You can heat a closed-type country veranda with ordinary heaters or a fireplace. Moreover, there are many varieties of fireplaces, so it can be easily chosen for any design of the veranda.
In the hot summer, you can hang blinds, curtains, or any other curtains to hide from the sun.
Photo projects of a closed veranda built to the house:


How and how to close the veranda
You can glaze the veranda in the following ways:
- wooden frames with ordinary glass;
- PVC windows
- cellular or monolithic polycarbonate.
In all of the above ways, you can close the veranda on your own. But before you start closing the veranda, you should draw a diagram of future windows, since:
- the room should be spacious and bright;
- it is necessary to determine the number of opening windows;
- take into account the location of furniture so that it does not interfere with opening windows.
Consider one of the ways - how to close the veranda with polycarbonate.
Advantages of polycarbonate:
- high strength (especially monolithic polycarbonate);
- delays UV radiation;
- low thermal conductivity;
- plastic;
- eco-friendly;
- thanks to the large color range, you can create an unusual design.
After the scheme is drawn and the materials are calculated, the frame is built. It can be made from metal profiles, wooden beams, bricks or other materials that are left over from the construction of the main building.
Important ! When calculating the required building material, consider the dimensions of the polycarbonate sheets and its minimum possible bend.
Before you close the veranda in the country with polycarbonate, you need to remember a few important rules for the installation of polycarbonate:
- crate step 60-80 cm;
- vertical channels of cellular polycarbonate should be located only vertically so that condensate can flow out;
- sheets are interconnected by special connecting profiles;
- the cut of the sheet at the top must be closed with a special tape and a profile, the lower cut is closed with a tape that is capable of passing moisture, and several holes are drilled in the profile for the lower part to drain condensate;
- it is recommended to fix the sheets with thermal washers, as they do not damage the coating during its expansion with temperature changes;
- also during the fastening of sheets of cellular polycarbonate, it is necessary to leave free space inside the adjacent parts (for example, profiles) for the expansion of the material;
- remove the protective film only after installation;
- you can cut polycarbonate into the necessary parts with an electric jigsaw.
Below are photos of what a polycarbonate veranda closed from the outside looks like:


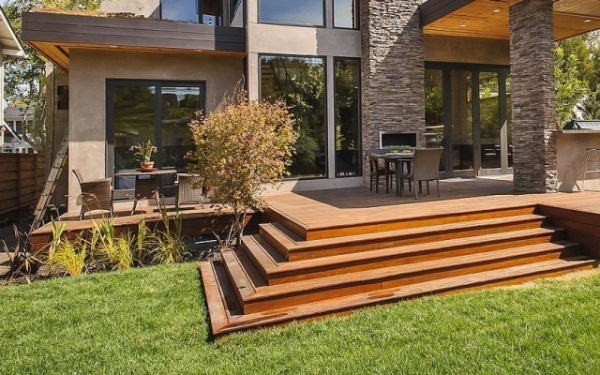
Porch
A closed veranda with a porch will look much more comfortable and attractive, and will also take on a completely finished look.
The porch can be built from wood, brick, stone, concrete mix, metal, or with the addition of metal elements.
The porch cover must be frost-resistant and non-slip to avoid bruises or injury.
Advice ! The porch should always be clean and tidy, as it affects the entire appearance Houses.
The porch can be of different shapes and sizes, it all depends on your imagination and capabilities, the main thing is that it should also be combined with other buildings. All of their types are equally suitable for both closed and open verandas.
Photo of a closed and open veranda with a porch:


The interior of the closed veranda
After the veranda has finally been built, it's time to move on to its interior.
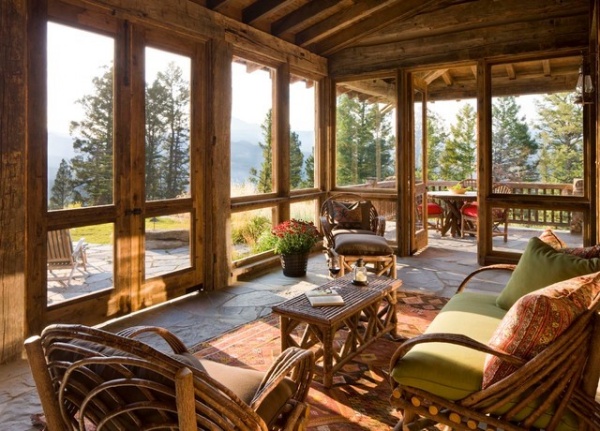
During registration, you must remember about the location of the veranda. So, if it is located on the east or north side, then the most suitable would be, for example, the British colonial style:
- wicker furniture made of rattan, mahogany or bamboo;
- linen and cotton fabrics with a floral pattern;
- many pillows with covers;
- tropical motifs (palm tree, ferns).
The floor can be covered with dark-colored material, as it will not overheat due to the location of the room.
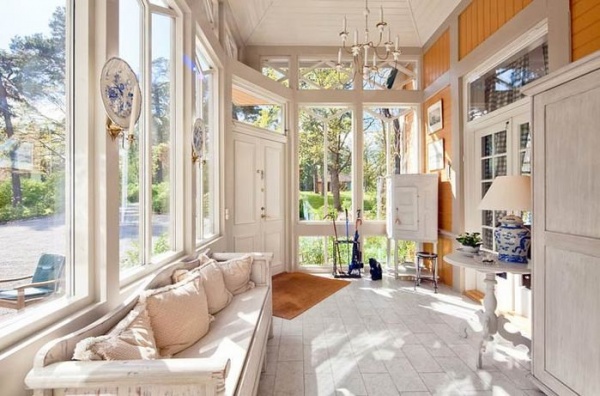
If the building is located on the south side, then the Mediterranean style is perfect, where there is a lot of blue and white color. Moreover, these colors are used not only in furniture, but also in the decoration of the room. Be sure to have a lot of fresh flowers and the presence of Roman blinds.
In each of these cases, you can apply any style with ethnic flavor:
- Oriental;
- ecostyle;
- Scandinavian;
- provence;
- country and so on.
All of them have a common feature - natural materials, that is, wood, bamboo, natural fabrics.
But whatever the style, there are universal things that will make any room even cozier and more comfortable:
- sofa cushions;
- tablecloths;
- chair covers;
- flowers in pots or trees, bouquets in vases, flowerpots;
- candlesticks, nightlights;
- paintings, photographs, panels.
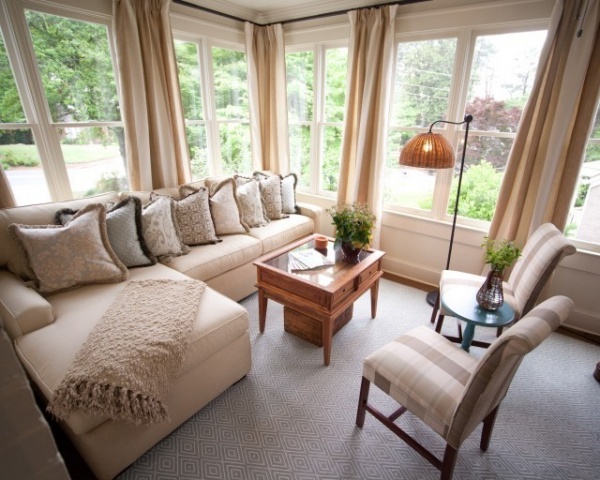
Photo of the design of the closed veranda:


In addition to all this, the interior of the veranda directly depends on the purpose of its use.
A closed veranda in the country can serve as:
- hallway, porch;
- kitchen, dining room;
- living room;
- children's;
- office;
- greenhouses.
Important ! When designing a veranda, remember the main rule of designers - proportionality, that is, you do not need to force a small veranda with huge furniture and vice versa.
Veranda-living room
Most often, the veranda is designed as a living room. For this case, you will definitely need armchairs, chairs, a coffee table and a sofa (if the area of \u200b\u200bthe room allows). In order for each family member to use such a room, it is necessary to take into account the needs of each of them during the design.
Each furniture and element should be combined with each other in style. If furniture is arranged in groups, then comfort will be best felt.
Photo design of a closed veranda-living room in a private house:


Veranda-dining room or kitchen
One of the most comfortable and pleasant places in the house. Minimalist style is perfect for this occasion. Ordinary set of table and chairs, indoor plants and textiles. And you can decorate with heart-loving details or retro style.
In any case, since this is a kitchen, you should take care of excellent lighting.
Photo of the interior of a closed veranda-kitchen in a country house:


Veranda-study
A comfortable chair, a desk, a bookcase - that's what the most important thing should be in the office. The rest depends only on your desire and the size of the room.

Children's veranda
The nursery can be decorated in the form of a ship or a princess's house. You will need a lot of colorful pillows various forms and characters, cozy houses, a sandbox with balls, and you can even install a swing.
Dining room, it is nice to have tea parties. You can build a veranda with your own hands using the tips from our article. We will tell you how to calculate the material, assemble the frame, etc. This will help you avoid mistakes, save time and money.
A veranda is an unheated extension to the main building, which adjoins the house on one side, combining the functions of a porch and a place to relax. Unlike a terrace, it is built in the same style as the house and serves as a shelter from rain and sun.
Veranda can be:
- with glazing (closed type);
- without glazing (open type).
The choice of materials for construction
When choosing materials, one should proceed from the fact that the veranda is most often built according to the principle of frame technology. For racks, lower and upper strapping, a beam of 150x150 mm is used. It can also be used for the log floor. For the installation of the main floor trusses, a beam of a smaller section is needed - 80x100 mm. Intermediate rafters are made of bars 40x40 mm. Filling between the posts - from edged boards with a thickness of 20 mm or from vinyl siding.
It is necessary to build a crate, which will require a beam of a smaller section (40x20 mm) or a metal profile. Stiffening ribs from the same timber are installed between the uprights. The same beam is needed for the installation of roofing lathing. The ceiling is lined with 20 mm boards, moisture-resistant plywood or OSB boards. For the floor, a grooved board with a thickness of at least 40 mm is used.
In order to know the exact amount of basic materials, before starting construction, it is necessary to make a sketch of the future veranda, in which all dimensions will be indicated.
 Veranda model with basic dimensions
Table. Consumables for the construction of the veranda
| Material name | Unit rev. | Qty | Average price, rub. | Total cost, rub. |
| Beam 150x150 mm (pine) | m/n | 45/1 m 3 | 7 500 | 7 500 |
| Beam 80x100 mm | m/n | 20 / 0.24 m 3 | 7 500 | 1 800 |
| Beam 40x40 mm | m/n | 20 / 0.24 m 3 | 8 500 | 2 040 |
| Beam 40x20 mm | m/n | 16 / 0.01 m 3 | 8 500 | 85 |
| Grooved board 40 mm | m 2 | 8 | 640 | 5 120 |
| Edged board 20 mm | m 2 | 6 | 280 | 1 680 |
| Brick ceramic ordinary M-100 | PC. | 250 | 12,50 | 3 125 |
| bituminous tiles | m 2 | 10 | 460 | 4 600 |
| Ruberoid | roll | 1 | 250 | 250 |
| Cement | kg | 150 | 50 | 7 500 |
| Sand | m 3 | 2 | 120 | 240 |
| Wooden window block 1200x1000 | PC. | 8 | 4 400 | 35 200 |
| Wooden door block | PC. | 1 | 5 000 | 5 000 |
| antiseptic | l | 5 | 380 | 380 |
| The total cost will be | 76 920 |
The table shows the main materials. Some of them can be replaced, depending on personal preference, for example, vinyl or metal siding, wooden clapboard, or a variation of it - blockhouse can be used to fill between the racks.
Foundation for the veranda
For light construction (which includes the veranda) best solution will be the construction of a columnar foundation. This will significantly reduce the cost and speed up construction.
Particular attention should be paid to the base elements located at the entrance: they must be stronger than others. This requirement is caused by the need to prevent the veranda from tilting away from the house, which often happens when the foundation pillars subside. This can be avoided by building additional supports.
The construction of the columnar foundation for the veranda is carried out in stages:
- The site is being prepared: trees and shrubs are cut down, stumps are uprooted.
- The marking of the places of installation of the supports of the columnar foundation is being carried out.
- Pits are dug below the level of soil freezing (approximately 1.1-1.2 m), at the bottom of which sand bedding 150 mm thick is arranged. Sand must be moistened and compacted.
- Crushed stone is poured with a layer of about 100 mm.
- Crushed stone is poured with a liquid cement-sand mortar, after which concreting is performed on top of it. The concrete layer should also be about 100 mm.
- A roofing material is laid on top of the concrete in two layers (for waterproofing). Bricklaying in progress: brick columns are being built square section(one and a half bricks). The height of the above-ground part should be such that the floor level of the veranda is slightly lower than the floor level of the main part of the house.
- All supports must be at the same level: this must be controlled with a water level.
- After the masonry is completed, the pits are backfilled. The soil needs to be compacted.
- Two layers of roofing material are also laid on top of the posts.
 The pillars of the column foundation must be at the same level
Attention! It is impossible to leave unfinished construction for the winter: due to spring heaving of the soil, unloaded pillars can be unevenly displaced. Fixing this will be difficult.
Frame construction and wall construction
First, we mount the lower trim from the beam (all connections are made only above the foundation pillar). The timber in the corners is joined half a tree and a spike is driven into a drilled hole with a diameter of 12 mm. To lay the log, grooves are hollowed out every 50-60 cm.

Racks must be installed strictly vertically. They are fixed with brackets and special corner connectors. For ease of installation, the racks are temporarily fixed with jibs. The racks closest to the house should be made higher than the ones farther away so that the roof slope is at least 7 °: this is necessary to ensure good rainwater runoff and snow melting.
The frame of the veranda will become stronger after installing the window sill beams between the uprights. The distance from the floor level is about 0.5 m (windows should be large).
The top trim is the same as the bottom. In it, grooves are hollowed out for the bars of the crate.
In the squares formed by the bars of the lower trim, uprights and window sill beams, diagonal elements are installed (crosswise), connecting them half a tree - they will additionally strengthen the structure. The walls under the window are sheathed on the outside with boards or other suitable material (siding, shield panels, etc.). A heat-insulating material is laid between the inner and outer skin - mineral wool (if the veranda is not used during the cold season, the insulation can be omitted).

Attention! Wood must be inspected and boards and beams with signs of decay and insect pests should be rejected. All wooden elements of the frame should be treated with an antiseptic agent, and after installation, paint should be applied.
Roof and floor installation
On top of the mounted crate, we lay sheets of moisture-resistant plywood or OSB boards. We use it as a roofing material: under such a roof it will be more comfortable during rain. A gutter should also be installed with a slope of 3-5 ° towards the water outlet.
For the floor, well-dried, planed tongue-and-groove boards with a thickness of at least 40 mm are needed. They are tightly driven together, leaving a compensation gap of 5-10 mm at the edges.

Note: in order for the floor to serve for a long time, the space between the foundation supports is not sewn up, or air vents (ventilation holes) are arranged.
After that, a porch is attached to the veranda, doors are installed and glazing is performed. Windows can be with single glass: this is enough to protect against rain and wind. Window frames with double-glazed windows are necessary if the veranda is planned to be heated (in this case, all cracks must be foamed and covered with platbands).
The last step is interior decoration. On the veranda you can install a table for tea drinking, if the area allows - you can install a dressing table and decorate with flowers and climbing plants so that you can comfortably relax on the veranda during the summer heat or rain.
A veranda in a private house is a covered terrace, which is often attached to the house with their own hands. It is located along the main wall and is a room without heating, for a pleasant pastime in the summer season. You can often find modern terraces with glazing, they can be in any weather. Doing it with your own hands, it is necessary to observe the general ensemble of the country or country house, observe a single style and use the same materials in construction.
In a country house from logs it is better to make a summer terrace in the form of a log house located next to the main building. The construction of a veranda in wooden log cabins is often carried out in conjunction with the construction of the main house and its roof smoothly passes into the roof of the extension, which has a wall adjacent to the house, a single roofing material is used. In this article, we will walk through the main points of building a terrace of two types: open or closed, with our own hands.
General provisions for the construction of a veranda
Modern construction of country houses, country cottages, at the design stage, provides for the construction of a veranda for the house. In order to save money, the process of building extensions is removed by customers, for further completion with their own hands. Consider the main points that you need to pay attention to from the generalized experience of building terraces on your own.
Parameters by which verandas differ:
- How is it located in relation to the house: corner construction, from the end or along the facade of the house.
- Degree of security: open or closed (glazed) extension. Using modern materials, it is possible to make an open veranda from a closed veranda, this is achieved by sliding doors.
- In what design is it made: built-in - a foundation common with the house or attached - its own foundation.
- Construction form: rectangle, semicircle, polygon.
Veranda project
We must not forget, when making an extension project near the house, that its purpose is to improve the performance of the main structure: make it spacious, add beauty, comfort. The covered terrace also has the function of improving the thermal performance of the house. For the correct construction of the summer extension structure, it is necessary to follow the rules that are indicated in the developed project.
What does the project consist of:
- We determine in which place of the main house we will attach a veranda. The main aspect is the observance of the aesthetic perception of the entire architecture of your own house together with the veranda. Important! Experts recommend equipping a veranda in regions with high summer temperatures on the western or eastern side of the main house. It will be less exposed to direct sunlight.
- It is necessary to indicate the entrance to the terrace (veranda). Indicates entry from outside and entrance from home. You can make a through passage through the veranda when the door to the house is opposite the entrance to the veranda, this method is not welcome, as there is a risk of drafts.
- Choose the type of doors and their installation location.
- We determine the total size of the summer room located along the house. The length is often taken to be equal to the length of the wall along which the veranda is built. The width is usually taken in the range from 3 meters to 7 meters, the main thing is to keep the proportion. When choosing the dimensions of the veranda, we correlate them with the overall dimensions of the house in order to maintain a single ensemble of the exterior of the building.
A good example of building a veranda with your own hands, when the project is being done at the design stage of the whole house.
Let's go through the construction of the veranda step by step wooden house with your own hands. It should be noted that an extension to the house can only be started after its complete shrinkage. Log houses, or those made of timber, are actively shrinking for three years, during this period it is better not to build an extension, otherwise the walls may be skewed. Experienced builders recommend, for those who do not want to wait, to build a transitional veranda structure with a house that allows the frame to play.
How to start construction?
House makeover should be included in the permits. To obtain these permits, you must contact the regional department of architecture and submit the following documents:
- The right to own a piece of land (the land on which the house stands).
- Design documentation of the main building.
- Written consent of all registered tenants in the house for reconstruction, extension of the veranda.
- Builder's application for registration of an extension.
It is advisable to start drawing up documents for building permits 3-4 months before the start of work. From the generalized experience of private developers, this is a lengthy procedure.
It is possible to build an extension without permits, but in this case, problems may arise when the house is inherited or you wish to sell it. The reason is to change the total area of the house, since the veranda is part of it, and total area residential building is considered with it. The BTI department may view this as an unauthorized decision to increase the area for housing. This is especially appreciated when the terrace is covered with heating.
No need to get carried away and make deviations in the size of the terrace, which are indicated in the project. A simple check will easily figure this out, and a fine with documentation adjustments will follow. For what can expect squatter builders joining a veranda home specified in the law of the Russian Federation.
Preparing for construction, choosing the material
After determining the construction site of the veranda, it must be prepared. A construction site begins along the selected wall, so before starting all work, you must:

What tool and material do we need?
When a wooden extension is made with your own hands, tool needed:
- Having building skills is necessary: a hacksaw, an ax.
- Power tool: sledgehammer, hammer.
- Marking: tape measure, plumb line, level, marking cord, corner.
- For the foundation: shovel
If a metal frame is made, a welding unit and a grinder with a disc for cutting metal are additionally prepared. This type of frame is considered the most economical for the construction of an extension.
It will look better brick porch or wooden. Important! Observe the conformity of the materials of the extension and the main house.
Wooden summer outbuilding requires the following material:
- Lumber: beam, log, board, lath.
- Elements of wooden fasteners.
- Mixtures that perform protective functions for wood.
- Construction material: crushed stone, concrete.
- You will need drying oil and roofing material.
- Choosing the material for the roof of the veranda.
- Window and door systems.
In the design of an additional room, for summer holidays, using metal corners, instead of wooden materials use a metal profile, compositions for metal processing.
It is possible to make an extension (walls and roof) of polycarbonate for a better view, the panorama will be complete and panoramic. The positive properties of this material include, and the ability to keep heat perfectly, it can be used for walls and roofs.
Advice! Materials that will be used in construction and require pre-treatment must undergo this process prior to construction.
 The first thing to do is determine the type of foundation for your veranda. The popular type is columnar foundation, since it is not tied to the foundation of capital construction (houses). If the veranda is being equipped for a long time and thoroughly, it needs a strip foundation.
Before making a foundation, you need to refer to the house construction documents, which indicate what soil it stands on, you can choose from this type of foundation for an extension. Parameters to pay attention to:
- What is the ability of the soil to absorb moisture.
- What is the composition of the soil at the construction site of the veranda.
- At what depth does the soil freeze in the region of residence.
- How close to the surface is groundwater.
- General principles of soil stability.
When choosing the type of foundation for the veranda, we pay attention to the foundation of the main building, its design, and the state of the load-bearing walls. After choosing the foundation, it is done marking on the ground for further work.
Advice! A small wooden veranda will stand quite well on a columnar foundation at the corners of the extension. For wide and long verandas, the installation of pillars is used every 600 millimeters along the length and width of the extension.
Column foundation, how to make it?
The base (foundation) for the extension is just as important as for the main house, it must be made of quality material. Work order:
- We dig holes for pillars to a depth of at least 100 centimeters, its depth cannot be less than the depth of the foundation under the main structure. The level of soil freezing is taken into account, the hole should be deeper than this level.
- At the bottom of the dug holes we make a pillow, this is a mixture of sand and gravel. The pillow can be made in layers, sand, gravel.
- We fill the pillow with concrete.
- We lay out supporting posts from bricks when the main house is brick. If the main house is wooden, wooden beams are used as posts. Metal supports or asbestos pipes are used in columnar foundations for a frame veranda.
The veranda looks beautiful when it is at the level of the 2nd floor of the house. In this case, the ground part of the extension support is displayed at the level of the main foundation under the house. When a house with a high base is recommended to bring the veranda to its level.
We make a strip foundation
It is used if a heavy veranda with glazing is planned. For its arrangement, a trench is dug around the perimeter of the future veranda, formwork is installed. It is placed a little higher than it is planned to fill the foundation with concrete.
After pouring the foundation with concrete, it is periodically moistened with water until it is completely formed, this is necessary for uniform hardening of the foundation.
We make the frame of the veranda
 For a wooden house, the frame of the veranda begins with laying the timber on supports in the lower trim. In the corners we use a “dovetail” for cuts, it’s better join the beam at the corners. For reliability, nails are used, you can fasten the dowel.
A beam for a wooden veranda is used with a section: 100x100 or 180x80 millimeters. When logs are used in the strapping, their cross section should not be more than 120 millimeters. Supports near the wall are made higher than the rest to form a pitched roof. When the frame is mounted, horizontally mounted bars are the basis for the window sill if glazing is provided. The top trim completes the installation of the veranda frame, it is the basis for the rafters, and creates rigidity for the entire system.
Temporary spacers must be used to avoid distortion in the frame structure.
Veranda roof
After having decided on the material for covering the roof, they begin to install the battens on the rafters, which are attached to the upper harness.
Structurally for verandas are offered the following types of roofing:
- Single roof. This is a simple design, easy to implement. Requires a slope from the main wall of the house towards the street.
- Gable roof. It is used if the veranda is attached to the end of the house with a narrow side.
- Polygonal roof. Its design is diverse, the main thing is to observe the slope for water runoff.
The truss system is installed based on the selected material:
- Lathing for metal tiles, slate and ondulin
- Solid decking is done for flexible roofing materials.
 With your own hands, the floor is made simply:
- We install logs on the lower strapping of the veranda structure. The distance between the lags is not more than 100 centimeters. We do their installation perpendicular to the floorboard.
- We cover the logs, checked by the level of the floorboard.
If you plan to build open veranda, many converge on the floor installation with a slight slope for the water stack. The board is fastened with self-tapping screws, the length of which is two board widths. It is necessary to soak the floorboards with a solution that resists the creation of fungal deposits.
Conclusion
Some trim elements can be carved in a wooden veranda. Great importance plays the arrangement of furniture on the terrace, it will create an interior and add comfort. Flowers and plants will enliven the room, give a sense of continuation of a residential building.
If you decide that there is not enough veranda in the house or in the country house, then it can always be completed. But first, ask yourself: why do you need an additional outbuilding? If it is purely for relaxation against the backdrop of nature, then it makes sense to get by with an open terrace or gazebo. The veranda is erected to increase the thermal insulation of the house, because it plays the role of a vestibule between the street and the front door, blocking the direct entry of cold masses into the premises. The side function of the extension - to be a place of rest - will be performed only if the room is spacious and insulated. Then in winter you can sit with a cup of tea, contemplating the winter landscapes. Let's try to figure out how best to attach a veranda to the house so that it is warm in winter and maximum air in summer.
Since the veranda will become part of the main building, its style should match the design of the house itself. It is recommended to use the same materials that make up the walls and roof of the house so that the building looks harmonious.
If modern materials are used in the decoration of the house, then the glass veranda looks quite appropriate.
You can also combine materials, connecting the house and the veranda with the help of decoration. For example, if the house is brick, keep the same roofing, and make the walls of the veranda from blocks, but finish the exterior decorative plaster and with it to finish the foundation of the main building. It is definitely worth attaching a wooden veranda to a wooden country house.
The best ideas for decorating the veranda can be found in the material:

Wooden house and veranda look like a single ensemble
Planning and legalization of the project
The veranda is always built so as to close the front door. Therefore, in an already finished house, you will not be able to attach it from the side you want. Without an entrance inside, this room will be torn off from the house, and food and tea from the kitchen will have to be brought into it across the street.
The owners themselves come up with the dimensions of the veranda, taking into account the number of people who could relax in it at the same time. For the needs of a family of 5-6 people, a 3x4 m building is enough. But here it is worth considering general form from the street. If you think of a small veranda, and the dacha itself is two-story, then it is unlikely that your architectural ensemble will look harmonious. But for small houses, you can just attach a veranda to the entire width of the wall of the building. This will increase the usable area, and from the outside it looks quite decent.
But for any footage, you will have to officially legalize the building. And not after construction, but before! When you come up with the design of the veranda and estimate its general appearance, go to a special building design department and order a veranda project. After its manufacture, one must go to the architectural department of the city in order to obtain a building permit and make changes to the project of the house. Why is it important to do this ahead of time? It takes about 2 months for the project and approval, so it is better if they fall in the winter, when the construction season has not yet begun.
Marking and laying out the site
Before you start work, you need to prepare the site. To do this, remove the fertile layer (about 15 cm) and take it to the garden or flower beds. The site is leveled and staking is started. According to the dimensions specified in the project, mark the boundaries of the future veranda. To do this, iron pins or wooden pegs are driven into the corners of the building and twine is pulled tightly around the perimeter.

The outer edge of the breakdown should match the dimensions of the veranda, and the inner edge should be retreated to the width of the foundation
Creating a Foundation: Pour Rules
Most often in Russia, for a veranda attached to a house, a strip or column foundation is made, equal in depth to the foundation of the main building. At the same time, it is recommended not to tie them into one monolith, because the house and the veranda have different weights, which means different degrees of shrinkage. And so that a heavy building does not pull a light building behind it, put the veranda on a separate base. To do this, a gap of up to 4 cm is left between the foundation of the house and the veranda.
Attention! When creating the foundation you should take into account the characteristics of the soil in your area and the total weight of the building. Lightweight foundations on heaving soils can “play”, and then the veranda will move away from the wall of the main building. In addition, they are not designed for heavy walls, for example, made of brick, and can shrink under their pressure.
It is used for the construction of large verandas made of bricks or blocks, which are covered with a heavy roof (slate, metal tiles, etc.). The easiest way is to build a strip foundation for a veranda to a concrete house.

The heaviest veranda will stand on the strip foundation
For this:
- A trench is being dug (calculate the dimensions according to the foundation of the house).
- The formwork is placed at a height equal to the height of the future foundation (or slightly higher). It is made from boards, knocked down into shields.
- Concrete is prepared in the following proportion: 1 part of cement, 3 parts of sand and 6 parts of crushed stone.
- The first layer of concrete is poured to the bottom and reinforced with stones to make about 10 cm.
- Then the next portion is poured, stones are added again, etc.
- For the top layer of concrete, stones are not used, but the surface is leveled with a trowel and left to dry (3-4 days).
- If it’s hot, then they spill it a couple of times a day to avoid cracking the foundation.
If the veranda is frame or wooden, then you can put it on a columnar foundation. To protect against heaving of the soil, dig holes to a depth below the freezing of the soil in your area (more than a meter). For a small and light veranda, it is enough to put posts only in the corners. For a large one, it is worth making a series of intermediate posts with a step of 50-60 cm between them.

Column foundation can be made of concrete, blocks or red brick
Work progress:
- Holes are being dug.
- The bottom of each of them is covered with a 20-cm layer of sand.
- Concrete is poured to the surface of the earth and is expected to dry.
- Coat the finished post with bitumen and fill the gaps between it and the ground with sand.
- The above-ground part of the column is created from brick or block masonry, bringing it to the height of the main foundation or slightly lower. Be guided so that about 30 cm remains to the finishing floor of the veranda.
Subfloor installation
Work order:
- We fill the space of the subfloor with expanded clay for insulation.
- We cover the foundation with a double layer of roofing material (both tape and columnar).
- We fix the logs on the foundation, having previously smeared them with an antiseptic.
- We lay edged boards (thickness 5 cm).

Logs are pre-impregnated with an antiseptic composition
You can also make a concrete floor, but in this case you will have to carry out additional thermal insulation work, because the base will draw cold from the ground, and the floor on the veranda will be constantly cold.
The construction of the frame of a wooden veranda
Consider how to build a wooden veranda. To do this, they mount a frame of bars, 10x10 cm in size. Work procedure:
- On the finished draft floor, bars are placed for the lower strapping, connecting in the corners with a “straight lock”.
- Cut out in the bars every half a meter grooves for vertical racks.
- They put racks, fixing them with nails and staples.
- A beam for the upper strapping is attached to the racks from above.
- Near the slope of the roof of the house, a beam-girder is nailed, on which the rafters will lie. It must be taken to the anchor bolts (and all the posts adjacent to the building).
- The truss system is installed.
- The whole tree is treated with an antiseptic.
Material on the construction of a veranda in a frame-type cottage will also be useful:

The bars for the lower strapping are laid on a foundation waterproofed with roofing material

A rafter system is attached to the bars of the upper trim
Design features of the roofing pie
Most often, roofs are made single-pitched. At the same time, they are more sloping than the roofs on the house. The creation of a roofing pie on the veranda is carried out in the same way as the installation of the roof of an ordinary house.

A continuous or intermittent crate is stuffed onto the rafters, depending on the roofing.
Only if you have an attic-type house, then you made a vapor barrier with one of the layers. In the veranda, vapor barrier is not needed, because the under-roof space will not be used. In addition, with high-quality insulation of walls and floors, the vapor barrier layer is contraindicated. After all, a couple of the premises must go somewhere. And it will seep through the ceiling to the attic, and from there - volatilize outside. To do this, it is worth laying a special super-diffusion membrane as a waterproofing layer, which does not let moisture in from the outside, but the steam from the inside passes freely. True, it is not used for steel and metal coatings, because they can rust from condensation. For metal tiles buy a special condensate film.

Superdiffusion membrane consists of microscopic funnel-like pores
Wall cladding and window installation
After creating the draft floors, you can sew up the frame, leaving openings for windows and doors. For this:
- At the locations of the windows, we install a window sill board, which should be about half a meter from the floor. We fix the board to the vertical posts.
- We sew up the frame with materials that will keep warm and fit the main building. From the inside it can be plywood, and on top of it - lining, outside - or wood. But be sure to lay a layer of insulation between them and a waterproofing film (on both sides of the insulation), so that moisture from the street and steam from the inside do not penetrate into it. Don't forget to leave window openings.
After you have made the frame of the veranda to the house, insert windows and doors.

When installing vertical racks, a step is made between them equal to the width of the windows

It is better to sew up the walls on both sides, laying insulation inside
Also, it is necessary to pay attention that the door should not be located opposite the internal door leading to the house. Otherwise, drafts cannot be avoided. It is best to do it from the end, so that the cold air that has flown in when opening does not find its way into the living quarters.
Features of creating a brick or block veranda
If the veranda is attached to a brick house, then it is logical that its walls are made of bricks or blocks, ennobling them with decorative plasters.

The brick veranda must have a solid foundation, as the construction will be heavy.
Mounting Tips:
- It is better to put the extension on a strip foundation.
- Take on the masonry yourself only if you have building skills.
- Since the building will not be large, laying half a brick is enough, and lay out the inside in blocks.
- Fill the voids with expanded clay.
- They trim such a veranda with drywall or plaster it, and then paint it.
Pay special attention to the insulation of each structural element. Even those owners who first put up an uninsulated veranda look for ways to make it warmer after a couple of seasons. Because freezing corners and frosted doors are not very pleasing to the eye. And in Russia, severe winters are not uncommon.
Almost every house has a room at the entrance - a veranda, which serves not only as an entrance hall, but also as a place of rest. Many do not distinguish between the concepts of "veranda" and "terrace", but these are two completely different structures.
A terrace is an area attached to a house or a stand-alone area with any hard surface, usually raised above the ground. A fence can be built around its perimeter, often a low wooden balustrade. Sometimes the site is left completely open. Brickwork, concrete, asphalt, wooden boards are used as the floor. Before you equip a hard surface, you need to make a solid foundation. First, a sand cushion is poured, then gravel is laid, and concrete or asphalt is poured on top. Flooring from boards is recommended to be placed on bars treated with bitumen, special compounds or mining.
Terraces are popular in dry climates where it rarely rains. For terraces, a canopy is often built to protect from the weather or sunlight. In our latitudes, it is not advisable to arrange a terrace adjacent to the house, since precipitation will flow from the roof. But a separate platform with a table and benches located on it will serve as an excellent place for relaxation and gatherings.
The veranda has a common wall with the house and is an unheated closed room. It is usually erected from the same material as the main structure. But in order to make it more decorative, you can attach an interesting wooden veranda to the stone house or combine styles. They try to make the veranda bright, with a large view, so it has continuous glazing on two or three sides.
The design of a country house with a veranda
The veranda is not considered a separate building. This is a section of the house that is attached to the building when it is built or after some time. Usually the veranda is attached to the facade or to the end side.
All verandas can be divided into two types:

When designing a future veranda, it must be remembered that the extension should look harmonious with the main building. The design should fit into the overall style of the house, as well as correlate in size.
The right foundation for the veranda
During the construction of any structure, pouring the foundation is one of the most important and important points work. When planning an extension, it is necessary to carefully consider the parameters of the foundation, taking into account climatic conditions and features of the soil cover.
It is the foundation that ensures the reliability of the extension, since this element takes on the main load of the entire structure. Therefore, you need to carefully consider all the nuances and make a preliminary calculation. In case of violation general requirements when pouring the foundation, the structure is unlikely to last a long time.
The depth of the foundation for the veranda should be the same as the foundation of the house. Verandas located on soils with high level groundwater, may have a deeper foundation than the main building.
The most popular types of foundation in the construction of verandas are tape And pile. In areas with special mobility of soil layers, rubble bases are used.

Do-it-yourself veranda. Photo
Veranda construction technology
Construction starts with equipment frame, based on the base - foundation. It can be filled with a continuous tape or made from individual brick columns. In this case, the number of foundation blocks must correspond to the number of corner posts. The construction of the foundation for the country veranda consists of several phases:
- Construction about bindings foundation. It should have notches for installing a log on which the floor will rest.
- The lower trim is reinforced with a double system - external and internal, because racks will be mounted on it, which are fastened with iron staples and nails.
- Installation uprights. For them, bars or interconnected boards are used, the thickness of which in the aggregate should not be less than 4 cm.
- Upper harness. This is the strengthening of logs or boards along the upper perimeter of the racks, which will make the entire structure reliable and stable.
- Beam for rafters. It is fixed under the slope of the house for the entire length of the veranda and serves as the basis for mounting the rafters.
- rafters they are laid with one end on the beam, and with the other on the outer edge of the strapping. It is best to fix the bars and beams with anchor bolts.
- The beam is placed in such a way that the roof of the veranda goes under the roof of the main building.
Veranda roof connection
The roof of the veranda attached to the building is often covered with the same roofing material as the main structure. The arrangement of the adjoining roof directly depends on which wall the veranda will be built near. If the roof continues the slope of the main structure, then splicing two truss systems is simply necessary here.
The construction of the roof of the veranda involves the following procedure:

floor covering
Since the veranda is a high-traffic area, special attention should be paid to the flooring. It is best to use paint that does not just paint over the boards, but leaves their structure visible.
Attention!
Before applying any coatings, the wood must be impregnated with an antiseptic.
This treatment is especially relevant for open-type verandas, where all elements - racks, floors, fences - require special protection. Ideal for these purposes SENEG IMPRA. With this composition, even those parts of the structure that are in contact with the ground can be processed. It does not contain dyes and does not change the structural appearance of wood. Although there are separate options with an olive tint. Primer Pinotex, used for dry wood, deeply impregnates the fibers. But you need to make sure that the boards are well dried.

Do-it-yourself veranda. Photo
Oil formulations are used as paint Tikkurila And Pinotex. They absorb quickly and dry out. They will only need to be updated once a year.
Veranda glazing
The simplest veranda to a wooden house can be turned into a masterpiece of design ideas with the help of original glazing. And there are many options:
- wooden frames;
- metal-plastic windows;
- sliding panels;
- polycarbonate glazing;
- frameless glazing.
Wooden frames are quite expensive, and if the veranda is spacious, then you will have to pay a lot of money. Metal-plastic is cheaper and more practical. But even here some varieties are possible: windows can open or slide apart. Metal-plastic can be purchased in various colors. It is easy to apply a film of various shades on it. Many prefer stationary windows for the veranda that do not open.

Sliding panels are convenient for small verandas. They do not take up space when opened. Frameless glazing looks very nice, but it is used if there are no neighbors close, otherwise you risk being constantly in sight.
Polycarbonate can perfectly replace glass, while it does not require special installation skills. It can be fixed in the grooves of the frames with sealant and self-tapping screws.
Construction of the French veranda
Light wall structures - French verandas - are gaining great popularity. This is an airy exquisite extension to the house. And here you no longer need to puzzle over how to attach a veranda to the house with your own hands. The French design does not require a solid foundation, and the planning process is reduced to choosing a reliable manufacturer.

Installation of the finished product is quite simple:
- installation of supports around the perimeter;
- tension of rubber gaskets on glass;
- installation of glass in the grooves of the frame;
- fixing jumpers for fixing;
- installation of decorative elements.
French verandas are usually made with sliding windows. In addition, glazing is often used polycarbonate.
Veranda furniture
The veranda is a special place in a country house where the owners enjoy outdoor recreation.
In the annex, as in any other living space, furniture is a necessary attribute. For the design of country verandas, you can reconstruct old interior items. You can put old chairs on the summer veranda, slightly transforming them. In addition to chairs, old armchairs or couches are also great for summer holidays. If the owners like to eat on the veranda, then you can’t do without a dining table.

In a spacious extension, you can equip a fireplace or put a large sofa. However, this room should not be overloaded with furniture. If there are sofas in the room, the number of chairs should be kept to a minimum. In addition to the main pieces of furniture, you can use wall shelves or a small chest of drawers.
Usually for the veranda choose wooden or wicker pieces of furniture, complementing them with soft mattresses or pillows.
Curtains for the veranda
Often curtains are used for open verandas in the country. They give airiness and a romantic look to the whole structure. Light colors will easily go with any building materials, but bright contrasting colors can also be used.
Important!
The main emphasis should be on the practicality of the material. Remember that curtains on an open veranda will be exposed to the weather.

When choosing curtains, you need to focus on their main varieties:
- natural fabrics;
- synthetic fabrics;
- plastic curtains;
- bamboo curtains.
natural fabrics can only be used if they are put away for the winter. Otherwise, they risk turning into rags. Synthetic materials that are resistant to bad weather are more suitable.
Curtains from PVC allow you to securely cover the veranda from precipitation, dust and wind. The transparent film withstands temperature changes and retains heat in the room.
The most convenient are bamboo curtains. They are not affected by precipitation, durable, perfectly protect from the sun.